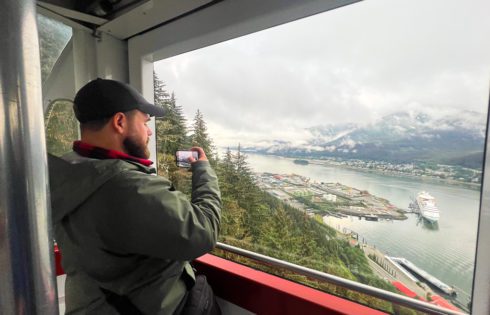
Mount Roberts Tramway Review: Here’s What You Need to Know

Juneau, Alaska, is surrounded by beautiful mountains and one of the best ways to take in the city and the surrounding area is to gain some elevation.

Luckily, you don’t have to plan an all-day hike to get up there thanks to the Mount Roberts Tramway.

Below, I’ll give you a full breakdown of what to expect if you choose to experience the Mount Roberts Tramway.

What is the Mount Roberts Tramway?

The Mount Roberts Tramway is an aerial tram that zips you up 1,800 feet to some of the best views of Juneau, Douglas Island, and the Gastineau Channel.

It’s one of the most visited tourist attractions in the area.

Home to a restaurant and quality gift shop, the tram is also a gateway to some great hiking trails.

Tickets for adults are $45 and $30 for ages three through 12. (You can purchase them online or in person.)

The daily ticket is good for the entire day so you could literally spend your entire day just riding up and down this thing (please don’t do that).

The tram usually opens at 8 AM and closes at 9 PM.

Tip: Use the free app WalletFlo to help you travel the world for free by finding the best travel credit cards and promotions!

Mount Roberts Tramway

Where is the Mount Roberts Tramway?

You’ll find Mount Roberts Tramway right by the Juneau Cruise Ship Terminal Area.

The Tramway is a popular meeting destination for various tours so if you book any kind of tour requiring a shuttle bus pick up, there’s a good chance you’ll end up here.

That makes this site a really convenient attraction to add on to the beginning or end of your scheduled activity.

It’s also located right next to the famous Tracy’s King Crab Shack so if you are wanting to check that off your list, it doesn’t get any more convenient.

Related Juneau Posts:

Mount Roberts Tramway

Pre-visit tips

Since this is just a tram ride there’s not a whole lot you need to do to prepare for your visit but I would recommend you to consider two things.

Weather

Juneau can be a very cloudy and rainy place and when the low-lying clouds roll in, you might lose out on your view entirely from up on the Mount Roberts Tramway.

So you have to think about whether or not it will be worth it to go up there when it’s super cloudy.

It’s a tricky decision because the clouds can move out pretty quickly and views can open up even when it’s pretty cloudy.

Plus, those clouds can create some very dramatic views that would arguably be more stunning than a clear day.

Because the daily pass allows you multiple rides, you could always head back down and then try to come up later on in the day when the weather changes.

Mount Roberts Tramway fog

Activities

You also want to think about the type of activities you’d like to do up there.

Some of the hiking trails can take you a couple of miles up on the mountain which means you could be spending a couple of hours on a round-trip hike. So you want to bring water, snacks, and possibly bear spray.

They also have a nature center along with a restaurant so you might want to think about whether or not you’d like to eat up there.

Visiting the Mount Roberts Tramway

Inside the bottom lobby of the Mount Roberts Tramway you’ll find a bathroom and also a café in case you need a little bit of a jolt before heading up on the tram way.

That may or may not be a good idea for some people.

Mount Roberts Tramway cafe

We purchased our tickets at the time of our visit and there was virtually no line for tickets or for boarding. During peak afternoon hours on a beautiful day, though, I’m sure it gets busier.

Mount Roberts Tramway lobby

We loaded into the gondola and it was nice to see that an attendant is inside one of the cable cars at all times.

Nothing worse than getting stuck in one of these things without any idea of what’s going on while you dangle hundreds of feet in the air.

Your capsule is entirely enclosed although there are a couple of small windows in the front and back that open with a gap of only a few inches. You can sit or stand as they have some benches inside.

Mount Roberts Tramway car

Because of the low-lying clouds we only had views for a short amount of time so we were trying to take them in as much as we could.

Mount Roberts Tramway view Juneau
Mount Roberts Tramway view cruise ships
Mount Roberts Tramway view

The clouds drifting through the spruce trees were pretty mesmerizing.

Mount Roberts Tramway view

We soared through the clouds for a little bit until they completely engulfed us as we arrived at the top.

Mount Roberts Tramway view

It took us about seven minutes to get up to the top.

At no point did we ever not feel safe inside the gondola nor did it ever bounce around or act funny like these things can sometimes do.

So if you are a bit on the fence about doing this due to a fear of heights, I think you’ll probably be fine.

Once we got up to the top, it was pretty evident that we wouldn’t be spending much time at the overlooks but I’m sure they have some pretty nice views for you to admire on a clear day. Or at least that’s what they tell me.

Mount Roberts Tramway view

This view right here is about as good as it got for us. And believe me, it didn’t last too long.

Since we didn’t really have any views to check out, we decided to just explore some of the surroundings.

Initially, we wanted to do a hike but we had to switch around our plans for various reasons.

Plus with the record levels of recent rain, the trails were very muddy and I’m pretty sure we would not have had views on the hike anyway.

However, we did wander down the trail a little ways and it was a really cool experience because I’m always down to explore a foggy rain forest.

Mount Roberts Tramway hiking trail

Plus, you never know what you’re going to come across like these carvings in the trees.

We made our way over to the nature center but unfortunately it was closed for renovations. With the views also closed for the moment, we didn’t really have whole lot to do up on the mountain except to wander.

The good news is that there are some indoor activities you can enjoy like the special film Seeing Daylight they put on at the 120-seat Chilkat Theatre.

It’s all about the native Tlingit culture and their indigenous ways of life and plays every 30 minutes or on demand if you are visiting during off hours.

Mount Roberts Tramway theater

Dining

Eventually, we decided we wanted to try out the restaurant “Timberline” to see what was all about.

Since we were visiting later on in the day and during a cloudy time, we basically had the restaurant to ourselves.

Mount Roberts Tramway restaurant

They serve some specialty drinks up there and we tried out the “glacier margarita.” Very strong and sweet with a pretty blue color.

Mount Roberts Tramway restaurant

For food we went with the popcorn shrimp and french fries.

The shrimp was super crispy on the outside and very soft and mushy on the inside which was just not my thing.

But the fries? Those were amazing.

I probably just should’ve just ordered a burger, though, because that is what they are known for.

Mount Roberts Tramway restaurant

The restaurant should have some pretty amazing views and they even have an outdoor deck where you can really soak up the views (or fog).

Mount Roberts Tramway restaurant view

Goldbelt Tram Gift Store

Later on we decided to take a visit to the Goldbelt Tram Gift Store.

It’s actually a really nice gift shop up there and they have a lot of 100% indigenous designed home and apparel products that looked really cool.

If you are into porcelain bowls, you’ll have a wide selection to choose from but they have a little bit of everything.

Mount Roberts Tramway gift shop

Trails

One of the main reasons you would want to ride the tram is to get access to the trails up here.

You’ll trek through a mossy rainforest and then make your way up on the ridge overlooking the Juneau area. You might even spot some deer or goats. Of course, you could also spot a bear.

The higher you go, the more difficult and overgrown the terrain may be. So just remember you can venture partially down these trails without getting in over your head.

You’ve got a few different options when it comes to hikes.

The hike that we wanted to do called the Mount Roberts Tramway to Gastineau Peak starts from near the upper Mount Roberts Tramway station. From there it’s a 3.9 mi round-trip hike with about 1,889 ft elevation gain.

Another more strenuous option is to begin at the Mount Roberts Trail trailhead down at sea level and then head your way all the way up at the top. You can then utilize the tram to get you down a little bit quicker. In that case, you only pay $15.

If you’re planning to make it up to one of the peaks, you may have to navigate through snow or ice so crampons might be necessary. This could be the case even in June or possibly July.

Also, there is an area at the upper station where you can clean the mud from your boots.

Mount Roberts Tramway hiiking trail

Final word

The tramway is a great way to get some good views of Juneau, Alaska.

However, with the way the weather is out here those views may not always be possible.

Thankfully, there are other things you can do here like hiking through a beautiful rainforest, shopping, enjoying a meal, or watching a film on the local culture.

Related Juneau Posts:

Manoa Falls Trail Review and Guide (Oahu, Hawaii) [2022]

Manoa Falls Trail is one of the most popular and beautiful trails in Oahu, Hawaii.

But is the trail worth it and what can you expect?

Below, I’ll give you a thorough guide so that you know exactly what you are getting yourself into when you head out to the Manoa Falls Trail.

What is the Manoa Falls Trail?

Manoa Falls is a short and relatively easy hike in Na Ala Hele, Honolulu, that takes you through stunning jungle terrain on your way to a beautiful 150 foot waterfall.

In total, we hiked 1.94 miles with 600 feet of elevation gain and completed the hike in 56 minutes.

Tip: Use the free app WalletFlo to help you travel the world for free by finding the best travel credit cards and promotions!

Where is the Manoa Falls Trail?

I struggled to find an exact address to the trailhead for Manoa Falls Trail.

However, if you put the following location in Google Maps it will take you very close to where the parking is: Mānoa Falls Trail, Na Ala Hele, Honolulu, HI 96822.

You basically just need to get to Manoa Road and then follow it until you get to the parking station.

It’s about a 15 to 20 minute drive from Waikiki and because you don’t have to do any off-roading to get to the trailhead, it’s extremely accessible even in a rental car.

That’s both good and bad because it means that everyone else can get there easily and you might have issues with crowds if you don’t start early enough.

As you travel along Manoa Road, you’ll see someone at a little cart in the middle of the road who is collecting payment for parking and that is when you will know that you are close.

The parking lot sign says that the hours are 8 AM to 6 PM. However, we arrived at about 7:30 AM and there was an attendant already there.

The Manoa Falls parking fee was $7.28 and I’m sure that it steadily increases every couple of years.

I heard that you can park in the residential areas to avoid the parking fee but I’m always nervous to park in residential areas when I’m unfamiliar with the towing policies and local customs. Plus, I think that adds on close to half a mile.

I figured the money would go to support the park anyway so it was not a big deal.

Related: Jurassic Adventure Tour Review (Kualoa Ranch) 

Manoa Falls parking lot sign
Manoa Falls parking attendant

They will give you a little ticket which you need to display on your dashboard so that you avoid getting fined.

Manoa Falls parking receipt

We arrived just after sunrise and did not have an issue finding an open parking spot. This trail does seem to get very busy so at times this parking lot might be full.

Manoa Falls parking lot

From that parking lot, you’ll see a little staircase poking out the vegetation and you’ll start there. The actual beginning of the trailhead is just a little bit ahead of you.

Read: Uber vs Turo in Honolulu, Hawaii (Which is Cheaper?)

Manoa Falls parking trail entrance

On the way in, we spotted a couple of wild chickens and roosters. The roosters on Oahu are not nearly as numerous as the ones in Kauai but I always enjoy seeing them.

Manoa Falls rooster

From that staircase, you’ll be walking along a paved road which I believe you might be able to drive on but it’s a short walk anyway so it didn’t really matter.

It’s possible that this road leads to more parking options but those might be for the Lyon Arboretum.

After a really short walk, you’ll see the trailhead sign which is pretty much impossible to miss with its bright yellow letters.

Related: Dole Plantation Review (Worth it or Tourist Trap?)

Manoa Falls trailhead

Manoa Falls Trail Experience

You can view my hiking map above to get a sense of the trail but below I’ll go into detail with a lot of photos and descriptions.

What’s great about this trail is that the stunning scenery doesn’t take long to arrive.

Once we stepped foot on the trail, I was immediately impressed by the canopy of trees above us.

Manoa Falls canopy

At about .2 miles into the hike you’ll head through a shipping container which will open up to a stunning area with vine covered trees that looks like something out of Avatar. We’re talking lush.

Manoa Falls shipping container
Manoa Falls trees vines

This was my first true encounter with Hawaiian vegetation and it seriously blew my mind. If you are new to Hawaii, this really is a perfect introduction to the beautiful jungle landscape.

Manoa Falls trees vines

The Waihi Stream runs through this area which adds a lot of beauty to the scene and probably explains the super dense vegetation.

Once you pass that area up the scenery gets tighter and you’ll be on your way to the falls.

Manoa Falls trail

The trail throughout the hike is pretty easy to navigate — I couldn’t imagine getting lost.

If you are doing the trail after a rain then I could see things getting pretty slippery at a few spots, though. That’s probably the biggest challenge this trail has to offer. Otherwise, I’d rate this trail as easy.

Also, you need to watch your head on a couple of occasions because you may have some branches hanging pretty low.

Don’t be like me and forget you have a trekking pole sticking out of your backpack.

Manoa Falls trail

On a couple of occasions, you’ll head over a few peaceful stream crossings. You won’t need to cross the stream yourself but the creek will be running by your side. Be looking to your side so you don’t miss a few nice photo ops.

Manoa Falls trail creek

At about .6 miles into the hike you come across a beautiful bamboo forest.

Manoa Falls trail bamboo forest

After that, you’ll encounter this little area that has a few interpretive panels to give you some background information on the area’s wildlife. I didn’t realize how many species have gone extinct in Hawaii.

Other than birds, we did not encounter any wildlife on our hike but you could hear those birds making all sorts of noises throughout the jungle.

This spot also has this gnarly looking archway to check out under the trees.

After this point, you’ll begin the steepest part of the hike. You’ll be gaining about 250 feet in about a quarter mile. That’s a decently steep grade but because it is only about a quarter mile, it’s not bad.

Because of the steeper terrain, this is where you need to be careful if you’re dealing with wet or muddy conditions. I found the trail to be just a little bit slick but we also visited during a pretty dry time.

I could see this stretch of the hike being a little bit treacherous if you’re coming during a wet time, especially on the way down.

So just take your time and you should be good. If you have a trekking pole or two it might be a good idea to bring it out for this stretch of the trail but it’s really not that bad.

Just when you start to feel a little bit of a burn in your legs, you’ll probably see the falls in the distance. At this point, you’re very close to the end and so hopefully the sights and sounds of the falls will keep you going.

Manoa Falls trail

Notice how there are two tiers to the waterfall.

Manoa Falls trail

As you get close to the falls, there’s another interpretive panel that will provide some history on this area.

You’ll also see a trail junction for the Aihualama Trail. I heard that the trail was not that impressive but I can’t personally vouch for that.

It also looks like there is another trail located off the Aihualama Trail that will take you to Upper Manoa Falls.

I believe that trail requires route finding, scrambling up slippery tree roots, and is considerably steeper than the trail to the lower Manoa Falls.

I wouldn’t attempt that trail unless you are very confident in your climbing abilities. The views from up there look pretty amazing, though.

However, we did not venture on any of the side trails because we had a few scuba dives coming up and were trying to conserve energy.

Anyway, once you pass the Junction for the trail, you are basically at Manoa Falls!

There had been little rain when we visited so the falls were not exactly raging but it was still a pretty cool site.

Manoa Falls

We started early in the morning and were lucky that we were able to enjoy the falls to ourselves.

But as we were making our way back to the trailhead things start to pick up so just be aware that this trail looks like it can be extremely busy.

Manoa Falls base

Once you get to the falls, you’ll notice a few signs that prohibit you from going forward.

There’s a few things to say about the signs.

First, it’s confusing because they say something along the lines of “do not proceed further.”

Yet, they are positioned in different areas so it makes you wonder why are they telling you “do not proceed beyond this point” when each point is located at a further spot.

One thing I realized in Hawaii is that these type of “DANGER: YOU WILL DIE” signs are located in many spots and often times it almost seems like more of a suggestion….

For example, we were headed to a beach area that had a sign that said do not proceed yet we continued on with a lot of other people and it was not a problem despite police hanging out right by the entrance.

It seems like these signs almost function more like warning signs about dangers like fallen rocks or steep and slippery terrain.

Perhaps given the high volume of tourists who tend to be inexperienced adventurers they feel the need to place the signs at the spots?

I’m not saying to ignore all of the signs or that you won’t get in trouble for disregarding them but they just don’t seem as “official” as you might think.

(I would definitely respect trespassing signs for private property, though.)

As far as getting into the water at the base of the falls, it’s said that the water contains some type of bacteria that can cause Leptospirosis, which is common in tropical climates.

Reportedly, it can cause mild to moderate flu-like symptoms that can last for up to 1 to 2 weeks

People still get in the water for those amazing photographs but if you’re not one to risk your health, you probably don’t want to take the chance.

The way back is pretty quick and easy but again going down is usually more difficult on slippery terrain so be careful.

The sun was just coming up above the tree line on our way out which made for some really beautiful lighting so I highly recommend a morning hike here.

Paradise Park

The entrance to Paradise Park is located right before you arrive at the parking lot. It’s basically right where the guy sitting in the middle of the road collecting payment for parking is located.

If you’re not aware, Paradise Park is an abandoned exotic bird zoo. It was once a major tourist attraction but was closed down in 1994.

Now, it is overrun with jungle terrain and it’s been featured in some movies like Jurassic World and shows like Lost.

Paradise park
Paradise park

Based on my research, I thought Paradise Park would be some area you could explore on your own but that was not the case. It was completely closed off to the public.

The only thing it offered was a little shop/restaurant where you could buy things like pineapples and other refreshments like Dole Whips and some types of food. (They did have some bathrooms, too.)

I’ve seen videos of people exploring Paradise Park so either things changed or they just decided to trespass.

You can still get a glimpse of it from one of the walkways but as far as exploring everything (legally), that’s not really an option as far as I can tell.

Final word

Manoa Falls is a great hike for people looking for a beautiful introduction into the jungle terrain of Hawaii. Given it’s easy access and close proximity to Waikiki, this is a great first hike to do in Hawaii to get your feet wet.

You’ll just need to start early to avoid the crowds and think about if you want to venture on any of the side trails that will be more of an adventure.

Jurassic Park Gates & T-Rex Paddock Hike & Off-Road Guide (Kauai, Hawaii)

The island of Kauai in Hawaii is full of locations from the original Jurassic Park movie that you can still explore today. Two of these iconic sites include the Jurassic Park Gates and T-Rex Paddock.

However, accessing these locations is not for everyone and can be quite challenging under certain conditions.

But in this article, I’ll tell you everything you need to know about getting to these sites including showing you a map with helpful way points and plenty of photos.

What are the Jurassic Park Gates and T-Rex Paddock?

The Jurassic Park Gates and T-Rex Paddock are two filming locations from the classic 1993 film Jurassic Park that you can still visit today.

There are two poles that supposedly mark the site where the Jurassic Park gates were located and there is a clearing by a river where the T-Rex Paddock was filmed. To see both of these locations it requires a 10 mile round-trip journey by foot or off-road vehicle.

Tip: Use the free app WalletFlo to help you travel the world for free by finding the best travel credit cards and promotions!

Jurassic Park gates filming location
The site where the Jurassic Park gates were located.

Where are the Jurassic Park Gates and T-Rex Paddock?

The Jurassic Park gates and T-Rex Paddock are located in the Lihue-Koloa Forest Reserve — a remote area near Wailua in Kauai, Hawaii.

You’ll need to venture approximately 5 miles into the jungle on an off-road vehicle (or hike on foot) to access both the Jurassic Park gates and the site of the T-Rex Paddock.

The off-road journey begins near the Keahua Arboretum and you’ll know you’ve arrived when you cross this colorful little bridge.

Related: Jurassic Park Filming Sites in Hawaii Ultimate Guide (Full List)

Bridge at Keahua Arboretum.
Bridge at the Keahua Arboretum.

Side note: the Keahua Arboretum is a really cool spot to check out the rainbow eucalyptus trees which you can see below. I highly recommend (it’s free).

rainbow eucalyptus trees Keahua Arboretum

Getting to the Jurassic Park Gates (hiking and off-roading)

You’ll need to choose if you want to off-road or hike (or a combination of the two) to get to the gates/paddock.

We are avid hikers and so I initially wanted to hike this but due to time constraints we had to switch to off roading. And honestly, I think that is the best call.

From a hiking perspective, the trail did not look super interesting (by Hawaii standards) and there is something that just felt so right about taking a Jeep through this jungle terrain.

It took us about one hour and 45 minutes to complete the entire drive out and back. My husband did all of the driving and while he is not off-roading every week he is a very solid 4×4 driver.

If you don’t have any experience driving off road, this path is doable but you might easily get freaked out by water crossings and a few of the muddy/bumpy sections.

We saw one Jeep simply park before one of the water crossings, presumably because they did not want to risk it.

Also, I would advise you to only do this with a four-wheel-drive vehicle although there are reports of people making it with two wheel drive.

Note: If you have a rental car, you may be personally liable for damage when off-roading so keep that in mind.

To make things easy for yourself, I would recommend downloading the AllTrails app and then using my navigation map with way points which you can see below.

It will tell you where all of the major sites are and also where you will face obstacles along the way such as muddy areas and water crossings.

Note: I did get a little bit of service while we were out there but for the most part it was a pretty weak signal.

Beginning the drive or hike

When you arrive at the Keahua Arboretum, you may see a sign that says the road beyond is “temporally closed.”

This may bum you out to a major degree but don’t lose hope!

This sign was up when we visited but we proceeded anyway because I believe that sign only applies when the yellow gate is closed, which is your first real obstacle.

(The gate is located just a little bit past the sign on the dirt road.)

Sometimes it’s closed for whatever reason (weather?) and if that’s the case, your only option would be to hike in (assuming that is okay).

For that reason, you might want to prioritize this trip towards the beginning of your time in Kauai. That will give you more time to change your date if you need to.

Thankfully, this gate was open.

About half a mile into the drive you’ll come across a bridge crossing the creek.

Take a look at the photo below and it will give you a good indication of what safe water levels look like at this point.

If water is flowing over this bridge, I’d be very careful about the water crossings coming up as they may not be be passable.

Your next obstacle comes about one mile in.

It’s a water crossing that could be impassable after heavy rains.

Remember, this is near Waiʻaleʻale — literally one of the wettest places in the world.

If you’re not experienced with monsoon seasons or flash floods, remember that just because a stream is passable on your way in, that does not mean it will be passable on your way out.

It is gonna take you a good amount of time from this point to hike or drive to the gates and back and it’s very possible that if a storm moved in you would not be able to get back out until the water levels go down.

So just use extreme caution when dealing with weather systems on this little expedition.

Jurassic Park Gates water crossing

I got out and walked across so you can see how deep the water levels were on a good day for a 6’1″ human. (The picture below is facing the direction you’ll see when coming back.)

Jurassic Park Gates water crossing

If you’re hiking you’ll need to remove your shoes or possibly just wear water shoes.

The cold water will probably be clear enough for you to see where you’re stepping which helps but the crossing is filled with large, smooth river rocks which can be tricky to cross. I almost slipped a few times crossing without my trekking pole.

Jurassic Park Gates water crossing

After that crossing you can relax a little bit and enjoy the green scenery but you do have another obstacle coming soon: a large puddle.

This one can be tricky because the water is not clear and it’s harder to tell how deep the hole is.

Jurassic Park Gates water crossing puddle

I got out of the Jeep and poked around this murky and slightly oily water with a trekking pole for hidden underwater potholes.

At that point, I was pretty much mentally prepared to step into a hole and end up waist deep in this gross water but luckily that didn’t happen.

While the water is kinda nasty, there was this little spot with a bunch of lily pads that I thought was mildly interesting.

Anyway, you can see how deep this section got based on the photos below.

It was deep but not that bad.

Jurassic Park Gates water crossing

After this crossing all of your major obstacles are done.

You’ll then come across a fork and make sure you head the correct way (which is to the left).

If you’re using GPS or have Alltrails and have downloaded my route above there is no reason why you should get lost or miss a turn.

It’s actually pretty darn easy to follow.

There will be a few bumpy areas to deal with and it’s these little sections that could be a problem for people with low clearance.

Be ready to take your time on a couple of spots. If you start moving forward and aren’t sure about your route just reverse back and then line it up again.

Jurassic Park Gates bumps in road

At around 3.5 miles in, there is another gate but it doesn’t look like this rusted gate has been used in a very long time so I would not worry about it being closed.

Right at around four miles in you’ll arrive at the famous Jurassic Park gates!

Jurassic Park gates poles
Walking up to the Jurassic Park gates!

Now here is the controversy, which you may or may not have heard about.

Some say the two poles are actually about 200 to 300 feet short from the original Jurassic Park movie entrance gates.

The main argument I have seen is that the road is different from what appeared in the movie.

I don’t know about that though because you would assume production altered the ground based on the fact that they also laid down a track on there.

There’s also the fact that 30 years have gone by and the road could’ve been altered dramatically by natural forces or by man.

People who believe these are the actual Jurassic Park gates question why these poles would be placed here if they weren’t from the original movie site.

Perhaps, years ago some people built them in a slightly misguided attempt to mark the location of the gates?

I tried to look at the backdrop from the Jurassic Park movie to see if I could line up any of the mountains, but it was nearly impossible to do using the scene with the gates closed due to the low-lying clouds.

Jurassic Park gates poles

But there is one shot where you can see beyond the gates and it reveals more details like a waterfall in the background and a specific tree behind the gate.

It also looks like there is a slight bend in the road towards the right which would line up with some of the photos below.

(I believe the palms were placed on site by production.)

Based on all of that, I believe the gates could very well have been located closer to the bend than the two poles currently are.

Assuming the gates are farther down, you can simply check out that view once you pass the poles.

Here’s what that view looks like:

Jurassic Park gates location

Regardless of where exactly the gates were, if you drive along or hike along this path you have journeyed through the original Jurassic Park entrance gates which is a really cool feeling and honestly kind of a bucket-list adventure.

Once you have enjoyed your time at the Jurassic Park gates, you have the choice to keep going to the site of where the T-Rex Paddock was shot.

This is where the daytime shots were taken as the Ford Explorer drove past the paddock (all of the night shots when s*** got crazy were done in studio).

The T-Rex Paddock is about a mile farther down the road and I highly recommend that you consider going to that spot because unlike the Jurassic Park gate, we know exactly where that location was filmed.

Beware that the road does get a little rougher once you pass the gates. We definitely had to deal with more muddy spots and more puddles in that section.

While there were a couple of sections that were slightly tricky, everything was still very manageable in the Jeep.

It seemed like there was a lot of gravel or rocks at the bottom of some of these puddles which made it easier for the Jeep to get through.

Still, try to use caution when venturing into the puddles because you may not be able to judge if you are dealing with rocks or mud.

Once you get past about three different sections of bumpy road/puddles, you’ll be very close to the T-Rex Paddock, which was about 4.8 miles from the start of the trail.

You’ll know that you arrived when you see a clearing which may already be where a couple of vehicles are parked.

If you take a look at the scene still from the movie, you can instantly make out the three humps in the background that tower behind the T-Rex Paddock. It’s one of the easier shots to line up.

(In the image below, the peak on the left is not visible in Jurassic Park because of the heavy clouds.)

T-Rex Paddock in Kauai Jurassic Park
Parked at the T-Rex Paddock in Kauai.
T-Rex Paddock filming scene Jurassic Park

It’s a really cool spot for Jurassic Park fans.

The area behind the paddock has a stream running through it which is the North Fork of the Wailua River and actually an incredibly scenic spot.

If you have some snacks with you this would be a great opportunity to relax and enjoy a lite lunch by the flowing water.

The spot is actually near the beginning of the trail to what is known as the Waialeale Blue Hole Falls Trail.

It’s a difficult trail that will require you to get wet and navigate river crossings but the pay off is that you end up at the Weeping Wall with stunning views of all the waterfalls.

If you can start early in the morning and dedicate an entire day, this could be quite the experience.

After that, you need to head out exactly the way you came.

We did not find going downhill to be any more difficult than going uphill and with the added confidence of knowing that we could make it through the water crossings, it was actually a pretty enjoyable and stress-free ride.

I will say that some portions of the road are too narrow to allow someone else to pass.

In several areas it does widen up so that vehicles could pass each other but in some situations you might find yourself in a tight spot.

Luckily, it doesn’t seem like there are a ton of off-roaders that use this path (at least not when we visited).

Final word

This was one of my favorite experiences while in Hawaii. It’s incredibly fun to head deep in to the jungle and while hiking this would be a fun experience, there’s just something about taking a Jeep through this area that feels more fitting for a true Jurassic Park experience.

Red Rock Canyon State Park Guide (California)

The unique orange-and-white desert cliffs and buttes at Red Rock Canyon State Park (not to be confused with Red Rock National Conservation Area in Nevada) offer exciting hiking and exploration opportunities that are perfect for novice hikers and families alike.

Tip: Use WalletFlo for all your credit card needs. It’s free and will help you optimize your rewards and savings!

Although not very well-known, Red Rock Canyon in California has been used in several well-known Hollywood movies, including The Mummy and the opening scene from Jurassic Park. While no actual dinosaur fossils have been found at the park, Red Rock Canyon is full of other fossil-rich strata dating back as far as twelve million years ago.

Related: Best national parks in Southern California

The unmistakable orange and red cliffs at Red Rock Canyon State Park. Photo by Matthew Dillon.

A variety of Native American peoples once inhabited the canyon region, and the area offers a fine collection of pictographs and petroglyphs as evidence of their once-thriving civilizations.

Ritual sites of the original Coso people were found in the El Paso Mountains of the park, a tribe known for trading goods and services with other native tribes as far west as the Pacific Coast.

Their predecessors, the Kawaiisu Indians, also inhabited the area and left evidence of long, challenging food-gathering trips to remote regions including the Mojave Desert and the infamous Death Valley.

Perhaps as a means of creating more heat during the colder months, the Kawaiisu learned to live in larger groups of sixty to one hundred people during the winter, but branched out into smaller groups during the warmer months of spring and summer.

History places many different names on the Kawaiisu populations, including Tehachapi, Paiute, and Caliente, but the indigenous Kawaiisu Indians simply referred to themselves as “Nuwa” or “people.”

They were a friendly people that got along well with their neighbors and participated with other tribes in ancient methods of hunting, gathering, and the important trading activity on which their lives depended.

In fact one of the more dramatic rock features located at the edge of the El Paso Mountains range was a trade route used by the Kawaiisu and other Native Americans for thousands of years, and then later by European settlers as they traveled westward toward the Pacific.

Vegetation at Red Rock Canyon includes the very same Joshua trees whose tough leaves were used by early Native Americans to make baskets and sandals, and whose flower buds and seeds were used as an important dietary staple.

Joshua trees are native to the Southwest and mostly found in the Mojave Desert at places like Joshua Tree National Park. These beautiful trees can live for hundreds of years, though their ages are difficult to ascertain because they don’t grow rings.

Part of the yucca genus, they rely exclusively on yucca moths for pollination. These moths lay eggs in the flowers of the trees and deliberately pollinate the Joshua trees so that, when the eggs hatch, the caterpillars will have seeds to eat.

Even more fascinating, scientists have discovered certain species of yucca moths pollinate only certain varieties of Joshua trees, creating even more incredible evidence of one of best examples of coevolution in the world.

Charles Darwin at one time remarked that the relationship between the Joshua tree and the yucca moth was “the most remarkable fertilization system ever described.”

A row of Joshua trees at Red Rock Canyon State Park. Photo by David Seibold.

Unfortunately the future is bleak for these trees as a recent study in 2011 predicted that 90% of Joshua trees will be eliminated in the next sixty to ninety years as a result of climate change.

Thousands of years ago, Joshua trees were able to survive rising temperatures because their seeds were widely dispersed by large mammals like the now-extinct Shasta ground sloth.

However, today only small rodents like squirrels disperse their seeds but not far enough for the trees to migrate into more suitable climate zones. Thus, with rising temperatures, the Joshua tree population will likely suffer a drastic decline in the near future.

If you ever visit the park after a rainy winter when the wildflowers are in bloom, you’ll be dazzled by the brilliance of their unique colors and hues.

As for wildlife at Red Rock, it’s quite likely that you’ll come across roadrunners, lizards, and squirrels, as well as hawks and desert mice.

The park offers a few short trails that are perfect for beginners and families.

The Hagen Canyon Trail will take you past some of the interesting rock formations, such as Camel Rock and Stony Window. It’s only one mile long and can easily be done in forty-five minutes or less.

Another popular trail is the main trail, also known as the Red Rock Canyon Trail. It’s a loop trail about a mile long, and it too offers a fairly easy trek. Along this trail you’ll get up close to many of the strange sandstone formations and also come across a few “caves,” which are actually crevices.

Many visitors opt to do both of these hikes since they’re short, easy, and can be completed together without too much trouble.

Photographers may get more out this location than anybody else, however. At sunrise and sunset, these rocks come alive with deep red and orange tones that allow for spectacular desert shots.

Tip

  • The best seasons to visit the park are spring and fall. Temperatures in the summer often soar above 100°F, so be sure to stay hydrated and take all proper precautions.

Getting There

The park is 25 miles northeast of Mojave on Highway 14.

Nearby Destinations

  • Fossil Falls (49 miles; 55 min)
  • Alabama Hills (94 miles; 1 hour 30 min)
  • Los Angeles, CA (121 miles; 1 hours 50 min)
  • Pinnacles National Park (250 miles; 4 hours 10 min)
  • Sacramento, CA (358 miles; 5 hours 10 min)
  • Lassen Volcanic National Park (539 miles; 7 hours 50 min)

32 Outdoor Gifts for Dad (He Will Actually Love) [2021]

Finding good outdoor gifts for dad can be an overwhelming experience because there are simply so many different options. But I’ve narrowed down a list of 32 different outdoor gifts that I think many dads would enjoy receiving. These gifts are for all different budgets and tastes. Some are serious while others are borderline gag gifts but might still be what you’re looking for. So here they are.

1. Survival grenade

I don’t think there’s on outdoorsy dad who wouldn’t appreciate a survival grenade. These come in all sorts of different shapes and sizes but they all come equipped with essential survival items. They might be a little gimmicky but you can’t deny the usefulness of all of the tools that these grenades are packed with.

This Holtzman’s survival grenade comes with 48 emergency items which include:

  • Around 45 ft. of 550 paracord
  • 2 ft. safety orange thin paracord
  • Compass
  • LED flashlight
  • Multi tool pocket knife
  • Flint Striker
  • 30ft of 12 lb Test Fishing Line and 4 Fishing hooks
  • 6 Waterproof Matches
  • And many more items. 

2. Hiking boots

An active outdoor dad is always going to appreciate some quality hiking boots. I recommend trying to find out what size and style that this particular dad prefers before buying a pair of hiking boots to make sure he’ll be comfortable with your choice.

If you have no idea about the his preference or you’d just like to surprise him then you can go with proven brands like Columbia which have waterproof hiking (which I believe are a must). But again, I’d recommended discreetly finding out his favorite brand and going with those.

Hiking
Photo by Kitty Terwolbeck.

3. A GPS locator

I write about a lot of off-the-grid places in my articles and especially in my eBook, Hidden Gems of the Western United States. And I’ve realized that if you want to explore many of these hidden gem type destinations then you need a GPS tracker to make sure that you don’t get lost and can help others find you if necessary.

These GPS locators don’t have to be expensive and you can get an affordable GPS tracker from a trusted brand like Bushnel for under $100.

4. Tactical Christmas Stocking

If you’re looking for a Christmas gift for the outdoorsman dad then look no further than the tactical Christmas stocking. The great thing about this is that it’s a unique gift that will certainly stand out and can be a lasting reminder to a dad how much he is appreciated year in and year out around Christmas time.

What’s also great is that these stockings are very cheap — you should be able to find one for around $12 or do so.

5. External phone battery

It’s becoming increasingly common for hikers to use their phones while in the outdoors. Whether they’re relying on GPS or pulling up route descriptions or simply taking video and photos, mobile phones are more useful than ever when in the great outdoors.

The issue is that utilizing these features can quickly drain the battery of a smart phone. But there are a lot of different external battery packs that you can purchase on your phone so that even on a long hike that takes all day your phone can maintain power along the way.

You can find these external battery packs for under $30 at many places so they’re a great gift for someone on a budget.

iPhone 6s funda Smart Battery Case – Lanzamiento de Apple
Photo by iphonedigital.

6. Hiking socks

You might think gifting a pair of socks is pretty lame which it usually is. But a nice pack of high quality hiking socks is a welcomed gift for just about any man who enjoys the outdoors. Personally, my favorite outdoor socks are People Socks, which come in ultra-comfy wool which helps to keep my feet nice and dry during hikes.

They are pretty much the only hiking socks that I purchase now and they are made in the USA!

Hiking
Photo by Lisa Williams.

7. Leatherman Wave

Leathermans are great gifts for any dad even if they aren’t what you’d consider a “true outdoorsman.” They can be used for all sorts of different purposes and they are reasonably priced with plenty of options that stay under $100.

The Leatherman Wave is one of my favorites and comes with 17 tools including:

  • 1. Needlenose Pliers
  • 2. Regular Pliers
  • 3. Hard-wire Cutters
  • 4. Wire Cutters
  • 5. Wire Stripper
  • 6. 420HC Knife
  • 7. 420 HC Serrated Knife
  • 8. Saw
  • 9. Spring-action Scissors
  • 10. Ruler (8 in | 19 cm)
  • 11. Can Opener
  • 12. Bottle Opener
  • 13. Wood/Metal File
  • 14. Diamond-coated File
  • 15. Large Bit Driver
  • 16. Small Bit Driver
  • 17. Medium Screwdriver

leatherman wave
Photo by Flavio Serafini.

It’s no wonder that it’s their most popular multitool and an international best seller. It’s compact and lightweight and so it’s a perfect companion to bring along when exploring the great outdoors or just bringing around wherever you go (except the airport — although there are TSA compliant multi-tools.

8. Yeti Hopper

A portable cooler can be just what a dad needs who likes to spend time outdoors. Whether you’re boating, fishing, hunting, camping, or even tailgating — having a portable cooler can be extremely handy.

The Yeti Hopper is one of the most highly rated portable coolers and features a HydroLok Zipper which has a a design borrowed from HazMat suits, so you know this thing is going to be able to hold its liquid. The Hopper comes in different colors and different sizes but you can find models that hold around 18 cans of beer or 10-12 bottles of water.

And while they are pricey but will absolutely keep your beverages cold for a longgg time.

9. Chill-O-Matic

The Chill-O-Matic is an ingenious product that will get a room temperature 12 oz drink ice cold in 60 seconds flat!

It works 240 times faster than a conventional freezer and should fit any standard sized beer or soda can. To function, it only needs two AA batteries and it’s lightweight and easy to bring around to events. 

10. Indestructible flashlight

So most dads have at least one flash light and many others have flash lights designed for the outdoors. But not every dad has a flashlight like the Coast Polysteel 600 that’s made to take a beating on a regular basis.

It’s known for being water proof, drop proof, and crush proof so even for the most reckless male, this option could be suitable. It outputs a bright 710 Lumens on hight and 73 Lumens on low and the beam distance on high can hit 810 feet. The runtime on high is 2 hours and 15 minutes while on low it can last for up to 40 hours! It also comes with a nice sleek black appearance. 

11. Fish sandals

Don’t lie — you know some dad somewhere will appreciate these amazing fish sandals.

I’d honestly buy them for my own pops but I’m pretty sure he’d wear them out to the grocery store and my mom would have to deal with that on a regular basis. But these are still pretty much the perfect gift for the right kind of fish-loving dad out there.

These come in different colors and sizes so imaging walking around as one uniformed family of fish feet!

12. A high quality backpack

I used to skimp on backpacks but found myself constantly needing a new backpack because the straps would wear down or break and the backpack’s material would degrade. I soon realized that when it comes to backpacks for the outdoors, you usually get what you pay for.

So I suggest that if you’re going to get a backpack for a father you love, don’t go with something unproven. Instead look to trusted brands like the Northface and Patagonia. These backpacks are usually built to withstand the test of time and it’s why they receive such great reviews most of the time.

The North Face Recon Backpack is a great option for someone looking to keep their spend limit close to $100. The backpack comes with a laptop sleeve, tablet sleeve, organization and hydration port, and FlexVen injection-molded shoulder straps. It’s truly a multi-purpose bag that can be used for all sorts of purposes and it should be able to take a good beating over time. 

13. Ultraskiff 360

Okay so this is definitely the most expensive gift on the list. But maybe you have some siblings who can go in on it with you and help to spread the cost around and make it a little bit more affordable. The Ultraskiff 360 is the ultimate fisherman’s platform/boat.

It’s propelled by a 12volt electric trolling motor and most new users find it easy enough to use even if they don’t have any prior boating experience. You can check it out in the video below.

13. Lifestraw

You never know when you might need to drink your own… lifestraw. I recall getting lost in the backcountry in Yosemite National Park a few years ago and being in desperate need of water — I would have done anything to have a life straw with me!

Lifestraws are very cheap at $15 and will provide 264 gallons (1,000 liters) of safe drinking water without using chemicals/iodine. It’s proven to remove “99.9999% of bacteria including Escherichia coli (e-coli), campylobacter, vibrio cholera, pseudomonas aeruginosa, shigella, salmonella” so you can’t go wrong with it. 

There’s also no shelf life so your outdoor father can put it away until he’s ready to use it on the next outing. And even if your dad’s not an outdoorsman, these are handy to keep with you if you’re going to be on a road trip or want to take extra precautions in case of an emergency.

P1090143

14. GoPro

GoPros are great because they are very easy to use and you are extremely durable.

You can bring them with you scuba diving, on vacations, hiking trips, sporting events, the list goes on. And now they capture video in 4K and some even have 360º capabilities. You really can’t go wrong with a GoPro.

15. Helinox Chair One

Almost every dad I can think of could use a quality lawn chair. Whether its watching little ones playing football or baseball or just relaxing at a campsite, a quality lawn chair is a valuable asset for many fathers out there.

The Helinox Chair One is a great options because it’s super light but still very comfortable. If you’re looking for something that’s easy to lug around then this chair offers you that feature. And for being so lightweight, it’s also surprisingly sturdy and high quality. It’s really the perfect balance between portability and durability.

Bikepacking microadventure Limburg
Photo by Kitty Terwolbeck.

16. Outdoor speaker

One of the biggest reasons for spending time in the great outdoors is to avoid technology and get away from it all. But sometimes you still want to bring some of your tunes with you and enjoy them out in nature.

The APIE Portable Wireless Outdoor Bluetooth Speaker IPX6 is perfect outdoor speaker who wants to play their music without worrying about ruining their electronics. This wireless speaker has a range of 33 feet and a 2200mAh battery that can hold a charge for up to 10 hours of playtime depending on the music volume level.

17. Hammock

Not many things are more relaxing than enjoying a hammock in the outdoors.The fantastic thing about hammocks is that not only are they ultra-comfy but they can also be ultra-cheap like this Farland Outdoor Camping Hammock.

Hammock
Photo by jchapiewsky.

18. Coleman Classic Propane Stove

For all of those foodie dads out there who don’t want to resort to a granola diet while camping. Coleman offers some of the most popular propane stoves for campers. They come with wind Block panels which help shield the burners from winds which would normally turn your cooking experience into a frustrating one.

It comes with 20,000 total BTUs of cooking power and can fit a 12″ and a 10″ pan at the same time. So if you’re trying to cook up some meals for a few people then your life just got made easier with this camping grill.

The burners are also independently controlled so you can throw two separate dishes on the grill with different cook times and still be okay (assuming you’re the multi-task type of camping chef). the assembly time is about three hours but you can pay extra to have an expert assemble the grill for you.

These stoves go for close to $40.

Camping Stove
Photo by The Tedster.

19. Etekcity Mini Camping Stove

If you think that Coleman stove is a little too bulky then consider going with a mini-camping stove. You’re going to have to contend with the elements like wind a lot more but this type of mini camping stove is ultra-portable and can be perfect for things like boiling up water.

20. Camping Cookware

You can’t have a camping stove without come cookware.

The good news is that camping cookware can be very easy to find at reasonable prices. I like the Yodo Anodized Aluminum Camping Cookware Set that’s perfect for four to five people. The pots are made from Hard anodized non-stick aluminum which makes them easier to clean (which any dad would truly appreciate).

The Morning Grind
Photo by Logan Brumm.

21. The NORTHblu Pop-up tent

Some dads just need a simple solution to camping: a pop-up tent. These involve minimal set up effort and can still get the job done for a couple of people. The dimensions on this tent are : 87″ x 60″ x 43″ and the tent can fold into the carrying bag which comes with a 30″ diameter.

The tent is made from 90T polyester fabric and there is no ground tarp required which further lessens the load you’ll have to carry. The tent comes with a large entrance door with mosquito net and three ventilation holes along with one inner side bag.

The only major drawback to this pop-up tent is that it is only made to withstand light drizzling. If you’re going to be camping somewhere for an extended amount of time and there’s a chance of a good down pouring you might want to go with something that’s much more protective or purchase a rainfly for the tent.

Despite the lack of protection agains the elements, this tent is a solid option based on the price and convenience.

22. Thule Sapling Elite Child Carrier

What’s better than a dad hiking with their little one? How about being able to strap your kid on to your back so you don’t have to worry about them getting exhausted when you’re exploring the great outdoors?
 
The Thule Sapling Elite Child Carrier comes with a removable backpack and large zippered compartment good for storing diapers, clothes and other gear. It’s fully adjustable so that you make a transition between parents and it also comes with a hydration sleeve stores up to a 3L reservoir. And lastly, it also has a viewing mirror so you can keep an eye on your child as you the trails.

23. Hiking pants

When it comes to hiking pants for dad, there’s a clear winner in my book. Columbia convertible pants are definitely the way to go. These are durable hiking pants that receive great reviews from customers.

It’s often the case that when trekking your body temperature changes along with the environment and so you need pants that are versatile and can keep you comfortable regardless of how warm or cool you get.

The Columbia Men’s Silver Ridge Convertible Pants accomplish this take by allowing you to remove the lower portion of the pants and convert them into shorts. The pants come with Omni-Wick advanced evaporation technology which helps to pull sweat away from the body and Omni-Shade UPF 50 sun protection. And you can also choose from a nice selection of colors depending on the father’s preference. 

You can get these pants for under $50 which is pretty reasonable considering the level of quality that Columbia is known for.

24. An emergency flashlight

You never know when a flashlight might not work or when you might have accidentally installed faulty batteries that don’t have the juice to power your flashlight. So it’s a good idea to have a back-up plan where you can use a solar-powered light in emergency situations.

The ThorFire is a versatile emergency light that is both solar & hand crank powered, so there’s no batteries needed. And you don’t have to worry about exhausting yourself with effort to get this light to come on and stay on since just 1 minute cranking will generate enough power for 1 hour.

For solar charges, one hour of direct sunlight will provide120 minutes of light or 140 Minutes of flashing.

The light is also IPX6 Waterproof and submersible up to 45 feet so you don’t have to worry about losing your light even in some of the toughest conditions. So whether it’s needed for outdoor exploring or just in case of emergency, I think any dad would appreciate the gift. You can find the ThorFire for as low as $15. 

25. A trail stool

Sometimes all you need is a small trail stool to give you a place to get off your feet and relax while in the outdoors. These are great because they are compact and usually very lightweight. This trail stool folds up to the size of a rolled-up newspaper and is durable up to 275 pounds. the total weight of the stool is only 2.2 pounds. 

26. Stanley Classic Vacuum Bottle

Just seeing a Stanley Classic Vacuum Bottle reminds me of my dad. These are tried and true and come with vacuum insulation that can keep drinks hot for up to 24 hours, cold 24 up to hours, or iced up to 120 hours. It’s like this thing has super powers. 

These are rust-proof, leak proof with insulated lids, and come with life warranties so they are certainly worth the money. I don’t think any list for dad gifts is complete without a Stanley Vacuum Bottle on it.

27. A sleeping bag

Any father could use a good sleeping bag. And it’s not hard to find one with decent quality for a reasonable price. The key to finding the right sleeping bag is to look for one that will suite the environment he’ll be camping in.

A sleeping bag for below zero temperatures is going to be too hot for someone camping the middle of Texas durning the summer.  There are lots of options to choose from and here’s one of the most highly rated sleeping bags on Amazon right now.

28. Down jacket

Down jackets also called puffer jackets are great for being outdoors in cold climates. I recently spend some time in Norways chasing the northern lights and if it wasn’t for a down jacket, I think I would have turned into a statue of ice.

Many of these can be quite stylish, too. I personally like the down jackets from Columbia with a 100% polyester shell. These jackets are pretty versatile so they could be used for hiking and outdoor activities or worn when traveling around in colder climates.

29. CamelBak M.U.L.E. Hydration Pack

You can’t go wrong with a CamelBak.

They are well designed and from a respected brand, so any dad who sweats and drinks would appreciate the pack. Whether you’re running, hiking, biking, or doing any type of physical exertion, CamelBaks are great products that can keep you hydrated easily with its magnetic tube trap.

The CamelBak M.U.L.E. Hydration Pack comes in different sizes and colors and the 100 ounce pack linked here holds approximately three liters of H2O. 

30. Pocket Folding Knife

Dads need knives.

Sometimes it’s for fishing, hunting, bushcrafting, or other activities and sometimes it’s just nice to have a good quality pocket knife at your disposal. This spring assisted knife is a multi-purpose knife that’s easy on the budget at under $15 and has received fantastic reviews online. If you really don’t know what to get an outdoorsy dad for Father’s Day, then going with a nice knife can be a solid option. 

31. Headlamp

A headlamp can be used for hiking, camping, exploring caves, and other outdoor activities like photography. They are even handy when working on projects in dim areas like a garage or crawling around in an attic.

Headlamps come in all sorts of different varieties but you don’t have to spend a fortune to find one of good quality. The Cobiz Brightest 6000 Lumen CREE LED Work Headlight is a great option that is waterproof and great for all sorts of activities, even running. 

32. Gift card from REI

If you just can’t make your mind up despite all the hours I spent trying to make things easy on you it’s still understandable… I guess ;).  But seriously if you can’t find the right gift then consider just going with a gift card from a store like REI. Then he’ll be able to pick out whatever his outdoorsy hear desires.

Final word on outdoor gifts for dad

You can’t really go wrong with most of the gifts (ok so maybe the fish sandals could be an issue). Try not to overthink your gift and don’t underestimate how useful some of the cheaper items can be to someone who frequents the outdoors. And if all else fails you can just purchase a gift card and keep things simple.

Cover Photo: BLM.

Tanque Verde Ridge Trail Hike Review | Saguaro National Park

The Tanque Verde Ridge Trail at Saguaro National Park is a pretty narrow and rocky trail that can get a little bit steep at times although I never found it to be super challenging because we did the miniature version of the hike which is a 3 mile out and back hike.

Tip: Use WalletFlo for all your credit card needs. It’s free and will help you optimize your rewards and savings!

It’s a perfect hike if you only want to spend a couple of hours hiking and are looking for a decent work out along with some fantastic views of the surrounding mountains. 

But you can continue along with the trail for many more miles and work your way up to higher elevations where the scenery begins to change. It also leads to different campgrounds, such as the Juniper Basin Campground (6,000 feet) which is about 7 miles from the trail head.

Since we have not ventured that far out yet, this review will only focus on the shorter version that we did.

The trailhead is located right off of Cactus Loop Drive. The easiest way to get there is to turn right after you enter Saguaro National Park and go down the two way street until you see the turn off area for the Javelina Picnic Area. (If you first turn left on Cactus Loop Drive, you will have to drive the entire scenic loop until you arrive at the picnic area.)

There are a few parking spaces in the area as well as some covered picnic tables which would be a perfect place to relax on a nice day.

Javelina Picnic Area.

We did this hike during the coronavirus outbreak, so there were reminders about social distancing on the trailheads.

There was a light to medium flow of other hikers on the trail so keeping a distance was not very difficult, although coming back down we did have to step aside quite a few times.

We arrived at the trailhead at about 7:10 AM on a Saturday which also happened to be Easter weekend. There were still plenty of spots available in the parking lot so parking was not an issue.

The trail starts off with some very mild changes in elevation and is very well marked and kept up throughout. Once you hit about half a mile, it is a very steady upward trend in elevation (810 total feet to an elevation of 3,900 feet).

You should easily be able to find your way along the trail 99% of the time.

I only recall one or two instances where it wasn’t immediately clear where to go but after taking a couple of steps we could see the trail pretty clearly. I could have easily done this hike without checking my GPS.

Along the hike you will come across much of the typical vegetation found in Saguaro National Park. You’ll see prickly pear cactus, cholla, barrel cactus, palo verde trees, and of course plenty of large saguaros.

Teddybear cholla cactus.
Palo verde tree.

There is one of the rare crested saguaros cactuses on the trail but it is further along than we went so we were not able to see it.

The portion of the trail that we did never felt very steep but there are some areas where you will have to navigate relatively steep rocks for a few steps and make your way up large steps. Trekking poles are a big help.

Tip: Use WalletFlo for all your credit card needs. It’s free and will help you optimize your rewards and savings!

We saw a couple of kids along the way so I think this can be a kid friendly hike but there are a couple of spots where you would want to keep a very close eye and probably assist them depending on their age and abilities.

It’s not so much the risk of falling that is a potential issue but the possibility of falling into a cactus which makes coordination and balance all the more important.

There was a nice display of wildflowers along the way.

Pinkflower hedgehog cactus?
Flowering ocotillo.
Coulter’s lupine.

It does not take very long for you to start to see some great views as you make your way through the hike. 

And you will have sweeping views of all of the surrounding mountains like the Santa Rita Mountains, the Tucson Mountains, and Mount Lemmon. I did not realize how surrounded we were by mountains until we made our way up on this hike. It truly is impressive.

There is basically no shade along with this hike so if you are attempting this during the day in the summer, you will want to take adequate preparations for water and sun protection.

If you are a trail runner, I could see this being a pretty good trail for that, although it can be a little narrow at times and you may come into contact with some of the bushes/cacti.

Overall, I think this is a terrific hike if you are wanting something that is a little bit challenging but that can be done in a couple of hours and it will offer some great views, close encounters with saguaros, and a chance to check out some of the other interesting flora and wildflowers.

Unfortunately, we did not see any wildlife during our hike but I have read reports of others running into rattlesnakes and of course there are the other animals out there like coyote, mountain lions, javalena, and others.