Almost Half of TSA Pre-Check Travelers Think Lines Are Too Long

TSA Pre-Check is a program launched by the Transportation Security Administration (TSA) back in 2011 to enhance the pre-boarding security screening process. It offers expedited screening by providing you with a shorter line and fewer restrictions when making your way through security. But it doesn’t look like everyone’s satisfied with the current Pre-Check status quo. The LA Times reports that a recent survey conducted by OAG shows that many TSA Pre-Check customers aren’t too happy with what they signed up for.

It reports:

But a survey of nearly 2,500 North American travelers found that 45% of fliers who enrolled in TSA PreCheck still think the lines are too long and the $85 cost for a five-year membership may not be worth it.

The survey taken by OAG, a company that compiles and provides data to airlines, airports and others, found that the percentage of travelers who feel the TSA PreCheck lines are too long was even higher amongbusiness travelers, at 57%.


TSA has highlighted its own positive stats on its website where it claims that in February 2017, 97% of TSA Pre-Check passengers waited less than 5 minutes and that Pre-Check has  over 4 million members currently with a presence at 180+ airports and 30 airlines. 

It’s a little surprising that so many Pre-Check customers would be dissatisfied with waiting 5 minutes or less, but I think many Pre-Check travelers feel like anything short of a breeze through security with no line is a loss.

This is especially true when it feels like the standard screening line (with an average waiting time of 10 minutes) is moving more quickly. Sometimes waiting in a 5 minute virtual stand-still line is more frustrating than waiting in a 7 to 10 minute line that is steadily moving. I attribute those type of scenarios to understaffing or lack of training and that’s probably what’s got a lot of Pre-Check people unhappy.

That, and another complaint with TSA Pre-Check is that many terminals aren’t outfitted with TSA Pre-Check. I’ve been to terminals in MIA and LGA that operate the “dumbed down” version of Pre-Check where you don’t have to take your shoes off but still have to remove your laptops, liquids, and often are subjected to other restrictions. The biggest downside is that you still have to wait in the standard screening line.

I think that TSA should advertise TSA’s presence with an asterisk for certain airports that don’t operate a TSA Pre-Check line at all terminals, so you at least have some level of notice that you might not receive Pre-Check benefits. Sometimes you may want to consider going through security twice in order to experience a lounge but if you won’t be able to go through Pre-Check each time, you may not feel like it’s worth it.

On the other hand, it has been exciting to see Pre-Check expand to so many different airlines. Some of the major airlines that they currently serve are:

  • Aeromexico
  • Air Canada
  • Alaska Airlines
  • American Airlines
  • Avianca
  • Cape Air
  • Delta Air Lines
  • Emirates
  • Etihad Airways
  • Hawaiian Airlines
  • JetBlue Airlines
  • Seaborne Airlines
  • Southwest Airlines
  • Spirit Airlines
  • United Airlines
  • Virgin America
  • Virgin Atlantic

Overall, I’ve been mostly happy with TSA Pre-Check, but I’ve had a bad experience here and there. Hopefully, TSA will continue to increase its staffing so that both lines, standard security and TSA Pre-Check will continue to become more effecient and we’ll see more airlines and airport (terminals) participating in the program. If you want to know more about TSA Pre-Check read my guide here.

Guide to TSA Pre-Check

TSA Pre-Check is a relatively recent program launched by the Transportation Security Administration (TSA) back in 2011 to enhance the pre-boarding security screening process. It started off as a bit of an experiment found in only a handful of airports and utilized by only American and Delta Airlines, but in 2013 it opened up to the public so anyone could apply. Now it’s found at over 180 different airports and involves 16 different airlines. Here’s what you need to know about TSA Pre-Check in order to decide if you should apply. 

What are the benefits of TSA Pre-Check?

TSA Pre-Check offers passengers expedited security screening that comes in the form of two main benefits. The first major benefit is having access to much shorter lines and the second benefit involves having fewer restrictions to abide by when you make your way through those shorter lines. 

Expedited line

In almost all cases, the line for TSA Pre-Check will be shorter than the standard security line. Thus, you’ll often be able to breeze through security and stress less about getting through a long, snaking line of nervous passengers. Notice I said in “almost” all cases. Sometimes the TSA Pre-Check lines get backed up just as bad (or worse) than the standard security lines so you can’t take this benefit for granted 100% of the time.

Also, sometimes, such as very early in the morning or very late, the Pre-Check lanes will not be open at some airports. However, during these times, the lines aren’t usually a problem so it’s not a major deal.

And finally, some airports don’t implement proper TSA Pre-Check lines. At some airports you may find that terminals that don’t serve the hub airline have no TSA Pre-Check or a “dumbed-down” version of it where you get to keep your shoes on but still have to abide by some of the standard rules like taking out your liquids and laptop. 

Despite the occasional exception, I’ve found the TSA Pre-Check line to be shorter the vast majority of the time when going through airport security, so I definitely think the expedited line benefit is worthwhile.

Fewer restrictions

The other major benefit is that you’re able to enjoy fewer restrictions when going through security. You often only have to pass through a traditional metal detector (as opposed to the full-body scanners) and you also get to enjoy the following benefits:

  • Shoes can stay on
  • Belt can stay on
  • Light jackets can stay on
  • Laptops allowed to stay in bag
  • Liquids (3-1-1) can stay in bag

On occasion, if your shoes or belt contains too much metal or your jacket is too bulky, you may have to remove them. 

Screen Shot 2016-07-20 at 9.24.33 AM

Is it guaranteed each time I fly? 

Unfortunately, getting TSA Pre-Check is not guaranteed every time you fly. However, your odds of getting Pre-Check once you are approved are somewhere close to 97% each time that you fly, so you can rest assured that you’ll be enjoying the benefit almost every time that you fly.

The application process is very simple

Compared to Global Entry, the application process of TSA Pre-Check is a breeze. (I finished the TSA Pre-Check application for both of my parents in about 10 minutes.) All that is required is very basic contact information and verification about any previous run-ins with the law and you’re done. You can find a link to the application here

Scheduling an appointment

There are many more enrollment centers for your appointment compared to Global Entry, which means that you can schedule an appointment and get approved much quicker. There are some reports of applicants having a hard time finding openings, but TSA has made recent attempts to provide more staffing and locations for appointments so hopefully that’s less of an issue now.

At the appointment, you’ll provide some form of official identification (e.g., passport) and the agent will take your fingerprints in order to complete the background check. You then pay the non-refundable $85 fee (good for five years) and then it’s all over. For many, the appointment only takes a few minutes and is a pain-free process.

After your in-person interview, you should receive your approval decision within 5 business days, likely by email. You’ll be able to check your status online and pull up your Known Traveler Number (“KTN”) but will need to wait up to 48 hours for it to be activated. If you don’t check your status online, a letter will arrive in the mail after about 10 to 21 days after your appointment.

Add your KTN to frequent flyer accounts

It’s very important that you remember to enter in your KTN number into all of your frequent flyer accounts. When you log into your accounts online, you should see an option to input your KTN number somewhere in your profile.

Once your KTN is saved into your frequent flyer accounts, you are often automatically eligible for TSA Pre-Check each time you fly but it’s not guaranteed that your KTN will be added to your future itineraries. Thus, you should always verify that your KTN is in your itinerary each time you fly — this is especially true if someone else is booking your ticket as part of their itinerary.

Tip: if you have pre-existing reservations when you get approved, I recommend calling into the airline before you show up to the airport to make sure that your KTN is on your itinerary. Also, have your KTN handy every time you check in at the airport to so that the agent at check-in can add in your number just in case it isn’t showing up.

How do you know you’ve been cleared for TSA Pre-Check for your flight? 

When you print out your boarding pass (or view it online), you’ll see “Pre-Check” somewhere on the boarding pass if you’ve been cleared. If for some reason you don’t see it, always check with an airline agent to make sure your KTN was in your itinerary. If it was, then you simply were unlucky and didn’t get cleared in that instance.  

What airports participate? 

There are over over 180 different airports that participate in TSA Pre-Check. You look up what airports are part of the program here.

What airlines participate? 

The number of airlines that participate in TSA Pre-Check is growing each year and is now over 30. Some of the airlines that take part in the program are:

  • Aeromexico
  • Air Canada
  • Alaska Airlines
  • American Airlines
  • Avianca
  • Cape Air
  • Delta Air Lines
  • Emirates 
  • Etihad Airways
  • Hawaiian Airlines
  • JetBlue Airlines
  • Seaborne Airlines
  • Southwest Airlines
  • Spirit Airlines 
  • United Airlines
  • Virgin America
  • Virgin Atlantic 

Not all of these airlines offer TSA Pre-Check when flying internationally, however. I recently flew Southwest to Mexico and it was confirmed to me that Southwest did not offer TSA Pre-Check for international flights as of that time. Update: Southwest offers TSA Pre-Check on international flights now! 

Membership is good for five years

Your membership will continue for five years. After that point, you’ll need to return to a TSA enrollment center to renew your application.

Use credit cards to cover the application fee

I mentioned the fee is $85 (non-refundable) for five years worth of membership, which isn’t bad at all. However, many credit cards offer statement credits that you can use to get TSA Pre-Check for free. Some of these cards are:

  • Chase Sapphire Reserve 
  • Platinum Card from American Express
  • Citi Prestige
  • Citi Executive AAdvantage Card
  • Ritz-Carlton Rewards Card 

These cards offer credits for both TSA Pre-Check and Global Entry. Thus, you need to arrive at a decision about which one is better for you to apply for before utilizing your credit. 

Global Entry or TSA Pre-Check?

I’ll write a little more in depth on this decision at a later time, but many people are not sure which program is better for them to apply for. It’s actually a pretty easy decision to make, considering that if you get Global Entry, you also get the TSA Pre-Check with it. 

Thus, the question is do you need the additional benefits of Global Entry? The factors you should consider are: 

  • Do you fly internationally? Global Entry is allows for expedited entry into the U.S., so if you never fly internationally, this benefit will not be needed. 
  • Do you have a checkered criminal history? The standard for approval are much higher for Global Entry with respect to having a criminal history. If you have things on your record (e.g., DWI, possession, etc.), you might not be able to get approved for Global Entry but might still have a shot with Pre-Check. 
  • Are you near an enrollment center? If you’re very far away from a Global Entry enrollment center and aren’t crazy about the expedited entry into the U.S., you might not feel it’s worth it to travel that far when you can likely find a TSA Pre-Check center much closer. 

All things considered, if you’re not interested in Global Entry, TSA Pre-Check is worth the little bit of time it takes to apply. And considering that you can get this benefit for free with certain credit cards, it definitely makes sense to look into applying and making your travel experience a little less stressful. 

Guide to Applying for Global Entry

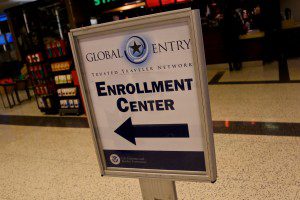
Global Entry is life-saver when you’re coming back into the U.S. after international trips and you stumble upon a ridiculously long customs line. Global entry not only offers you way for you to zip through customs when coming back into the United States, but it also provides you with TSA Pre-Check so you can zip through TSA security when departing on both domestic and international flights. Here’s a guide on what you need to know to apply for Global Entry.

Set up a GOES account

The first thing you need to do is to sign-up for a GOES account. Here’s the website for GOES (which stands for Global Online Enrollment System). You’ll use a GOES account to process your application for Global Entry and it can be used for other related programs, such as NEXUS.

Setting up a GOES account is very easy and should only take you a minute or two to complete. 

The first thing it will ask you is if you have ever applied for Global Entry, NEXUS, SENTRI, U.S. / Mexico FAST, U.S. / Canada FAST. Make sure you don’t forget to include this information if you have applied before because it can really screw up your application and perhaps prolong the application process.

Screen Shot 2016-05-06 at 1.10.12 PM

On the next couple of screens you’ll input all of your necessary contact information and set up your password and security questions. It’s all straight-forward and shouldn’t be a problem. 

Screen Shot 2016-05-06 at 2.01.25 PM


Once your GOES log-in account is created, you will log back in and then be taken to the screen below. You will then click “Apply for a Trusted Traveler Program.”

Screen Shot 2016-05-06 at 2.04.03 PM

You’ll be asked if you’ve ever applied for any of the programs and assuming you hit no, you’ll begin the application. They will ask you a couple of quick questions like how you heard about the program, your citizenship, and then they will provide you with options for your application based on what you submitted. Be sure to select Global Entry assuming that pops up for you. 

Screen Shot 2016-05-06 at 2.08.41 PMThe next screen will provide you with all of the enrollment centers in your state. You should take note of the enrollment centers near you for your future reference so that you can more easily schedule your interview when it is time and perhaps call in to inquire about their walk-in policies. If you live by a major city, you shouldn’t have to go far for an interview but if you live outside of most major cities, you may have to travel a couple of hours to get to the nearest available enrollment center. 

On that same screen, scroll all the way down to the bottom to confirm your intent to enroll in Global Entry.

Screen Shot 2016-05-06 at 2.11.37 PM

Begin the official Global Entry Application

Once you hit that button, you will officially begin the Global entry application. You can see all the different steps you’ll have to fill out below:

Steps to the Global Entry application

You should breeze through the first options but be sure you put down the correct information for your “Citizenship Information.”  This is how you will prove that you’re a U.S. citizen. 

For most people, I recommend choosing to use a passport because it’s the same document that will be required for your “admissibility documents.” Keep in mind that whatever documents you include in your application, you’ll have to bring to your interview.  

I recommend choosing to use a passport for your “Citizenship Information.”

Next you’ll have to provide your “admissibility documents.” There’s only one selection that appears and it’s for your passport so enter in that information to advance to the next screen.

Next, you’ll put in some pretty straight-forward information like your primary residence, diver’s license, and current address, all easy stuff. 

Employment and address history

Then, comes the most potentially time-consuming portion of the application.

If you’re like me and have lived in tons of different places in recent history and had quite a few jobs/internships, you’re going to have a lot to fill in. If you haven’t rounded up all this information before, it would be a good idea to make a list of all of the places you have lived and worked for the past 5 years.

Travel history

Next, you have to put all countries you’ve travelled to in the past 5 years other than the United States, Canada, and Mexico

I actually forgot to mention a country when I filled out this portion of my application but was able to update the information at my interview. So if you happen to slip up and forget about a country, just try to bring it up at your interview. I doubt it will be an issue unless you tell them something like you “accidentally” forgot about your monthly runs to Iraq and Syria. 

Additional Information

Finally, a very important section comes up: criminal history. Make sure you answer this question honestly and hopefully your answer to these questions will be no.

It’s been stated by officials of United States Customs and Border Protection that “any type of criminal conviction would disqualify someone” for Global Entry. Some people have had luck with being approved with expunged misdemeanors from their days as a minor but those seem to be in the minority. The reality is that in the majority of cases, if you have had any type of misdemeanor and definitely a felony in the past 10 years (and maybe even longer) you will probably be denied. 

If you are denied for such a reason, you can write an official appeal letter but the general consensus with an appeal is that you have a slim to none chance of getting a decision overturned. 

And remember, there’s no refund for the $100 application fee if you are denied. 

After one more question you’ll be at the end of the application and just need to perform the “final review.” Take a close look at your answers to make sure everything is accurate and then you’re ready to submit your application.

Pay the $100 fee

When you submit your application you will be prompted to pay your $100 fee.

There are many credit cards that provide you with a $100 statement credit that can be used toward Global Entry, such as the Platinum Card from American Express, the Ritz-Carlton Card, and the Citi Prestige, just to name a few. With cards like the Platinum Card, you simply pay for the application with your card and await the statement credit with no further action necessary. 

Going to “review”

After you pay the fee, your application needs to be “reviewed.” It varies with how long it might take for your application to be reviewed. Most of the time it seems to take one week, but it could be just a couple of days or maybe even a couple of weeks. Just be on the look out for an email from GOES during this time and/or log-in to your GOES account to check your account status. 

Conditional approval letter

If you pass this review, you’ll receive an email to log-in to your GOES account for an update on your application. You’ll then see that you’ve been conditionally approved!

The letter from Global Entry will state:

We are pleased to inform you that your U. S. Customs and Border Protection, Global Entry membership application has been processed and you are now invited to visit an enrollment center to complete the enrollment process.

In order to finalize your Global Entry enrollment, you must schedule your Global Entry Interview within 30 days of the date of this letter. You do not have to complete the interview within 30 days….

It will also tell you to bring the following original documents with you to the enrollment center:

  • A valid passport. If you travel using more than one passport, please bring them to the interview so that the information can be added to your file. 
  • A permanent resident card (if applicable);
  • Documents providing evidence of residency. Examples are: driver’s license (if the address is current), mortgage statement, rental payment statement, utility bill, etc.

Personally, I just brought a driver’s license (because my address was current) and passport to make it easy but bring whatever qualifies and makes you comfortable.

Although it doesn’t tell you in the conditional approval letter, you need to bring a copy of the conditional approval letter itself to the interview with you! 

Once you schedule your interview, you should get an email reminding you to bring this document, but go ahead and print it out as soon as you can and try to remember to bring it. (I’ve heard of some agents getting really irritated when applicants forget to bring the letter to the interview.)

Another thing, the Global Entry membership number in your conditional approval letter will be your official Known Traveler Number in the future if you get approved, so it’s also a good idea to go ahead and take down the information. (This will be the number you insert into all of your frequent flyer accounts online so that you’ll be granted TSA Pre-Check.)

The interview process

So once you’re conditionally approved you can finally schedule your interview. Remember, you must schedule the interview within 30 days — not actually attend it within 30 days.

July 9, 2017 update: You can take care of your interview returning to the US at select airport locations. 

The availability for interviews varies across the country. I got in within about a week but others have been forced to wait months.

If you are facing a long wait time but you want to get in earlier just try to log-in continuously to schedule an interview since cancellations happen all the time. You could also do some research to see if any of the facilities near you allow walk-ins. Many will probably state that their official policy is no walk-ins but (although I don’t encourage it) you can always take a chance and just show up if you really want to. People did this at IAH and were able to get in even on a busy day.

During my interview they asked me very basic questions and the entire process only took a few minutes. They asked me questions like: 

  • “What’s your occupation?”
  • “Do you travel for business or pleasure?”
  • “Do you travel with a family?”

After just a few questions, they took my photograph and fingerprints and I was done. 

Some facilities will require you to watch a short video on Global Entry but that was not the case for me. If you want to read more about my Global Entry interview experience in Houston click here

Approval

Some applicants will be be approved right at the conclusion of their interview but others will have to wait to receive an email regarding their approval. My email came about 5 minutes after my interview but it could take longer for others. 

Once you’re approved you are free to use your Known Traveler Number for all itineraries and it’s good for five years! If you’ve already made a booking you may have to call in to certain airlines to get it added to your itinerary (looking at you Southwest Airlines).   

A few weeks after you’re approved, you should receive your ID card in the mail. It’s an official government ID so it can be used for a lot of things in place of your diver’s license but you don’t need it to use Global Entry in the airports. As far as I know, the only time it would be requires is at certain land crossings at the border of the U.S. and Mexico or Canada. 


1 2 3