
If you’re traveling outside of the country soon you probably want to consider putting travel notices on the Chase credit cards or debit cards that you want to use. If you don’t do that then you run the risk of your cards not working properly abroad and you’ll have to deal with that frustration, which is no fun when traveling.
So avoid the frustration and set your Chase travel notices following these easy steps broken down below.
Interested in finding out the hottest travel credit cards for this month? Click here to check them out!
Table of Contents
How to Set Up a Chase credit card travel notice
It’s very easy to set up a travel notice for your Chase credit card and bank account. You can set up a travel notice over the phone, via the Chase App, or simply do it online — whichever is more convenient. However, I would recommend doing it online because it is so easy.
Tip: Use the free app WalletFlo to help you travel the world for free by finding the best travel credit cards and promotions!
Setting up the notification by phone
If you’re looking for the Chase travel notification number, just call the number on the back of your credit card or debit card.
I’ve made calls from the plane as I’m boarding and Chase handled pretty quickly so it usually doesn’t take the agents very long to put the notification on.
If you’re ever outside of the US you can call Chase collect number at: 1-302-594-8200
Setting up the Chase travel notification online
To set up a Chase credit card or debit card travel notice, it only take a few steps.
The first thing that you need to do is log-in to your Chase account. Once you are logged in, click on “Account management” and then click “Profile and settings.” This will all be found at the top of your screen as pictured below.

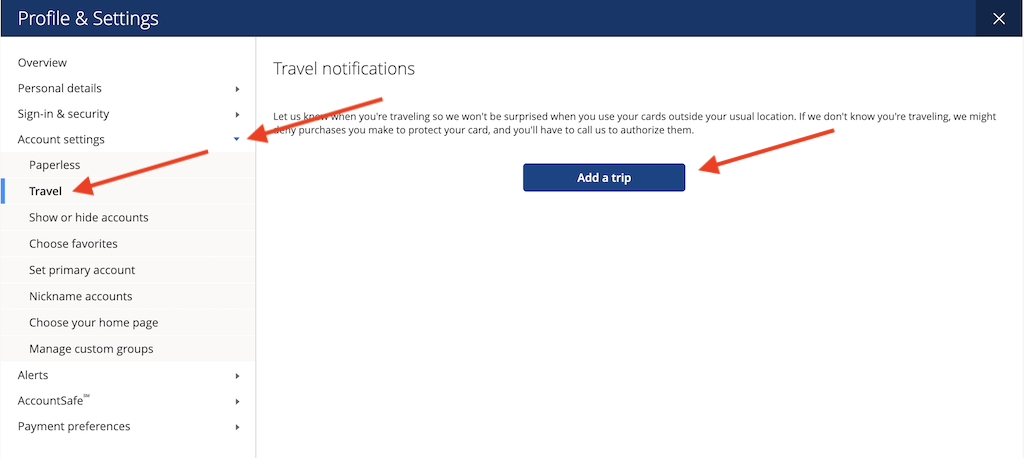
Once you are in profile and settings, now you want to click on “Account settings” and then click on “Travel.” To begin the process of adding a travel notification, simply click on “Add a trip.”
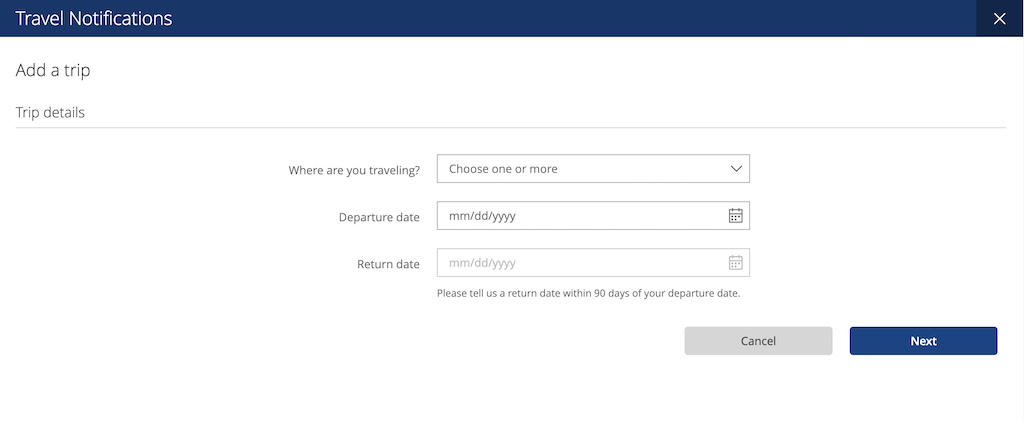
At the next screen, you will need to enter some basic information regarding your travels. This information includes the destination, the departure date, and the return date.
Your departure date can be as far as one year out. But note that the return date must be within 90 days of your departure date. You can choose different countries or you can even choose specific states within the US for your destination.
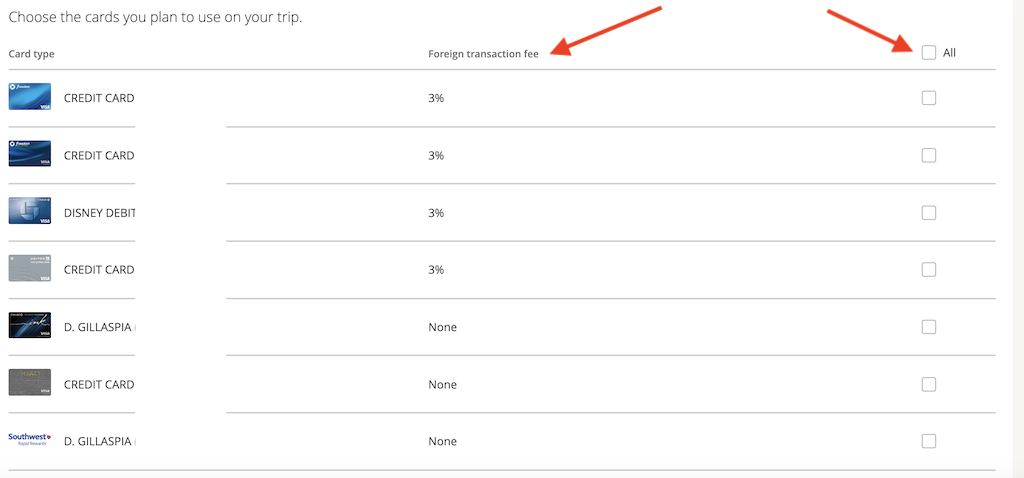
Once you click next, you will be asked to add the travel notification to specific cards.
You can choose to add the travel notification to only one or a few cards or you can select to add the travel notification to all of your cards. You can also choose to add a travel notification to a debit card so that your bank account has the travel notification on it as well.
Something that is cool about this screen is that it will tell you whether or not your cards have foreign transaction fees.
If they don’t have foreign transaction fees, that means that you won’t be charged extra to process a transaction in a foreign country. If they do have foreign transaction fees, you will be charged 3% for the transaction. That means that if you make a purchase of $100, you will be charged an extra $3 foreign transaction fee.
If you want a solid credit card that does NOT have foreign transaction fees look into getting the Chase Sapphire Preferred, which comes with a 60,000 point bonus after meeting the minimum spend requirements of $4,000 within the first 3 months.
This is worth over over $1,000 if you use points for premium airfare redemptions! Find out more details about this card here.
Once you click to move onto the next step, you will then be able to verify your travel notification and submit it.
Setting up the Chase travel notification online (old interface)
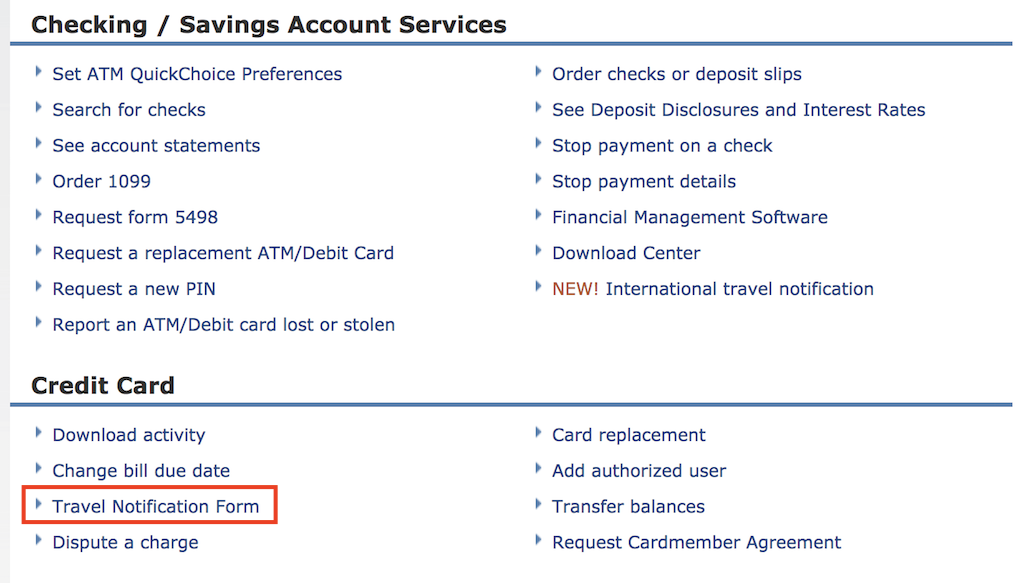
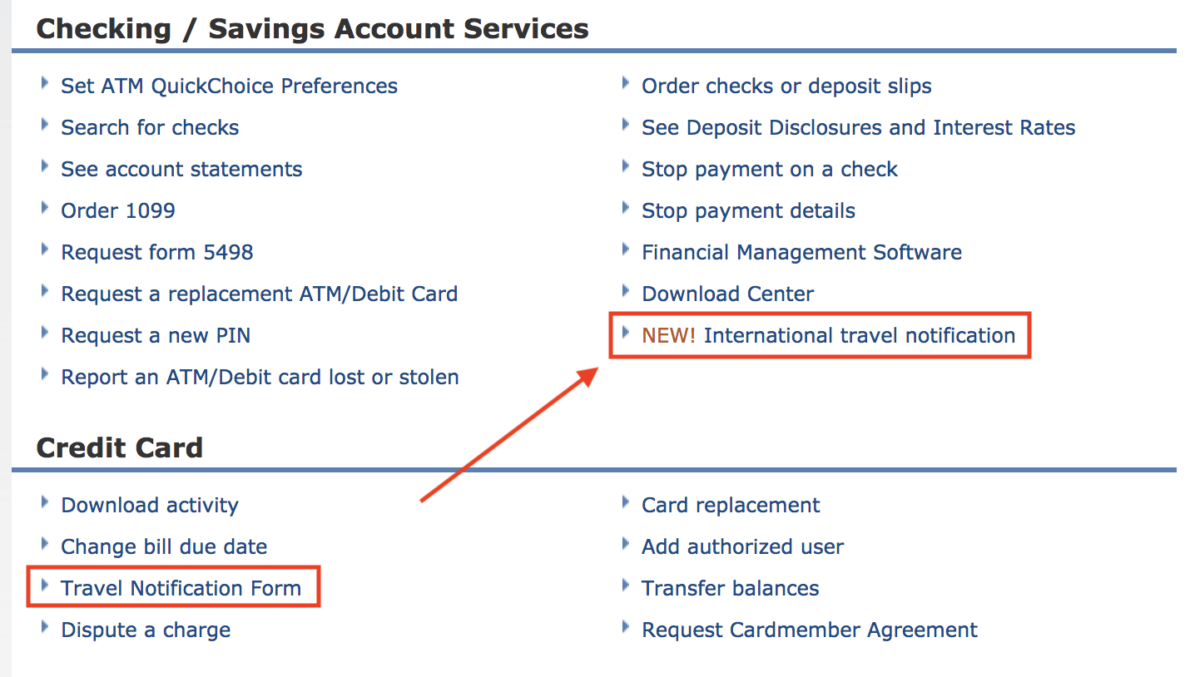
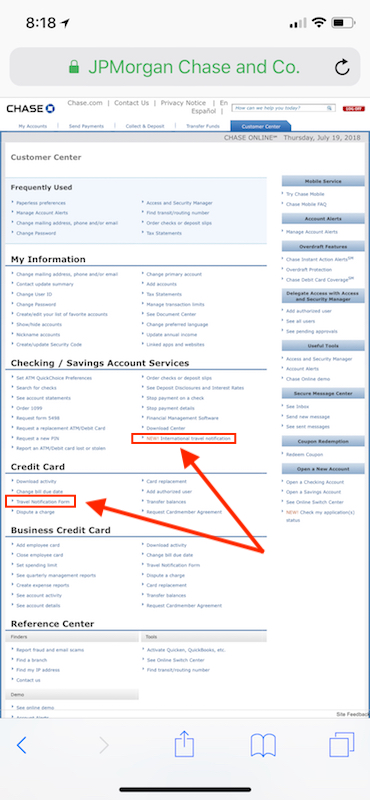
If you are somehow still working with the old Chase interface, then the directions below will apply to you. Log in to your Chase account and click on “Customer Center.” In the Credit Card section, you’ll see “Travel Notification Form” which you’ll need to click on.
That will take you to the first step of the travel notification process.
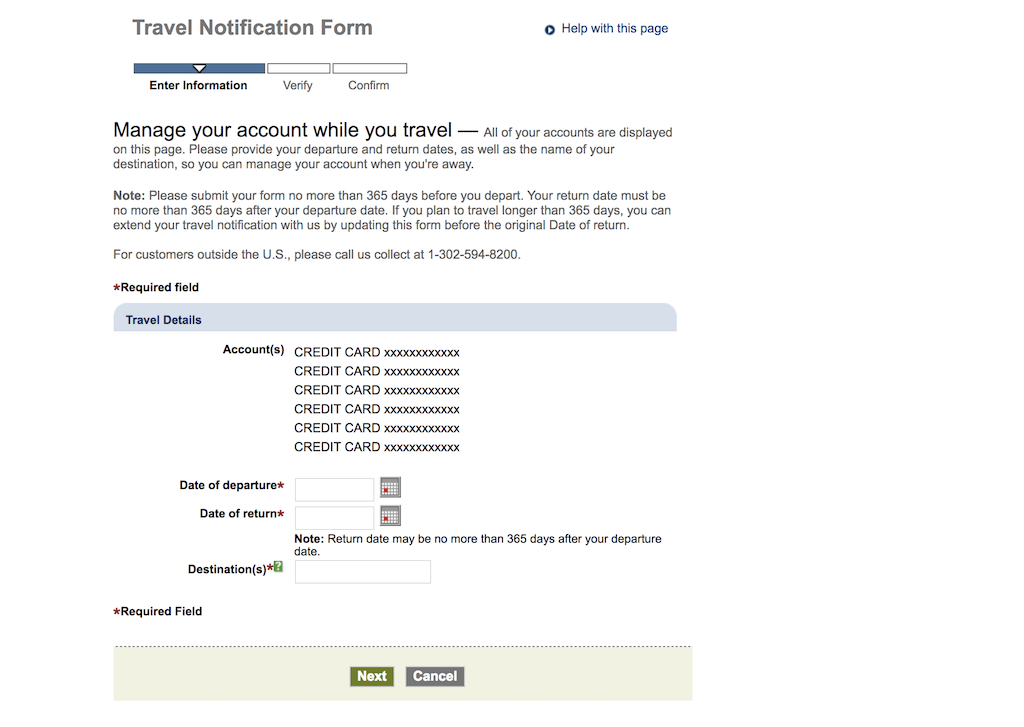
Enter Information
You can submit your travel notifications no more than 365 days before you depart.
Your return date must be no more than 365 days after your departure date. If you plan to travel longer than 365 days, you can extend your travel notification with them by updating the form before your original date of return.
When you begin to enter your information, you should see the full roster of credit card that you have with Chase. In my case, I have six credit cards with Chase.
The travel notification will be put on all of the credit cards.
All you have to do is enter in your date of departure and date of return and enter in your destinations. Chase requests that you input cities for the destination, and I’m not sure if it will work if you enter countries.
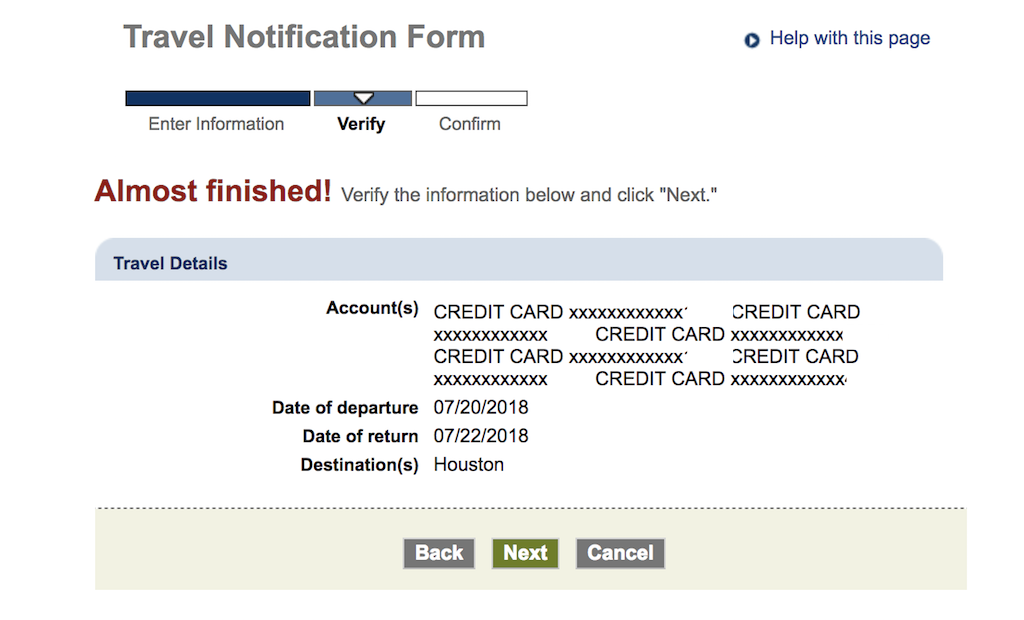
Verify your information
Next, all you have to do is verify your credit card information and your travel dates and destinations.
Once you do that you’ll move forward and confirm the notification.
Chase bank travel notice
If you need to put a travel notification on for your bank account (debit card, ATM, etc.), you can use the method above if you have the new Chase interface and simply select your debit card. But if you are still working with the old interface, the process is a little bit different.
You’ll notice in the image below that you click on a different section of the website to initiate the travel notice for a checking or savings account.
Security Check
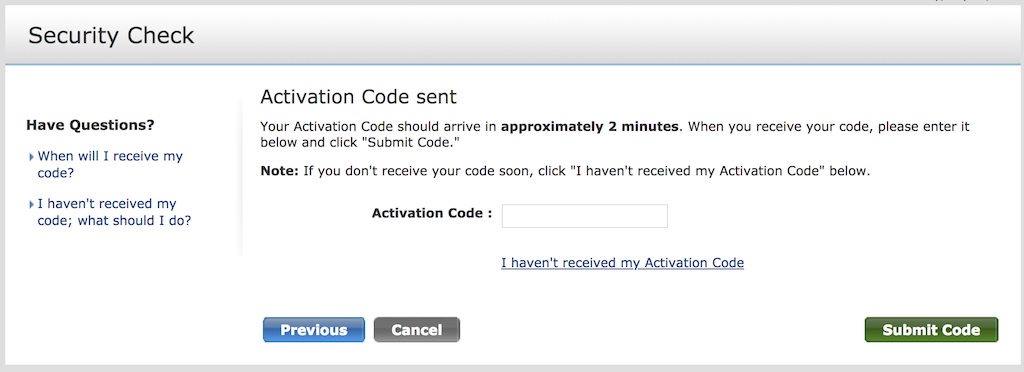
When you first try to put on your travel notifications you’ll likely be stopped and asked to verify your identity. This is done by sending either a text message or a phone call to one of your phone numbers on record.
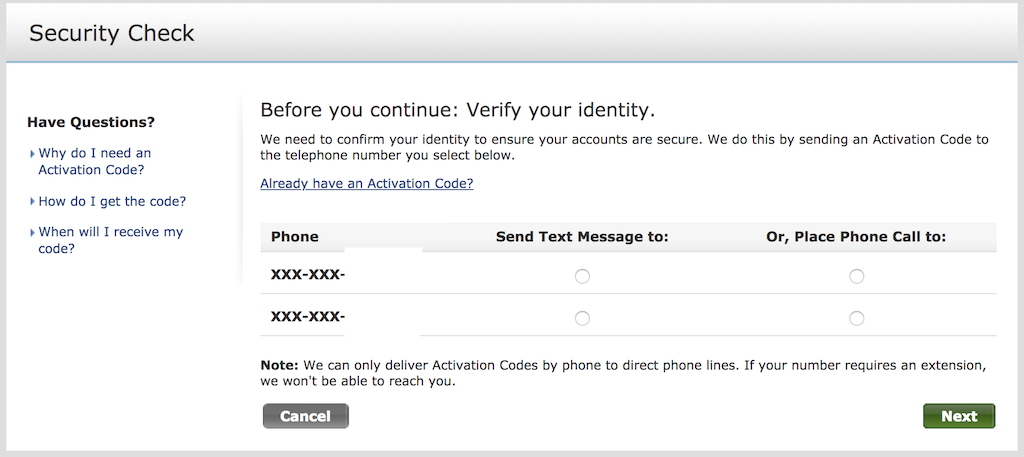
The code should arrive within two minutes (mine arrived instantly) and you should be able to enter in the activation code and verify your identity quickly.
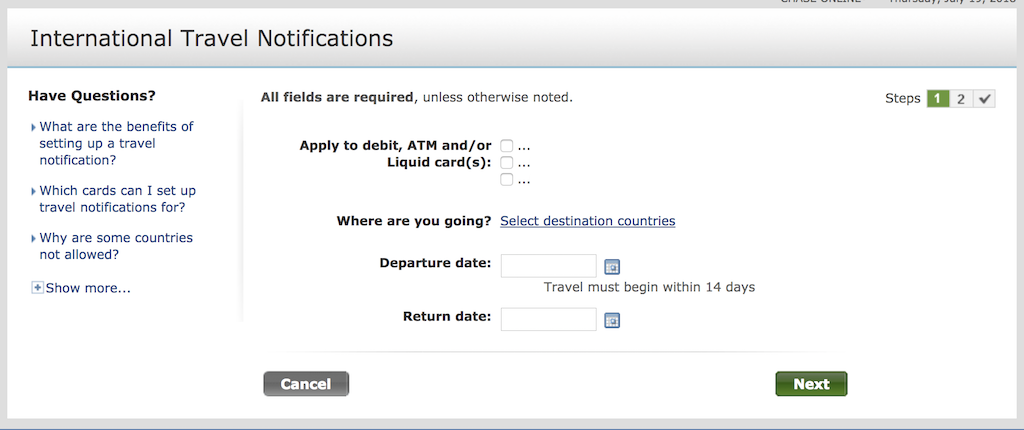
Once you’ve done that you’ll be taken to the International Travel Notifications screen where you can choose which cards you want to apply the travel notification to (debit, ATM, liquid cards, etc.)
You’ll also need to choose a destination and then also choose a departure date and a return date.
One of the big differences with the bank account notifications is that your travel must be within 14 days.
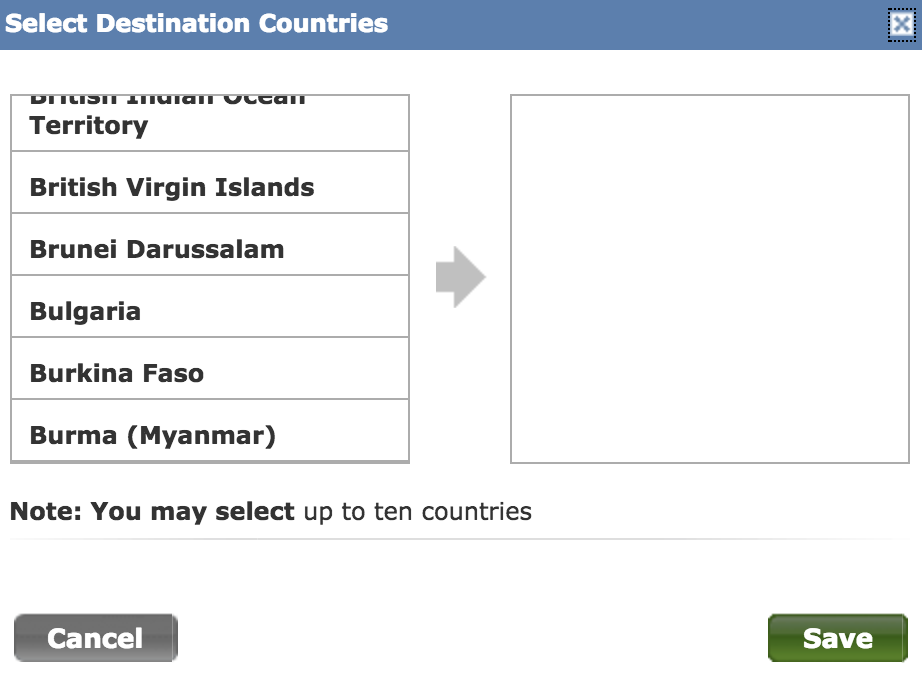
When you click on Select destination countries a small window will pop-up where you can add the countries.
Note that you can only select up to 10 countries.
To set up a travel notification for a country that’s not in the country list, call the phone number on the back of your card and inquire with Chase about that country.
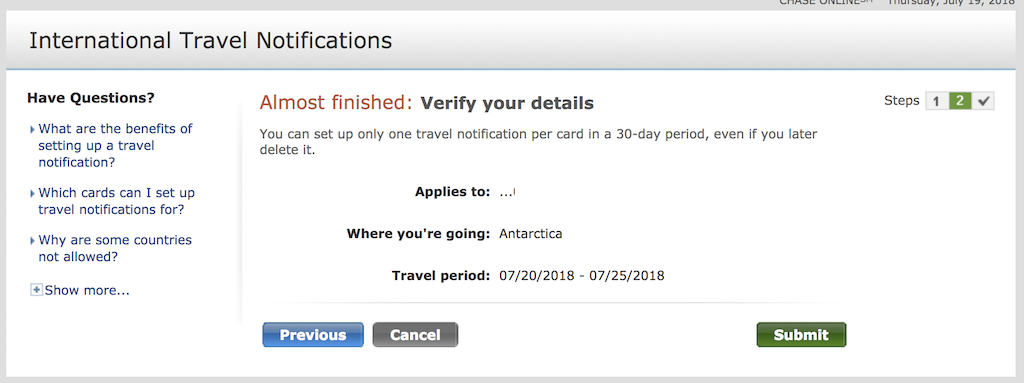
Once you’ve selected your countries, you can advance to the next step where you’ll need to verify your details. You’ll see the debit card the notification is going to apply to along with the travel period and where you’re traveling to.
Tip: Use WalletFlo for all your credit card needs. It’s free and will help you optimize your rewards and savings!
Do you need travel notifications?
Some people think that travel notifications are a waste because they are able to travel without any difficulties. But don’t fall into this trap.
Just because you didn’t have any hiccups on a trip, that doesn’t mean that other trips will be like that.
I highly recommend always putting on travel notifications.
You never know what kind of inconvenient experience might await you if you don’t bother with putting on the notifications. Since it’s so easy to add them, I really see no reason why you wouldn’t do it.
One thing that’s interesting about Chase is that if you start to do a lot of international travel, they will pick up on your travel habits. It’s not clear to me exactly how many trips are necessary, but once you start taking a lot of trips, you might not even need to put on travel notifications.
After about a year of travels, I called in to put in a travel notification for Belize one time and I was told that I no longer needed to provide travel notifications because they were aware of my frequent travel patterns. This has happened to other people in the past as well.
I’m not sure if there’s a way to disable this but I found it very convenient and felt okay with it because I monitor my transactions on a regular basis.
Still, sometimes I’ll call in just to make sure everything is fine before I depart to a foreign country just to be on the safe side. (You never know when these type of policies will be updated, changed, etc.)
Do you need travel notifications for out of state travel?
Regarding domestic travel notifications Chase states:
“No. You don’t need to set up a travel notification if you’re traveling to another state, only when you plan to travel abroad.”
My card has been denied in New York (out of my state) before because of fraud prevention and I had to call in to Chase to authorize the charge. Since, it was not abroad it wasn’t a major issue to make the quick phone call but I could have probably avoided the situation just by putting in a notification.
This is generally more of an issue for larger purchases.
So if you’re planning on spending quite a bit of money in another state or city from where you live, it might be a good idea to just call ahead of time and get them to clear the transaction.
What if your travel notifications don’t work?
If you get caught somewhere and your card is not working, then there’s one simple solution.
You can call the number on the back of your card and speak to the fraud prevention department to allow them to process your transaction. You’ll usually have to re-run the transaction when this happens.
(I usually make international phone calls with Skype for these purposes.)
Certain countries excluded
Chase notes that they “exclude certain countries from our travel notification service due to either fraud protection or to align with certain federal guidelines and restrictions.”
These are often referred to as “at risk” countries.
How will you know if a country is excluded?
You’ll know immediately after you submit your notification if they’ve excluded any of your destinations from this service. If you’re traveling to an excluded country and you need help using your debit, ATM and/or Liquid Card, just call the phone number on the back of your card.
Can you cancel travel notices?
Yes.
If you set up a notification and then later you change your mind, you can click “Cancel.”
If you need to delete a notification you’ve already set up, click “Delete Travel Notification” and follow the steps on the next screen.
Avoiding foreign transaction fees
Chase offers several credit cards that will allow you to avoid those pesky foreign transactions fees.
Two of my favorite options are the Chase Sapphire Reserve and the Chase Sapphire Preferred. But many of their co-branded credit cards like the World of Hyatt Card and IHG Rewards Club Premier Credit Card don’t have foreign transaction fees, either.
However, some of their no annual fee cards like the Chase Freedom cards come with foreign transaction fees of 3%.
If you’re wanting to avoid ATM fees when traveling abroad, Chase offers the Chase Private Client program.
The program offers:
- No fees at non-Chase ATMs and this even includes international ATMs
- Refunds for ATM fees charged by the ATM owners up to five times per statement period
- No exchange rate adjustment fee for debit card purchases and ATM withdrawals in currencies other than U.S. dollars.
- No Chase fee for all domestic and foreign wire transfers, incoming or outgoing, completed at any Chase branch, chase.com, via telephone or email.
There are a ton of other benefits related to wealth management that the program offers and you read more about Chase Private Client here.
Does the Chase app offer travel notifications?
The Chase app allows you the ability to set travel notifications. To do this, log-in to the app and click on “Profile & Settings” -> “My Settings” -> “Travel” and you will see the options for setting up your travel notices.
You can also still pull up the Chase website on Mobile to enable your travel notifications.
International travel tips
If you are traveling internationally, you might also want to check out my international travel checklist. This runs you through many different things you want to do before heading out on a trip in addition to just setting Chase travel notifications. It’s easy to forget about checking for things like how tipping works, what’s taboo, and other common questions so be sure to check it out.
Final word
Setting up Chase travel notices is not difficult and you can do it over the phone, via the app, or online — whichever you feel more comfortable with. You might also be set them up via a secured message but I’ve never given that a try.
One last reminder: always keep a photo copy or make a note of the phone number on the back of your debit or credit card so that you have a phone number you can call to sort out any potential issues and you shouldn’t have any issues.
Daniel Gillaspia is the Founder of UponArriving.com and the credit card app, WalletFlo. He is a former attorney turned travel expert covering destinations along with TSA, airline, and hotel policies. Since 2014, his content has been featured in publications such as National Geographic, Smithsonian Magazine, and CNBC. Read my bio.

You can do it on the Chase app under profile settings
Thanks — updated!