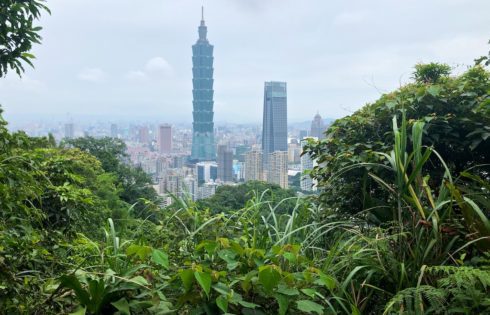
Ultimate Guide to Elephant Mountain in Taipei (象山, Xiangshan)

Elephant Mountain in Taipei is the perfect hike. It’s strenuous enough that you’ll get a bit of exercise and feel a little accomplished when you finish but it’s not so serious that you have to make extensive preparations to conquer it. Oh yeah, and it has some of the best views of Taipei.

In this article, I’ll tell you everything you need to know about hiking Elephant Mountain and give you some special tips so that you have a great experience. 

What is Elephant Mountain?

Elephant Mountain is one of the most popular attractions in Taipei, Taiwan. It’s essentially a long trail of about 600 stairs that leads you up to a series of lookout points and platforms, offering you superb views of Taiwan and especially Taipei 101.

Elephant Mountain is actually a part of a series of trails that run through the Four Beasts of Taipei (四獸山) — made up of four mountains Elephant Mountain, Tiger Mountain, Lion Mountain, and Leopard Mountain. There are different peaks you can traverse in this system of trails that will keep you busy for a couple of hours but Elephant Mountain is by the far the most popular and accessible. 

Tip: Use the free app WalletFlo to help you travel the world for free by finding the best travel credit cards and promotions!

Iconic Elephant Mountain view Taipei
The iconic Elephant Mountain view of Taipei.

How to get to Elephant Mountain 

It’s very easy to get to Elephant Mountain. If you’re taking the MRT, you’ll need to take the red line to the last stop, the Xiangshan Station (象山站). The fact that it’s the last stop makes it even easier to get to.

Once you make it to the station, you’ll pop out at Exit 2.

Exit 2 at Xiangshan Station
Exit 2 at Xiangshan Station (象山站).

If you pull the walk up on Google Maps, you’ll see that it’s about a 10-11 minute walk to the trail, which is also known as the Xiangshan Trail. (It’s also only about a 15 minute walk from Taipei 101.)

Getting to Elephant Mountain map
Getting to Elephant Mountain map.

After you exit the MRT station, you should be able to easily find signs pointing you to Elephant Mountain but note that the signs will say “Xiangshan Hiking Trail.”

Signs in park

You’ll basically follow along a park all the way to the trailhead. The park is nice and you’ll come across people working out or just going for a stroll with their pets. You’ll also see some basketball courts. Again, it’s very easy to find your way. 

Park in Taipei

Once you are approaching the end of the park, you’ll notice that there’s an incline and you’ll continue to follow the road around a curve. 

Bikes at park Taipei

As you approach the trail, you may see a stand open selling beverages. I recommend you pick up one or two bottles of water so that you can stay hydrated and stay up there as long as you’d like. I hiked this in June on a relatively cool day but I quickly ran through my water supply thanks to all of the stairs. If you desire to continue past Elephant Mountain, you’ll want extra water. 

Store front in Taipei

Finally, you’ll approach an unassuming intersection and you’ll see some stairs poking out of some lush vegetation — that’s the entrance to the Elephant Mountain trail.

It’s hard to miss with all of the signs, including the large elephant sign that I’m pretty sure anybody could understand. Also, Discovery Channel somehow found a way to brand itself in with the attraction, so you’ll see their giant logo as well.  

Stairs to Elephant Mountain Taipei

Pro Tip: It’s a good idea to apply bug spray before you head up on this hike. I started to get bit as soon as I stepped on the stairs and after I applied some insect repellant, I was good for the remainder of the hike. I don’t think you need the strong deep woods stuff — just a quality bottle will do. 

The Elephant Mountain Hike 

Anyway, once you make your first step get ready for a serious calf work out. If you’re not in great physical shape, I’d recommend to work on a stair master or walk/run some stairs for a few weeks before your trip. I had been doing a decent amount of cardio leading up to my visit but my legs still got very wobbly on the way down, but I think it wouldn’t have been so bad if I had focused on some stair work outs.   

The trail is pretty easy to follow but there is a major split toward the beginning of the trail. Stay right on the first split you come to and that will take you right to the Elephant Mountain viewpoints.

Stairs to Elephant Mountain Taipei

Usually at the splits there are helpful maps to assist you with heading the right direction, so just give them a look and you should be able to find your way okay. 

Trail guide map
Elephant Mountain map.

The main trail is all paved so you don’t have to worry about getting your shoes muddy (though there are some viewpoints that are off the trail). You’ll see lettering etched into many of the stones and bricks along the way — it would be cool to know what they say but I didn’t have a clue. 

There’s also usually railing along the trail adorned with elephants.

When it comes to the stairs, there is usually at least one side with railing you can hold on to for security. The steps aren’t super steep but there are a couple of segments that are steep enough to warrant your focus so that you don’t miss a step. 

You can opt to take each individual step or do what I did and go two steps at a time (on the more flattened steps). I even saw someone going down the steps backwards. 

If you get tired, you should be able to find a couple of benches along the way and they will also have benches at the viewing platforms that you can relax on. 

I really recommend that you take your time on this hike. Don’t forget to constantly look back at all of the different vantage points as you make your way up the trail — there are some really cool views of Taipei at pretty much every corner. 

There are also a number of interpretive panels to check out and you can learn a little bit about some of the native plants. I saw a lot of beautiful plants and flowers during the hike and some of the plants were foreign to me. 

Elephant Mountain viewing platforms 

There will be a few different platforms that are perfect for photographs. None of these are particularly large. This wasn’t a problem when I visited on a Tuesday morning around 8am but this would definitely be a problem on a weekend or holiday when trying to get photographs.

In those cases, you’ll definitely have to get there very early to make sure that you secure a spot. And I don’t even want to think about how busy Elephant Mountain gets on New Years! 

There are basically two main viewing platforms. The first is located about halfway through the trail and you can see what the view looks like from image below. 

Elephant Mountain viewing platforms.

As far as the view goes, they really are fantastic. You can set up for some sweeping views of the city and I believe that sunset would be the best time for photos. Unfortunately, I visited during the rainy season and I was not able to see any sunsets and barely ever saw any blue-colored sky. 

You’ll know when you’ve arrived to the main Elephant Mountain viewpoint because you’ll see the large elephant sign and also see the Discovery logo.

The viewpoint is covered so you can avoid the sun and/or rain if that’s an issue for you. There’s a tree surrounded by a bench in the middle of the wooden platform so you can relax there if you’d like. 

The views from the platform are fantastic. 

Elephant Mountain boulders

One of the most popular spots to hang out on at Elephant Mountain is on some of the boulders.

Elephant Mountain boulders Taipei
Elephant Mountain boulders.

There are a number of huge house-sized boulders on the trail. These boulders not only offer you some fantastic views of the skyline but you can also pose for pics on top of them for some epic shots. I didn’t have a photographer on standby and didn’t feel like bugging anybody so I didn’t opt for that shot but I would highly recommend it. 

Elephant Mountain boulders Taipei
Elephant Mountain boulders.

Many have carved their names into the boulders over the years.

Elephant Mountain boulders Taipei

They have footholds that allow you to easily climb up but some can be quite slick, so having shoes with good traction is recommended. 

Elephant Mountain boulders Taipei

Other trails on Elephant Mountain 

As you hike, you’ll see countless of trails going off the main pathway, some dropping off very steeply. These were very tempting to explore but I wasn’t in the mood for getting lost so I just passed up on them. 

You can also choose to keep going after you pass Elephant Mountain.

After I passed the main viewing area, I came across a little workout station. There were bars for doing pull-ups, dips, and they even had some weights and a bench up there. Some locals were egging me on to knock out some reps and I almost gave into the pressure but opted to chill out for a while. 

They explained the trail system to me and explained how I could continue on on a different trail that would lead me back to the MRT. One local recommended heading up to Thumb Mountain for great views. I didn’t do that but I added it to the list of things to check out next time.  

Elephant Mountain FAQs

How long does it take to hike Elephant Mountain?

Hiking Elephant Mountain can be done in a swift 12 to 15 minutes if you book it at a steady pace. But as you make your way up the stairs, you’ll see a number of vantage points perfect for photos, interpretive panels, and plants and wildlife you might want to stop to observe. You might also want to take a couple of breaks, so giving yourself closer to 30 minutes is better. 

Is Elephant Mountain free? 

Yes, this is a completely free attraction. Well, if you don’t count the energy you expend. 

What is the best time to visit Elephant Mountain?

Catching the sunset would be the best time for photos. So if that’s what you want to do, I’d advise to visit around an hour before sunset but on weekends or holidays you might need to venture out sooner than that. The hike isn’t that bad so you could end up doing it multiple times to get the timing right with the lighting and the crowds. 

Do you need to be fit to hike Elephant Mountain? 

Not really. It will help to be of at least average fitness but if you’re out of shape you should still be capable of making it to at least the first viewpoint. You might be more out of breath than others but it should still be possible. 

How many steps are there at Elephant Mountain? 

I’ve been told there are about 600 steps to get to the top of Elephant Mountain. 

Is there a cable car to the Elephant Mountain viewpoints?

No, you’re going to have to stick to the stairs as there is no cable car that goes directly to the viewpoints. 

Final word 

Elephant Mountain in Taipei is a popular tourist attraction for a reason. It’s easy to access and comes with great views of the city. I wish I visited when there was better weather because I would’ve loved to have spent more time exploring other trails and getting better photographs of the sunset. I highly recommend trying to time your visit with the sunset and sticking around for night time views of the city.  

When Is The Best Time of Year to Visit The Maldives? (Weather & Diving)

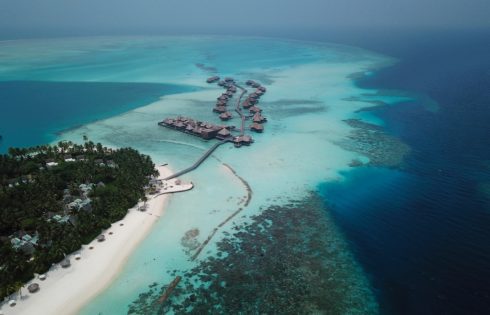
The Maldives is a dream destination for many people. It’s one of the most mesmerizing destinations with its beautiful white sands, turquoise atolls, and blue lagoons. But many people wonder “what is the best time of year to visit the Maldives?” 

While the temperatures are relatively stable year round, there are multiple rainy seasons to contend with. In this article, I will talk about the pros and cons of visiting at different times of the year and give some insight into things like weather, snorkeling, and diving.

When is the best time of year to visit the Maldives?

The best time to visit the Maldives is from January through mid-April. However, these are also peak times and other months of the year might also be good. Keep reading below for more pros and cons about the different times to visit the Maldives.

Tip: Use WalletFlo for all your credit card needs. It’s free and will help you optimize your rewards and savings!

Maldives geography

The islands of the Maldives are found in the Indian Ocean, about 310 miles southwest of India. The islands practically sit on the equator and are very flat (the Maldives has the lowest elevation of any country in the world). 

World map
Image via Wiki.

The country is made up of 22 atolls and about 1,200 islands that extend about 400 miles from north to south, making the Maldives one of the world’s most dispersed countries.

Map of Maldives
Image via Wiki.

The variety of islands and different geographical positions means that the experience can be slightly different when it comes to things like marine life and even climate to an extent. For this reason, you should always do research for these questions in this article based on your specific resort in island that you will be visiting.

Maldives from plane
Islands of the Maldives.

The Maldives rainy season

The biggest consideration you will probably have when visiting the Maldives is whether or not you should visit during the rainy season. But in order to make an educated decision on this you need to know what the rainy season actually consists of.

First, it is important to note that the rainy season can fluctuate slightly from year-to-year. Sometimes a rainy season might get started late or early so use the following as general guidelines for your planning, and always remember that mother nature cannot always be predicted with 100% accuracy. 

In addition, different sources define the rainy seasons differently and may include different months (though they are in agreement on the general time frames). There are two rainy seasons you need to be aware of. 

Northeast Monsoon season

There is something known as the Northeast Monsoon season. This occurs between October/November and March/April.  This technically is the “dry season” of the Maldives, though it depends on where you are situated within the Maldives. 

During the northeast monsoon season, you might experience some showers here and there but they will be short-lived and not very constant since this monsoon season is very mild compared to the main monsoon of the summer. If you want to maximize your odds of getting sunshine on your honeymoon then visiting between January and March is a good idea. 

Map of Indian Ocean
Image via chennaiweather1.wordpress.com.

Southwest Monsoon season

Then there is the main rainy season of the Maldives. This is known as the Southwest Monsoon season. This lasts between June/July and September/October. 

The rain showers in the Maldives during the rainy season don’t need to be feared. Like many other tropical areas, many of these rainstorms come quickly and leave just as quickly.

You might be able to enjoy a nice sunny day and just have to worry about heavy rain for a couple of hours and then get on with a clear night. Relaxing in a villa while a storm blows in can be a pretty relaxing experience. So don’t think that your trip will be ruined if you end up visiting during the rainy season, even on a honeymoon. 

With that said, sometimes heavier storms can roll in during the rainy season. When they roll in there can be multiple days of heavy rains and high winds so there is a chance that it could happen. Also, at many resorts you have to do a fair amount of walking so trying to get around in the rain could be a problem (some resorts will take you around in a golf cart). 

And of course there always could be typhoons though those are not super common given the geography of the Maldives. Because the Maldives is such a flat country and floods can be a real issue if there are major typhoons you might be evacuated. 

Rainfall graph for Maldives
Image via holiday-weather.com.

Maldives temperatures

The temperatures in the Maldives are very constant year-round. Highs will generally range from 84°F to 88°F (29°C 31°C) and lows 75°F to 81° (24°C 27°C). In other words, this is a very warm place all times of the year and you can count on it being in the lower 80s pretty much all the time.

When the sun is constantly shining it can get pretty hot but one great thing about the Maldives is that it receives some pretty nice ocean winds. If you book a water villa you will find that sitting out on the deck can be a very breezy experience. 

In fact, the breezes were so strong when we visited that we were able to enjoy the hot tub out on the deck (which I initially thought would be way too uncomfortable given the hot temperatures). 

It is also a very humid place as you would expect with it being located so close to the equator. The high-level of humidity and moisture in the air can be an issue for some electronics. When I visited the Maldives my DSL camera (Canon 6D) actually stopped functioning for a couple of days because it got too much moisture from the humidity alone. So this is something that you want to be careful of year round. 

The sea temperatures are also very stable. They range from 82ºF to 86°F (28°C to 30°C), so you can expect warm water, even in the middle of winter (a wet suit will not always be needed). 

Hot tub overwater villa Maldives

Maldives coral reefs

Extreme temperatures from El Nino in 2016 bleached and killed 73% of shallow-water corals within the Maldives. This means that many coral reefs will not be super vibrant when you go snorkeling (when you go diving it is a different story). With that said, I was still pretty happy with the amount of marine life that inhabited the bleached coral reefs. You can read about our snorkeling experience here.  

Fish and coral Maldives

Tip: Use WalletFlo for all your credit card needs. It’s free and will help you optimize your rewards and savings!

Best times of year to visit the Maldives

January, February, and March

January, February, and March are the best times to visit the Maldives in my opinion. This is because the rain is at bay and you will be able to enjoy many nice sunny days. In addition, the water is very clear at these times so visibility is fantastic for snorkeling and scuba diving.

The drawback of visiting at this time of year is that the peak season is upon you. Prices at some resorts can skyrocket during holidays so you need to be careful about which specific days you’re visiting. 

April

April is a great time to visit the Maldives as it is the very beginning of the rainy season and the end of peak season. The prices and availability should be much better beginning in April versus peak times during the winter.

Visibility for snorkeling and scuba diving should still be pretty great in April. I believe the spring is the mating season for Titan Triggerfish. These fish are extremely territorial during mating season and so if you are snorkeling for scuba diving during the spring be on the lookout for them.  

May

May is when the rainfall really starts to pick up. In fact, May can be one of the wettest months of the year in the Maldives. Visibility in the ocean also begins to drop a bit. That is not to say that you can’t still have fantastic dives during May it is just not going to be quite as clear.

April and May is also the time of Ramadan. The Maldives is a pretty liberal Muslim country whenever it comes to things like tourists at resorts eating pork, consuming alcohol, etc.

However, during Ramadan things could be a little bit different at some places (especially Malé). In many cases, though, you may not even notice a difference at resorts but just be prepared to be flexible with things like meal times. 

June July, August

During the months of June and July the rain can continue on to the summer. The rain does tend to calm down in July so it is not quite as wet as June. Keep in mind that even during the rainy season you are still getting an average of seven hours (or more) of sunshine during the summer months.

Visibility is not the greatest but this can also be a fantastic time to swim with whale sharks and manta rays. July can be a good time for surfing in the Maldives at certain islands. Once August arrives the rain will kick back up and the month will be much wetter. 

September and October

September and October have the potential to be the wettest months in the Maldives. So if you are trying to avoid the largest monsoons then I would avoid visiting during these times. The plus side is that this is whenever you might be able to find some of the cheapest hotel prices and there’s still a lot of sunshine. Also, this continues to be a good time to see large marine life like manta rays and whale sharks. 

November and December

November is the end of the rainy season and his when things start to calm down. You will still experience some showers but they are usually pretty manageable. 

Prices and availability can get difficult to find during the holidays such as on Christmas or New Year’s so you need to be mindful of that. It’s not uncommon for prices to triple or for there to be certain minimum stay requirements for booking during peak times like that. 

Whale shark and diver

Best time of year for whale sharks and manta rays

In some places in the Maldives you can find manta rays and whale sharks year-round. But remember, we are talking about over 1,000 islands spread out across many atolls so the times of year that are best suited for seeing them is going to differ.

Also, sometimes you can see both whale sharks and manta rays at the same time of year but in some locations you may only see one or the other.

For example, we visited the South Ari Atoll, which has whale sharks year-round and manta rays October through May. When we visited in February we had an amazing encounter with manta rays on a scuba dive. It truly was a magical experience. However, we did not see any whale sharks during our time underwater or when snorkeling. 

So if you really want to see whale sharks or mantas I would suggest that you contact the resort that you want to stay at and ask them about the peak times for that specific marine animal.

For example, while you can find whale sharks year-round, August to November might be the peak time for seeing whale sharks at the South Ari Atoll. 

Just remember, we are talking about mother nature here. Patterns can change and fluctuate from year to year so in some cases the peak season can change a little bit. That is why I would always make sure to contact the resort to try to get the most updated information (in fact, I would contact multiple resorts in the same area just to see if I can get corroboration on the data).

Manta ray

Final word

The Maldives is one of those destinations that really doesn’t have a bad time to visit. Even if you visit during the rainy season, it’s not that bad. The storms may not last that long and in some cases can be a beautiful sight to watch form out over the ocean. Plus, you can take advantage of the discounted hotel stays. 

If you visit during peak time, you will have to deal with peak prices but you also will get the best weather and fantastic diving and snorkeling conditions.  

The Conrad Maldives Underwater Restaurant Ithaa Review: Worth It?

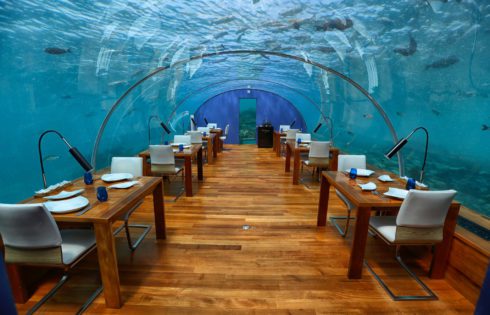
On our recent stay at the Hilton Conrad Maldives we decided to splurge one meal and try out the famous Maldives underwater restaurant known as “Ithaa.” Ithaa means “mother of pearl” in Maldivian and it’s known for being the first underwater restaurant in the world (although now there are others). Here’s what it was like to go for lunch at this Maldives underwater restaurant.

Where is the Maldives underwater restaurant Ithaa located?

The Ithaa restaurant is located at the Conrad Maldives Rangali Island. The restaurant is actually located at Rangalifinolhu Island, which is one of the other islands of Alif Dhaal Atoll that along with Rangali Island make up the Conrad Maldives.

Don’t get Ithaa confused with Hurawalhi, which recently built an even bigger undersea restaurant called 5.8.

Tip: Use WalletFlo for all your credit card needs. It’s free and will help you optimize your rewards and savings!

Booking reservations at Ithaa

We emailed the Conrad about a month prior to our visit and made reservations for two people. I’d read that you can request reservations 2 weeks prior to your visit, but I highly suggest that you contact the Conrad before that to ensure that you’ll have a spot reserved for your desired date.

How much does the Maldives underwater restaurant Ithaa cost?

We were informed that it would cost $210 USD + taxes per person for lunch and the final check came out to $566.72.

I used the American Express Hilton Aspire $250 Hilton resort credit and a $200 Hilton gift card I’d received to knock the effective cost down to around $116 so that made me feel a little better about the splurge.

Maldives underwater restaurant (1)
Ithaa restaurant (located in the middle of the photo) seen from above.

In addition to lunch, you can also visit Ithaa for cocktails from 11am to noon for $75 plus taxes (I believe that only covers one glass of champagne). Dinner starts at $325 per person plus taxes and kids are not allowed for dinner. The dress code is smart casual but you can wear shorts like we did (though for dinner I believe they request that men wear pants.)

I actually don’t mind splurging on some experiences like private helicopter tours or diving excursions but I’ve never cared to splurge on dining. But this meal had enough of an “experiential element” to it that I thought I’d give it a try. Plus, Brad had really wanted to try it out so we went ahead and booked the lunch.

Entering the underwater restaurant

Ithaa is about 5 meters under the sea and the entrance is located at the end of a pier, near the Conrad’s main pool area. It’s also on the same pier as the Sunset Grill, which is another beautiful restaurant at the Conrad. You actually have to walk through the Sunset Grill to get to Ithaa.

Maldives underwater restaurant (2)
The entrance to Ithaa.
Maldives underwater restaurant 22
Walking to the entrance of the restaurant.
Maldives underwater restaurant 23
The entrance to Ithaa.

We walked down the pier and made our way into the small building that housed the entrance to Ithaa. From the deck, you can look down and see the underwater restaurant from above.

Maldives underwater restaurant 1 (1)
The Maldives underwater restaurant from above the water.

The inside of the entrance has a mini-lounge which looks like an area you can rest up in while waiting for the restaurant to open. (We were admitted early to get photos.)

Maldives underwater restaurant 2 (1)
The entrance to Ithaa.

Once inside, you’re directed to take your shoes off, so be sure to have presentable feet/socks. You then make your way down a staircase, and within seconds, you’ll walk right into one of the most stunning restaurants on the planet.

Maldives underwater restaurant 25
Maldives underwater restaurant at the Conrad Maldives Rangali Island.

It truly is a beautiful sight to behold when you first walk in. Soothing music plays in the background. Fish start popping up all over the place. Dom Perignon bottles tempt you from afar. The entire scene is a bit surreal.

Maldives underwater restaurant 26
Maldives underwater restaurant 27
Maldives underwater restaurant 19
Don’t be fooled — the bottles are empty!

Like many other people, we’ve walked through aquarium tunnels before but it’s quite another experience to be walking in the midst of real marine life darting in and out of a real coral reef in the middle of the Maldives!

The first thing I noticed were the black tip reef sharks circling the tunnel. We counted at least five different black tip sharks though there could have been more. These were the same reef sharks that we often saw swimming near our overwater villa.

Maldives underwater restaurant 14
Black tip shark.

They feed the fish just as lunch is beginning so I’d say there’s a high likelihood that you’ll also see the sharks and many other marine animals if you visit. They actually go into a bit of a feeding frenzy around feeding time so have your camera ready for that.

Maldives underwater restaurant 29
More sharks.

There are many other fish to check out including many pufferfish, angel fish, parrot fish, and plenty of others.

Maldives underwater restaurant 12
Fish at the Maldives underwater restaurant.
Maldives underwater restaurant 10
Fish at the Maldives underwater restaurant.
Maldives underwater restaurant 6
Puffer fish.

And for those Finding Nemo fans, you’ll be happy to see there are a few sea anemones housing clown fish.

Maldives underwater restaurant 16
Clown fish!

If you love the ocean and especially if you enjoy snorkeling and/or scuba diving, this place is made just for you. In fact, it was difficult to focus on enjoying the meal sometimes because I was completely fixated on all of the different marine life that were making special appearances.

Maldives underwater restaurant 2
“Let me snap this pufferfish real quick.”

There are only seven tables in the restaurant but that makes the setting all the more enjoyable and intimate.

Maldives underwater restaurant 9

Once the meal begins, you can choose any unoccupied table you’d like. During our lunch, there were three other couples attending so there were a few open tables.

Maldives underwater restaurant 28
We chose a table in the corner.

The tables come with aquatic-inspired plates and uniquely shaped cutlery. The brown tables and wood flooring contrast brilliantly with the surrounding blue water. It’s also a cool and soothing sight to see the sunlight casting wobbly reflections inside the restaurant.

Maldives underwater restaurant 8
Maldives underwater restaurant 7
Check out the design of those knives.

Tip: Use WalletFlo for all your credit card needs. It’s free and will help you optimize your rewards and savings!

The lunch experience

We were first brought out a selection of breads which were very fresh and tasty.

Maldives underwater restaurant 4
Fresh bread.
Maldives underwater restaurant 5
Fresh bread.

For the first course — the appetizer — we were given butter poached lobster and white peach salad, served with Madlivian tuna and viniagrette. The salad had a nice balance of sweet and savory and was very fresh. I also dug the presentation.

Maldives underwater restaurant 11
Butter poached lobster and white peach salad.

The second course was the entree that consisted of artichoke and roasted garlic veloute, served with caviar, five spiced foam, and toasted brioche. The soup was heavy in texture but light on the flavor. The caviar and bread (which was slightly sweet) provided a nice touch, though.

Maldives underwater restaurant 13
Artichoke and roasted garlic veloute.

We decided to upgrade Brad’s dish for the main dish (for $40) so he went with the charcoaled reef lobster gratinated with saffron and espelette chili hollandaise and served with avocado mash, corn tiles, and beetroot tortellinili. Brad loved the lobster and the sauce served up with it, especially after squeezing some fresh lemon on it.

Maldives underwater restaurant 17
Charcoaled reef lobster.

For the main dish, I decided not to upgrade so I could try out the other main dish option. So I went with the sous vide bresse chicken with chanterelle mushroom risotto and blue stilton froth. This was actually stepping out of my comfort zone since I always avoid mushrooms but I’ve learned that gets very hard to do when traveling a lot and eating at nice establishments. The dish was excellent, though.

Maldives underwater restaurant 15
Sous vide bresse chicken with chanterelle mushroom risotto and blue stilton froth.

Finally for dessert we were served the honey roasted pumpkin cheesecake. I didn’t taste a whole lot of pumpkin with the cheesecake but it was still a very sweet and delicious dessert.

Maldives underwater restaurant 21
Honey roasted pumpkin cheesecake.

And as a final treat, we were given two small handmade chocolates, which were nice and wafery.

Maldives underwater restaurant 1
Homemade chocolates.

Overall, I didn’t really have any complaints about the food. The only complaint was that no champagne was included with a $560 lunch. I didn’t exactly expect free flowing Dom Perignon, but you would think paying that much could at least get you a single glass of bubbly to kick things off (only the dinner gets that).

Maldives underwater restaurant Ithaa menu

You can check the lunch and dinner menu online by using these links. Note that our lunch menu was a little different. Here is the menu we received for lunch:

Maldives underwater restaurant 3
Maldives underwater restaurant menu.

Three things to note about your underwater experience

It’s bright

The underwater restaurant is very bright and reflective (at least it was for lunch). I would highly recommend to bring your sunglasses because you will probably be wishing you had them if you failed to bring them.

Maldives underwater restaurant 20
Sunglasses are needed down there.

It’s warm

The second thing to note is that the restaurant is quite warm. While there are AC units built into panels running alongside Ithaa, it still gets pretty warm down there. So bring clothes that will keep you cool. My guess is that it might have to stay warm down there given the temperature of the water so I’m not sure there’s too much they can do about the temperature but you could always ask if it gets bad.

Maldives underwater restaurant 18
The AC vents only do so much.

It could use some scrubbin’

And finally, as one downside to the experience, the acrylic walls of the tunnel did show their age. I know that they clean the glass often but I couldn’t help but notice some major nicks and debris collecting on the outside of the tunnel. In fact, a lot of my footage didn’t look very appealing because of this. I understand it’s probably impossible to keep everything spotless but it wasn’t in as good of shape as I thought it would be.

Was it worth it?

As someone who doesn’t care to splurge on meals, I found the $560 bill a bit challenging to justify. Had champagne been included in that bill, I think I would’ve felt differently. It was still a very memorable experience and it’s such a unique environment to enjoy a meal in that I didn’t feel like I got ripped off or anything. But like many things in the Maldives, the prices can leave you questioning, “was that really worth what I just paid?”

So was it worth it? I’d say it was worth it to experience it all one time for the novelty and for the views but it’s not something that I’m in a rush to spend several hundred dollars on again.

Food Tour Through the Streets of Tokyo Review

When we visited to Tokyo, we wanted to try out some very cultural experiences and a night food tour through the streets of Tokyo seemed like the perfect option. We spent about four hours trying out all sorts of dishes that I’d never tried (or even heard of) and learned a ton about Japanese culture while exploring different parts of Tokyo that I probably would have otherwise never seen. The experience was definitely one of my favorite all-time things to do when traveling, and I’d highly recommend this tour with Urban Adventures to anyone looking to do a food tour in Tokyo.

Tip: Use WalletFlo for all your credit card needs. It’s free and will help you optimize your rewards and savings!

The tour

Our tour started with meeting at the plaza at JR Yurakucho Station at around 5pm. We’d just finished up a Japanese green tea ceremony on the other side of the city and didn’t have much time to spare, so we hopped into a taxi to make our way over to Yurakucho Station.

Tokyo Skytree from taxi
The sun setting behind the Tokyo Skytree.

At Yurakucho Station, we waited for only a couple of minutes in the busy plaza right outside the station. Our guide, Meg, picked us out from the crowd with ease and then found the other couple that we would be going along with. We only had four people total in our tour, but I know they can accommodate additional people if those slots are booked. I really liked only having four people in our group, though, as it allowed us to have a more intimate experience.

Meg first took us through some interesting alleyways underneath the train tacks that were lined with different restaurants and decorated with Japanese lanterns.

Restaurant lined alleyway Tokyo

Some of the alleyways were really picturesque.

Restaurant lined alleyway Tokyo

As we made out way through these narrow corridors (and throughout the entire tour), Meg had endless facts to provide us with about Tokyo, Japanese culture, and of course, food. I honestly kind of wish I would’ve been taking notes, because it was all really fascinating info.

Restaurant lined alleyway Tokyo

One of the more interesting sights were the hanging squids and other forms of seafood out on display at some places.

Squid on Tokyo food tour

We then arrived to the first restaurant, a smaller pub-like venue, which I believe is a pretty popular spot in Tokyo. Luckily, the guide takes you there before the rush, so you don’t have to deal with the crowds.

We started off with a round of drinks. The other couple went for Japanese beer while Brad and I went for hot sake and our guide went with a bottle of cold sake.

Hot sake on Tokyo Food Tour

I learned a lot about sake. First, “sake bombs” are definitely an American/fratboy invention and not something Japanese people are accustomed to. The thought of mixing sake with beer while barbarically slamming the table to drop a cup of sake from two chopsticks overhanging the glass seemed to humor everyone (understandably so). Second, just as many people drink sake hot as they do cold — I always thought hot sake was the norm. Third, Japanese people serve sake in little glasses, which they use to slowly sip the sake, rather than downing them like big shot glasses. Good to know (now). 

While we downed some drinks the chef labored right in front of us through the glass.

Chef on Tokyo Food Tour

After a few minutes, we were brought two plates loaded with different foods on skewers. On one plate, we had Shiitake mushrooms, ginkgo nuts, fried tofu topped with soy sauce, ginger, spring onions and bonito flakes (dried fish) in one plate. I’m not a mushroom eater but I did try the shiitake mushrooms and didn’t think they were bad at all. The ginkgo nuts had a weird fleshy texture to them but were alright and the fried sushi, even with bonito flakes (dried fish flakes) covering it, was actually delicious. Big props to the chef.

Tokyo Food Tour

Our other plate was really packed with protein. It came with chicken wings, shishitou peppers, asparagus and bacon, pork and shiso (perilla), and chicken breast topped with picked plum paste and shiso, all seasoned with salt, cooking sake, and leek. I don’t think there was a single item on this plate that I didn’t enjoy eating.

Tokyo Food Tour
(No, that’s not a corn dog on the right.)

If you’ve never tasted shiso (perilla), it’s pretty phenomenal. It’s not easy to pin point the taste because it’s got a little bit of an herb taste, cilantro taste, and even a little citrus/mint flavor going on. I’d never had anything like it before but I fell in love with it as did most of us, though the guy next to me didn’t care for it. 

The shishitou pepper we had is seriously fascinating. The peppers are usually sweet but about one out of every ten of these peppers is really spicy! It’s like Russian roulette but with vegetables — you never know what you’re going to get until you bite into it. A guy in the other group was the lucky one to get a spicy pepper and from what I could tell by the redness of his face, it was very spicy.

Tokyo Food Tour

After a couple of sake rounds and trying out all these delicious dishes and seasonings, we made our way to the subway to head to the next destination. Our guide had already pre-paid for our tickets so we got in and out in a breeze.

Subway in Tokyo

The next stop was for sweets. We stopped at this place in Tokyo called Ginza, a popular upscale shopping area of Tokyo, recognized by many as one of the most luxurious shopping districts in the world.

Crossing in Tokyo

The streets were pretty alive as we were there on a weekend night.

Store fronts in Tokyo

You’ll find all of the big name shops there like Gucci, Louis Vuitton, Armani, etc. It’s basically like NYC’s 5th Ave or London’s Oxford Street.

Crossing in Tokyo

It even has one of the crazy-busy crosswalks.

Crossing in Tokyo

Finally, we arrived at the sweet shop, where we ordered something called “anzu daifuku.”

Tokyo Food Tour
The sweets shop.

Anzu = apricot and daifuku is the name of the sweet that has rice cake (mochi) filled with red beans (anko). I really don’t think I could ever explain the taste and texture of the mochi if I tried a million times but of course I’ll try.

Anzu Daifuku Tokyo
Anzu Daifuku

Anzu daifukugot has got this very gooey texture on the outside and then a slightly tart apricot taste that’s balanced by the red bean flavor quite nicely. It took me a couple of bites just to process the weird tastes and textures but it was definitely tasty and I finished mine.

Then it was off to Tsukishima. Tsukishima is known for the large number of restaurants that you find lining the streets. We ate at one of the coolest places I’ve ever been to while there. It’s a lively place where groups of people come together to have a few drinks and cook up a meal together. At this place, it’s like having your own little hibachi grill at your table, except you are in charge of cooking the meal! (If you don’t want the responsibility you can request for someone else to take charge or at least assist you).

Tokyo Food Tour

Our guide helped us pick out some ingredients to combine for our meal and we chose monjayaki. This dish originated in Tsukishima and is what Tsukishima is known for. It’s basically a batter put together of different ingredients that I definitely was not able to discern with my taste buds. The batter is then pan fried until it begins to caramelize, so that you can then scrape of pieces of the monjayaki and eat it as it cooks. The process is kind of difficult to explain but it’s a lot of fun to partake in.

Tokyo Food Tour

We all got to try our hand at cooking.

Tokyo Food Tour

At first the batter looked a little iffy, but once cooked, I realized why so many Japanese people love this stuff. Hint: it’s delicious. 

Tokyo Food Tour

The second dish was okonomiyaki, which is similar to Monjayaki and takes on the same concept of pan frying the batter until it’s ready to be eaten.

Okonomiyaki is basically a Japanese savoury pancake and some even call it a Japanese pizza. The batter is made of flour, grated nagaimo, water, eggs, cabbage, and usually contains other ingredients including meat (or seafood) and vegetables.

Tokyo Food Tour

We then finished off our meal by making these chocolate egg rolled omelettes, which were a nice way to end the meal.

Tokyo Food Tour

By the end of the night, I was absolutely stuffed and tired. We’d been roaming Tokyo four over four hours and eaten a fair amount. I’d held off from eating before the tour to make sure I’d be hungry but I still was very full by the end of it.

Our guide Meg really made this experience for us. She’s very talented at her job and has encyclopedic knowledge about Tokyo and Japan in general. She’ll be able to tell you everything you need to know about the foods you’ll try and also help you out with inside tips on things to do and places to see in Tokyo. If you book this tour, hopefully you’ll get her or someone just as talented.

I recommend you to book early in advance as much as possible, though, because these food tours fill up quickly! 

Final word

Wandering through streets and alleyways that we would have never discovered on our own and trying out tons of different Japanese dishes that again, we would have never known about, was a tremendous cultural experience. We learned so much about the city of Tokyo, other places to see, and had a lot of fun and lively conversation through the night. This food tour through Tokyo was the highlight of my time spent in Japan and definitely one of my favorite things to ever to do. I’d rebook this tour in a second and do it all over again, so I highly recommend it to anyone looking do something cultural in Tokyo.

Guide to Booking Award Flights with ANA

The reward program for ANA has some very valuable sweet spots for both economy and business class redemptions to pretty much every corner of the globe. In addition, it’s pretty easy to rack up ANA miles from transfer partners making it a solid option for redemptions. However, the booking rules can be a bit confusing to comprehend. Here’s a guide for booking flights with both ANA and ANA partner airlines with ANA miles.

Star Alliance

ANA is a member of the Star Alliance, the largest airline alliance out of the big three (One World, Star Alliance, and SkyTeam). This means that you can use your ANA miles to fly on any of these other airlines (subject to availability).

Star_Alliance logo and members

The trick is to find availability for seats that can be booked with Star Alliance partners. The good news is that ANA is one of the best sites to perform searches for Star Alliance partner availability. Read about how to find Star Alliance availability here.

ANA Partners

ANA also has several non Star Alliance partners that you can book with.

Screen Shot 2016-04-10 at 10.22.32 AM
ANA non-alliance partners

How to Get ANA miles from credit cards

MEMBERSHIP REWARDS LOGO

Aeroplan is a transfer partner of  two major reward programs:

  • American Express Membership Rewards (1:1 ratio)
  • Starwood Preferred Guests (1:1)*

*Remember, when you transfer Starwood points in increments of 20,000 you receive an additional 5,000 in miles, so 20,000 points will earn you 25,000 Aeroplan miles. In addition, Starwood will often run promotions where you can earn additional bonuses on your transfers, such as up to ~25%!

ANA CARD
Just don’t

There’s also the ANA Card USA. It has an annual fee of $70 and offers 5,000 miles upon your first purchase. This abysmal sign-up bonus should be a last resort and I would only consider it if you just had to have the 5,000 miles and had exhausted all opportunities with American Express. 

Unique program policies

ANA has a few unique program policies. For example: 

  • You can book trips for up to 10 family members but they must all be registered
  • You can pool points with other family members but they must be registered and you must “apply” while paying for the application fee with 1,000 ANA miles
  • You can put reservations on hold for 24 to 48 hours by calling in (although YMMV)
  • Cancellations cost 3,000 ANA miles per person

In addition to these unique policies, there are several other booking policies. I don’t wont to bog down readers with all of them, so here are some of the important ones:

  • You must begin your trip within one year of ticket issuance
  • You can apply from 9:00 a.m. (Japan time) of 355 days before your boarding day (not including the date of departure) until 96 hours before departure.
  • You are able to change the boarding date or flight up to 24 hours before departure.
  • The name of the passenger, and the name of the individual supplying the miles cannot be changed.
  • The airline, passenger, sector, and route cannot be changed. (However, in certain cases where both ANA and Air Japan operate flights over the same sector, passengers may switch between the 2 airlines.)

ana-airways-logo
ANA definitely implements some unique booking policies

Fuel surcharges

You are almost always going to incur fuel surcharges when using ANA miles to book award flights. However, United Airlines is an exception, and thus can be a very valuable partner to redeem miles with. Air Canada and Air New Zealand are also great partners to use to avoid or mitigate charges.

The surcharges imposed by ANA aren’t the highest in the industry and many can be quite reasonable, but they are often pretty much impossible to avoid unless you book United Airline/Air Canada flights. For a closer look on fuel surcharges, keep reading further.

Screen Shot 2016-04-10 at 6.11.32 PM


Stopovers and Open Jaws

The rules section for “transfer partners” on ANA’s website is a little unclear but after playing around with bookings on the website and calling in to verify, I realized that the below rules apply to both ANA bookings and bookings with Star Alliance partners

1) One stopover is allowed on either leg

2) One open jaw is allowed subject to the following rules:

  • When the point of departure and final point of destination differ, both locations must be within the same country.

This means you can fly out of Chicago and come back to Houston, for example. (Confusingly, many regions like Europe and the U.S./Canada are considered one “country.”)

  • If the destination of your outbound trip and the point of departure of your inbound trip are different, they must be within the same area.

This is what confused me because they use the  term “area” versus “zone” and then they provide a small chart that doesn’t completely describe the areas. (See the chart below.) Thus, if you’re wanting to explore options for open jaw for inbound flights, I suggest experimenting with the website or calling in to see if the destination of your outbound trip and point of departure of your inbound trip fall within the same “area.”

November 25, 2016 update: the website is clearer on this point now.  

Screen Shot 2016-04-11 at 1.34.31 PM

  • For zones in which the destination of your outbound trip and the point of departure of your inbound trip are different, the required number of miles will be calculated by halving the required number of miles for each zone and adding them together.

The stopover can be combined with the open jaw rules for pretty flexible routing that can somewhat make up for the lack of one way redemptions in some cases.  For example, I was able to book the following on the website:

  • Outbound trip:
    • IAD -> LHR [stopover] -> CDG
  • Inbound trip:
    • LHR [open jaw]-> IAH [open jaw]

I called in just to make sure that this was a valid booking and didn’t get a 100% yes — it was more like, “we are pretty sure you can do that but the only way we can tell you for sure is if you transfer miles to ANA…” Thus, while this route should work according to the rules above, I’d always try to double check with ANA before planning on such a booking.

ANA sweet spots

ANA has several sweets spots that are worth mentioning.

Here’s a summary of the sweet spots for ANA:

  • North America to Europe
    • Business class: 88,000 miles
    • Economy: 55,000 miles
  • North America to South America
    • Business class: 88,000 miles
    • Economy: 55,000 miles
  • North America to Africa and the Middle East
    • Business class: 104,000 miles
    • Economy: 65,000 miles
  • North America to Japan 
    • Business class: 75,000 miles
    • Economy: 40,000 miles
  • North America to Asia 1
    • Business class: 80,000 miles
    • Economy: 45,000 miles

Keep reading below to see details on booking these sweet spots and to see how much you would pay on fees.

North America to Europe

ANA offers one of the cheapest and most efficient ways to get to Europe with award bookings. Take a look at the award chart below.

Screen Shot 2016-04-10 at 6.27.02 PM

Notice the sweet spot from North America:

  • 88,000 in business class

Compare that to the following

  • Aeroplan: 110,000 miles
  • American Airlines: 115,000
  • Delta: 125,000
  • United: 115,000 miles (140,000 miles if booked with alliance partner)

Here’s a real world example of a flight between IAD and LHR. First, you can see how much this trip would cost on United’s website.

Screen Shot 2016-04-10 at 11.15.16 AM

Screen Shot 2016-04-10 at 11.14.37 AM
United offers flights from North America to Europe for 115,000 miles but only if you fly with United. Partner airlines require 140,000 miles!

So you’d be looking at 115,000 miles assuming you were able to find United availability. If you booked the same trip on another partner airline, you’d be looking at 140,000 miles!

Now, take a look below at how much this same flight would cost with ANA miles.

Screen Shot 2016-04-10 at 11.09.55 AM
ANA requires only 88,000 miles and $183.70 to fly business class roundtrip to London from North America

88,000 miles plus $183.70 in fees to fly business class from North America to Europe is an absolute bargain, espcially given the product level of ANA.

And the deal is even sweeter when you book with Air Canada because the fees go down to $68!

But remember, those low fees are with flying United and Air Canada. Here is an example of what you’re looking at if you can’t get around the fuel surcharges

Screen Shot 2016-04-10 at 11.24.44 AM
North America to Europe with TAP Portugal requires $613 in fees

Screen Shot 2016-04-10 at 11.26.08 AM
North America to Europe with Turkish Airlines and Lufthansa requires $497 in fees

As you can see, the fuel surcharges can be pretty hefty and so I’d try my best to find availability on a United or Air Canada flight to avoid the charges.

Getting more value with stopovers 

Now let’s say you wanted to add a bit more value to the prior trip from D.C. to London  by making London a stopover en route to Paris, and let’s just throw in an open jaw back to Houston so you can see how it works.

So this flight path is going to look like this:

  • IAD -> LHR [stopover] -> CDG
  • CDG -> IAH [open jaw]

This route is legal because it has one stopover in the zone of your destination [CDG in Europe] and you are returning to the same zone of your departure [United States and Canada]. (You could also make your second leg depart from anywhere within the same “area.”)

So let’s see how much more we’d pay in fees.

ANA booking ANA booking

So that’s $155 more in fees to get the extra addition of Paris to your London trip.

If you searched long enough you could probably find better stop over deals than this but I noticed that a lot of the stopovers in Europe would incur pretty significant fees. For a true budget flyer, it might make more sense to just buy a one-way ticket on a budget airliner to your desired stopover location and then open jaw back from there to North America.

For example you could do:

  • IAD -> LHR
  • London -> Paris [with budget airline]
  • CDG [open jaw] -> IAD

And finally, don’t forget about economy flights from North America to Europe… at only 55,000 miles, that’s not a bad deal at all.

Therefore, ANA is one of the best options for getting to Europe from North America! 

North America to South America

Getting to South America can be a lucrative way to redeem ANA miles, too. In fact, with the potential for lower surcharges, I’d argue there’s even better value in flying to South America than to Europe in business class.  For example, Houston to Rio De Janerio is only 88,000 miles in business class and the fees are only $62!

Here are the miles required by other airlines or this route.

  • Aeroplan: 110,000 miles
  • American Airlines: 115,000 miles
  • Delta: 150,000 miles
  • United: 110,000 miles

Screen Shot 2016-04-10 at 11.57.59 AM
88,000 miles and $62.24 for North America to Brazil in business class!

Getting more value with stopovers 

Let’s say you were planning a larger scale trip to South America where you wanted to see Rio de Janerio, Santiago Chile (and maybe take a flight to Easter Island), and Lima, Peru (and take a short flight to Cusco to get to Machu Picchu).

For the same amount of 88,000 miles you could get to Rio de Janerio, Santiago, Chile, and Lima, Peru. You’d still have to cover your tickets from Rio to Santiago, Easter Island, and Cusco, but having everything else worked out with business class tickets for only 88,000 miles would be great.

A sample flight path would like this:

  • Outbound: IAH – YYZ -> GIG
  • Inbound: SCL[open jaw] -> LIM [stopover] -> IAH

This is all legal because your inbound leg departs from the same area (SCL in South America) as the destination of your outbound leg (GIG in South America) and you only have one stopover on your route (LIM which is also in the area of your destination).

The best part of this routing is that your fees would only come out to $101.25.

Take a look at what this itinerary looks like booked on the ANA website. Again, when I called in to verify this route I got the same “we’re 99% confident you can book this route but you’ll need to transfer your miles to ANA for us be sure.” 

Note: you could probably find better routings not flying through Canada but I just wanted to show  how much value you could get from 88,000 miles!

Screen Shot 2016-04-10 at 5.36.05 PM

Screen Shot 2016-04-10 at 5.36.15 PM
Total fees number to only $101.25!

Also, economy awards from North America to South America can really be bargains at only 55,000 round trip!

North America to Africa and the Middle East

104,000 in business class to Africa and the Middle East in business class is another bargain, in my opinion. Availability might sometimes be an issue, especially without the added flexibility of one way awards but being able to get to places like South Africa and Dubai in business class for 104,000 miles round trip is pretty phenomenal.

  • Aeroplan: 165,000
  • American Airlines:  140,000
  • Delta:  170,000
  • United: 140,000 (160,000 on partners)

Just keep an eye out for those surcharges, as you can see on the routes below they can be quite pricey. (Partner Etihad is known for having little to no surcharges, so seek availability with them.)

Screen Shot 2016-04-10 at 12.24.14 PM
$498 in fees with Turkish Airlines

Screen Shot 2016-04-10 at 1.53.20 PM
$593 in fees with Ethiopian Airlines

Also, economy awards from North America to Africa and the Middle East can really be bargains at only 65,000 round trip!

Getting more value with stopovers 

Don’t forget that Africa and the Middle East are part of the same zone (Zone 8). That means you would be able to combine a trip to the Middle East with your trip to South Africa. I struggled to find some availability for this trip so I wasn’t able to price out the fees but with enough time and willingness you could probably secure this route for a mere 104,000 miles.

Partner Restrictions

There are some restrictions when booking with certain partners that you should be aware of:

  • There are unavailable periods during which flight awards may not be used.
  • Even if your itinerary includes ANA flights, the Chart of miles required for Partner Flight Awards will apply if the itinerary includes even one flight partner airline.
  • Flight award passengers cannot use Suite Class, First Class and Business Class on certain aircraft flown by Singapore Airlines (A380, A380 and B777-300ER).
  • Flight awards for Hawaiian Airlines flights can only be used only be used for flights within the Hawaiian islands.
  • EVA Air Elite Class cannot be used.

Check here for more specific rules.

Sweet spots booking directly with ANA

When you book directly with ANA you are subject to different rules. They operate with a different map and on a seasonal basis.


Screen Shot 2016-04-10 at 6.38.12 PM

They have low season, regular season, and high season, which change for different years. Take a look at the season chart for North America/Europe and Japan.

Screen Shot 2016-04-10 at 6.40.06 PM

There are some real sweet spots for getting to Japan and Asia 1 (China, Guam, Hong Kong, Macau, Philippine, Taiwan).

The following rates apply during low season:

  • North America to Japan 
    • Business class: 75,000 miles
    • Economy: 40,000 miles
  • North America to Asia 1
    • Business class: 80,000 miles
    • Economy: 45,000 miles

The drawback is that you’re going to have to pay fuel surcharges for ANA flights. The good news is that they really aren’t that bad. In fact, as you can see below, the total fees for flying ANA from North America to Japan are actually cheaper than those including a United flight!

Screen Shot 2016-04-11 at 6.45.21 PM
Since there is one partner leg on this trip, the partner rate of 90,000 miles apply

Screen Shot 2016-04-11 at 6.45.09 PM
Only 75,000 miles and $85 in fees for round trip business class to Japan is great!

Remember, that while one stop over is allowed on ANA  flights, no stopovers can be made for flights departing from Japan.

Final Word 

So there you have it, ANA is one of the most valuable transfer partners of American Express Membership Rewards and Starwood and should definitely be considered an option if you’re planning a trip from North America to any of the zones discussed above. 

Cover Photo by lkarasawa via Flickr.