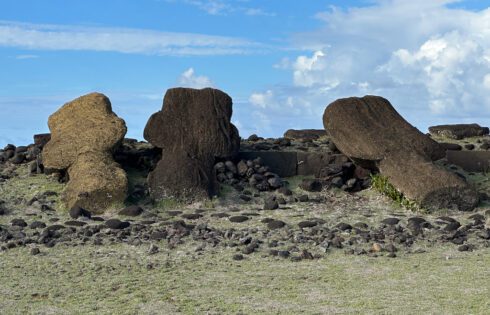
How to get to Easter Island: Everything You Need to Know

Easter Island is one of the most remote islands on Earth and as a result, it’s also one of the most difficult places to get to.

You most likely will have to deal with a number of connecting flights and as of early 2023, potentially a limited number of flights.

But, if you can have some flexibility with your schedule and are okay with enduring lots of hours in the sky then getting to Easter island is actually not that difficult.

In this article, I’ll break down how you can get to Easter Island as of 2023.

How to get to Easter Island by plane

If you want to get to Easter Island by plane, chances are you are going to have to go through Santiago, Chile. If you are headed from the US then that means you likely will be flying on one of the following airlines:

  • LATAM
  • American
  • United
  • Delta

If you’re trying to book a nonstop flight to Santiago, then the following airport hubs may offer that:

  • ATL (Atlanta)
  • IAH (Houston)
  • DFW (Dallas/Ft. Worth)
  • JFK (NYC)
  • LAX (Los Angeles)

There were once flights between Easter Island (IPC) and Papeete (PPT) although it’s not clear when those will return.

We happened to be visiting Mexico City so we booked a nonstop directly from MEX with LATAM, which was about eight hours.

Once you arrive in Chile, there are some specific measures that you need to follow to make sure that you get through the airport successfully en route to Easter Island. Be sure to check out the full guide here.

As for getting between Santiago and Easter Island, as of early 2023, there still are only flights going out about three days a week and it’s strictly with LATAM (unless you’re flying private).

The plan is for LATAM to ramp up flights to the island throughout 2023 so more flights should be heading that way during the fall. The good news is that they fly a widebody Dreamliner to Easter island which is one of the more pleasant aircraft to fly.

If you want to use award miles to get to Easter Island on this segment, it’s going to be very difficult (especially for business class).

Over the years, I’ve looked for award seats for this route and while I have come across them on occasion, it’s usually been very rare. Perhaps whenever the flights ramp back up it will be doable but I would not count on finding award seats for business class for now.

Related: Complete Guide to Exploring Easter Island’s Rapa Nui National Park

If you don’t like to deal with connections then I would recommend that you consider staying in Santiago for a few days before heading over to Easter Island. This is because the flight is about five hours between Santiago and Easter Island.

So if you already have had to deal with a couple of long connecting flights, the thought of going through yet another flight may be a complete turn off.

There are a lot of things you can do in Santiago like check out some of the museums or just stroll around the city which is quite nice as it is surrounded by beautiful (and huge) mountains. It’s a great “stop over” city.

Santiago Chile

Santiago Airport also has a nice airport hotel located right outside the exit (the Holiday Inn). You could simply stay at that hotel for a night and recharge for a flight the next day.

Purchasing your flight

One really interesting thing about purchasing a flight with LATAM while based in the US is that you could be paying a lot more than someone based in Chile!

When I was looking at flights from Santiago to Easter island, I noticed that the prices on the US website were twice as expensive! See the screenshot below.

You could utilize a VPN or just use the Chile LATAM website and go through the booking process in Spanish in order to take advantage of the cheaper rates.

In the past, I always heard about officials at the airport catching people doing this and forcing them to pay the difference. I believe that this enforcement practice was ruled illegal at some point although I’m not completely sure.

But I can tell you from personal experience that as US citizens with US passports we did not have any issues purchasing the cheaper tickets and getting through the airport.

Landing in Easter island

As you would probably expect, the airport on Easter island is very small.

Interestingly, the landing strip is actually longer than usual because it was modified to be able to accommodate emergency space shuttle landings! Pretty cool.

Lots of the hotels provide transportation from the airport to the hotel and will even greet you with a lei! It’s a really cool experience.

How to get to Easter Island by cruise

Another way to get to Easter Island is by cruise ship. I don’t have experience with taking cruises to Easter island so I honestly don’t know much about them.

However, I do know that sometimes Easter island is one stop among many on some very long cruises that go between places like the US and Australia. Some of these cruises can be over 100 nights! However you can find some that are just 2 to 3 weeks.

Coming up on Easter Island via the ocean would be epic because it would take me back in time to when early explorers first came across the island.

But we noticed that some of the sites were substantially busier when the cruise ship was in town so your experience will likely not be as quiet if you go to cruise route. Just something to think about.

Easter Island is by cruise ship

Final word

Getting to Easter Island is a little bit of a challenge.

You’ll need to be ready to deal with a few connecting flights and try to plan ahead so that you are not stuck with limited flight inventory due to the small amount of flights going to the island each week.

Should I Rent a Car and Drive in Montego Bay, Jamaica?

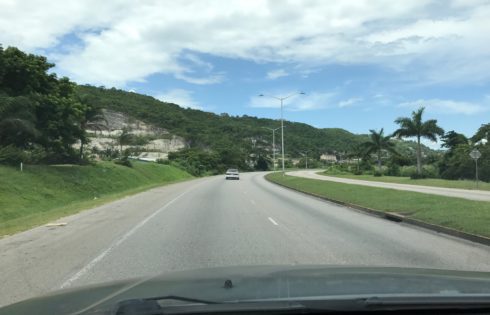
Jamaica is a beautiful country with tons of great places to see and for that reason, it’s tempting to jump in a rental car and take off to explore the country. But there are a few things you should know about driving in Jamaica before you let loose.

Tip: Use WalletFlo for all your credit card needs. It’s free and will help you optimize your rewards and savings!

Rental cars

Renting a car from Montego Bay Airport is a pretty straight forward process. Montego Bay Airport offers some of the rental car brands you’ve probably used before like Avis and Budget but they also have Island and Sixt available, too. We went with Avis since we have status with them, but after scoring another older vehicle, I think we’re going to try to avoid them in the future.

You can get a compact car like a Yaris for $40 a day. A larger car like a Corolla would run you closer to $60 or $70 a day. And an SUV will be around $90 a day. Unlike many places outside the US, many of the vehicles have an automatic transmission, which is great for newbs like me who still can’t drive standard.

The rental car check-in desks are located inside the airport just before the exit and you’ll see signs pointing you to where you need to go — it’s not hard to find them at all. Once you’re checked in, you’re walked next door to a small parking lot surrounded by a chain-like fence where you’ll find your car.

After just a couple of turns and a round-a-bout, you’ll be out of the airport and onto the main road: A1.

They drive on the other side of the road

Jamaica didn’t obtain full independence from the UK until 1962, so when it comes to riding on the highways, the UK presence is still felt. This means that they drive on the opposite side of the road in Jamaica compared to the United States. If you’ve never driven on the other side of the road, this might not be the best place to learn, as I’ll explain in my next point.

People drive crazy

Jamaicans drive crazy — there’s no denying that.

They are bold. They are aggressive. And they do not care how close they come to your vehicle when the cut you off. It will only take you a few seconds on a main road or highway to see cars zipping in and out of lanes and passing cars, seemingly coming within milliseconds of a head-on crash. They also hit the gas hard, as if each stop light is the start of a new drag race and pink slips are on the line.

Of course, not everyone drives like that over there. But there’s enough people who drive like maniacs that it is a noticeable problem. If you’ve never driven on the “other”side of the road, I’d probably advise you to just get a taxi.

The good thing is that if you’re just wanting to drive from Montego Bay to places like Negril, you can pretty much stay on one road (the A1) the entire time. This simplifies the driving process a lot but still won’t remove the crazy drivers from the picture. On our 30 minute drive at night to explore the Luminous Lagoon (which I highly recommend), I had at least two “this is it… we’re gonna die” moments, and I consider myself a relatively worry-free traveler.

So the bottom line is if you’re worried about stressing out behind the wheel or ending up in an accident, just stick to taxis, shuttles, or tour busses. If you’ve got some experience with driving on the other side of the road and do okay when presented with obnoxious drivers, then you’ll probably be okay, so log as you’re prepared.

Crash statistics

Road traffic accidents have been viewed as a public health issue in Jamaica, they’ve been so bad. However, according to the World Health Organization, the road fatalities per 100,000 people per year, aren’t much worse than the US and the rates aren’t close to many of the African countries known for many fatal traffic accidents. So if you do choose to drive here, it’s not like you’ll be driving in the most dangerous place in the world.

Still, you need to be vigilant when driving in Jamaica if you’re not used to dealing with aggressive drivers.

Parking can also be an issue

If you’re trying to get to some of the beaches, you may find that parking is limited here and there are a lot of “reserved” slots. I’m not sure as to what level they enforce reserved parking but it made it problematic for us to find parking near a couple of beaches. Thus, I suggest heading out early in the morning to lock down a parking space and doing research beforehand to see what type of parking situation you can expect at your destination.

Final word

Overall, driving in Jamaica is not for everybody. If you’ve got no experience driving on the other side of the road and easily get stressed when behind the wheel, I don’t recommend driving. However, if you’ve been exposed to some pretty chaotic driving around the world or are an otherwise confident and skilled driver, I don’t think driving in Jamaica will be so bad for you.

Booking.com

Visiting the Luminous Lagoon in Jamaica near Montego Bay

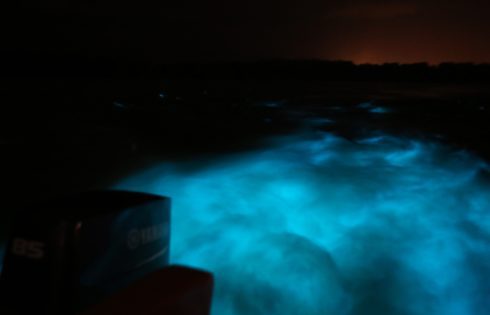
The Luminous Lagoon is a natural wonder in Jamaica that surprisingly many tourists don’t even know about. It’s one of the few bays in the world where you can witness a natural light show in the water, and even take a dip. Here are some tips and what you need to know for visiting the Luminous Lagoon in Jamaica.

Interested in finding out the top travel credit cards for this month? Click here to check them out! 

Tip: Use WalletFlo for all your credit card needs. It’s free and will help you optimize your rewards and savings!

Where is the Luminous Lagoon?

The Luminous Lagoon is a bay in Falmouth, Jamaica, about 40 minutes east of Montego Bay.

Map of Montego Bay Jamaica

What is the Luminous Lagoon?

The Luminous Lagoon is a special little bay because at night, it’s home to a natural phenomenon known as “bioluminescence.”

The lagoon is home to microscopic organisms called dinoflagellates, which are able to emit blue flashes of light when activated by some sort of motion, such as waves crashing or objects splashing in the water. The result is a mesmerizing display of glowing blue light when one takes a boat ride or swim in the bay.

The Luminous Lagoon is said to have some of the brightest displays of bioluminescence found around the globe, and thus it’s a popular spot.

Can I do a tour for the Luminous Lagoon?

It’s very easy to join a tour for the luminous lagoon. We went with Glistening Waters, which I believe might be the most popular tour company for the lagoon. They offer tours for $25 per adult ($12.50 per child) and tours run from around sunset to 9pm.

You can pre-book a tour online or through your hotel which will usually include transportation and often times a meal or you can just drive yourself to the lagoon (like we did) and then purchase your ticket there. They typically only take cash (USD accepted), so make sure you carry some cash.

The tour

The tours begin just after sunset and each tour lasts around 30 to 45 minutes. When we did our tour, Glistening Waters had two to three boats operating at a time, so there wasn’t a long wait time to get in.

Be prepared for the boat to be jam-packed with tourists (I’ve heard the tours taking place later on in the night aren’t as bad). I recommend sitting in the rear of the boat on the port side (left of the vessel if you’re looking towards the front). This is right where the ladder is that you’ll use to enter the lagoon.

Sitting there will allow you the best view of the water lighting up when the boat starts moving and will allow you to be the first person in the water, which will be handy for getting photographs from the photographer, who goes by the name of “paparazzi.”

Crowded boat at night
Packed tour boat.

As soon as you set out on the boat, you’ll start to notice some blue flickering in the water towards the back of the boat.

Luminous Lagoon in Jamaica
Luminous Lagoon in Jamaica.

Within a few seconds, that flickering will intensify and before you know it, you’re looking at glowing waves of blue light that resembles what you’d find in a lit up hot tub. Photos and video don’t really do it justice — you just have to see it in person.

Luminous Lagoon in Jamaica
Luminous Lagoon in Jamaica.

You can see the water light up from other parts of the boat, but I think sitting in the back will give you the best view, especially if you want to capture some photographs.

Luminous Lagoon in Jamaica
Luminous Lagoon in Jamaica.
Luminous Lagoon in Jamaica
Luminous Lagoon in Jamaica.
Luminous Lagoon in Jamaica
Luminous Lagoon in Jamaica.

Ideal conditions

You want to visit the lagoon when conditions are ideal, which means two things taking place.

The first is that you catch the lagoon on a day when there’s been little to no rain. If a heavy downpour has just taken place, the effect of the bioluminescence might be diminished.

Second, you want to catch it one night when the moon is not very bright, so try to avoid full moons. We caught it when there was a very small moon out and there had been no rain for a couple of days and the lights were very bright.

One great thing about the Luminous Lagoon is that the lights can be seen all year round.

Luminous Lagoon in Jamaica
Luminous Lagoon in Jamaica.

Getting photographs

The “papparazi” guy is in charge of getting photographs of you. I recommend you sitting by the back of the boat so you can be one of the first to get off and get your photo taken if that’s what you want. If you wait until others have unloaded, you’ll have to contend with getting the photographer’s attention with like 30 other people trying to do the same.

Also, the longer you wait to get in, the more silt will be kicked up by other people. This will also quickly diminish the brightness of the lights so you want to try to get your photos taken before that occurs.

Make sure that when you’re photo is being taken you’re swooshing up the water as much as you can to intensify the blue light. At the end of the tour you can buy photos for $25 and have them sent to you via email.

People swimming Luminous Lagoon in Jamaica
Guests swimming in the luminous lagoon.

Be careful when getting into the lagoon. It’s only about 4 feet deep and the bottom of the bay is covered in several feet of mud, so you want to ease into the water and try to keep your legs up so you don’t get covered in mud. If you happen to get some on you, it easily comes off with a good shake of the leg, which you can do when climbing the ladder back into the boat.

If you’re experienced with surface diving, you can lunge off the ladder, creating a blue silhouette. If you’re not a very experienced swimmer, a life jacket might keep you bobbing at the surface and away from the muck.

Luminous Lagoon in Jamaica
A human silhouette in the Luminous Lagoon in Jamaica.
Luminous Lagoon in Jamaica
A human silhouette in the Luminous Lagoon in Jamaica.

Tip: Use WalletFlo for all your credit card needs. It’s free and will help you optimize your rewards and savings!

Am I going to get eaten by a shark?

Jumping into the middle of a bay in the dark can be a little daunting.

Luckily, according to the guides there are no major predators in these waters. No sharks, barracudas, crocodiles, etc. While the guides claimed there were no jellyfish, I’ve seen (rare) reports of people getting stung by jellyfish. I personally wouldn’t worry about anything happening, but it’s important to know the risks.

Also, some complained that the little microorganisms agitated their skin, although this was not the case for most people.

Luminous Lagoon in Jamaica

Luminous Lagoon in Jamaica.

Taking photographs

Taking photographs of the lagoon is difficult. You’ll need a high quality DSLR to capture the light with your ISO turned up high. Most of my photos were turned up to 64,000 ISO on my Canon 6D to get the light to come out. You also have to contend with the moving of the boat and water, which makes it difficult to focus in such low light conditions.

Luminous Lagoon in Jamaica
Luminous Lagoon in Jamaica.

While I was not exactly thrilled with my photographs I did the best I could and at least I came away with some shots that showcased the blue light.

I don’t recommend utilizing flash since the guides will tell you to keep it off. I think the only person who uses the flash is the photographer. If you have a standard mirrorless, point and shoot camera, your photos are probably not going to come out very good but you can give it a shot.

Luminous Lagoon in Jamaica
Luminous Lagoon in Jamaica.

With my ISO turned up high, I was also able to get a little bit of video as well.

Since photographs and video can be difficult to capture, this is a destination where it really just pays to enjoy the experience. Have fun splashing around in the bioluminescence and watching it sparkle on your bathing suit as you exit the water. You might even catch a fish or two darting through the glowing waters.

One of the most interesting things to see is when the boat comes to a stop. The captain will probably take you to a rig that sank in the middle of the lagoon and once the boat comes to a stop, take a peak at the water near the boat. You’ll be able to see individual sparkles of light flashing like tiny stars in the ocean. The light was too faint for me to capture on my camera, but it was an amazing sight and only visible once the boat stopped moving at a high speed.

Final word

I’ve been able to experience some amazing natural wonders like the northern lights. And while this isn’t quite as exciting as the northern lights, it’s still a very cool experience that’s certainly bucket-list worthy. Almost everyone who unloaded off our boat was in agreement that this was an all-around amazing experience. If you catch it when conditions are right, it will surely blow you away.

Booking.com

My Northern Lights Experience in Trosmø, Norway

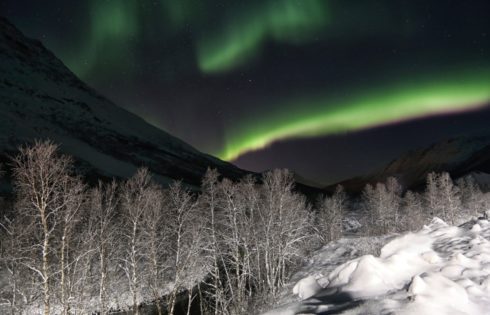
This past Christmas, Brad and I ventured above the Arctic Circle to explore Tromsø, Norway, and the beautiful fjords in search of the northern lights. The light shows we experienced far exceeded even our best expectations, so I felt the urge to share what it was like to go northern lights hunting in Norway for four nights.

See also:

Getting to Tromsø, Norway

We flew in to Norway on an SAS A330 in business class which I booked with Star Alliance partner, Aeroplan for only $12. Although the seats in business class were comfortable, I struggled to get any sleep which would make things very interesting for the next 24 hours.

SAS business class seats
SAS business class.

By the time we made our way through the airport in Tromsø, picked up our rental car, found parking, and walked back to the Raddison Blu amid a heavy down pour of sleet, we only had about 2 hours before our first northern lights tour started!

When I arrive in a new place, I struggle to subdue the excitement and am usually not able to just jump on a bed and take a nap. So despite my best attempt, I stayed wide awake for the next two hours until it was time for our tour.

Our tour was set for 7pm, which meant that I’d been up at that point for about 30 hours straightI was really worried I wouldn’t be able to enjoy the northern lights tour and considered putting it off until the next day, but I knew I’d never be able to let it go if the lights came out that night and I missed them. So I sucked it up and decided to go.

Tip: Use the free app WalletFlo to help you travel the world for free by finding the best travel credit cards and promotions!

Night one: An intro to the northern lights

We boarded up the tour van and took off through the snowy highways. It was drizzling with a mix of snow and sleet and all I could catch were quick glimpses of thick forests on the side of the road. Luckily, this van came equipped with quality wifi (that was even better than some hotels) and so it was easy to pass the time.

After about an hour and a half of riding, I noticed a very faint whitish streak in the sky through the dark-tinted windows. It was so faint, that I had to squint to make out the object. In any other setting I would’ve dismissed it for a cloud but the sight reminded me of exactly what I saw when I witnessed the northern lights from a plane.

Our van stopped on the side of the road and we all got out. To my amazement, it was the northern lights!

The only problem is that the lights were very weak and almost entirely shrouded by clouds. To be honest, it wasn’t the most impressive sight but at least we could say we saw them if nothing else appeared. Lucky for us, we were in store for a great show.

Northern lights Norway
The first glimpse of the northern lights!

After about five minutes of watching these lights, the clouds moved back in and covered the sky, so we moved on to try to find clearer skies. Our guides used their partners strategically roaming the Norwegian countryside in different regions to locate the clearest skies and they directed us.

After about 30 minutes, we saw more northern lights activity in the clouds and decided to set up a new spot on the side of the road. This new spot opened up to a large mountainous fjord.

It was at this point that the lights came out much more vividly and I saw my first truly impressive sight of the lights. While the camera picks up their green color better than what you’d see in real life, when the lights are strong, they look unmistakably green to the naked eye.

Northern lights Norway
The northern lights outside of Tromsø, Norway.

After setting up my tripod and spending some time adjusting the settings on my camera, I started to snap away at the sky, capturing thousands of stars along with the lights reflecting on the water.

Northern lights Norway
The northern lights outside of Tromsø, Norway.

After each minute, we noticed more and more stars dusting the sky as the clouds opened up. Green streaks stretched from overhead all the way down to the horizon beyond the mountains. This was a true northern lights experience and what I had been hoping for ever since my nightmare of a trip to Iceland in 2014.

Northern lights Norway
The northern lights outside of Tromsø, Norway.

After a couple of minutes for the lights to begin to intensify. They grew thicker and brighter and appeared all over the sky in different places.  One thing about the northern lights is you never know what they’re going to do.

Suddenly, these streaks started moving fast, whipping and whirling through the night sky. The green intensified into white and even purple and pink colors came out. It was electric.

Northern lights Norway
The northern lights dancing.

There were ooohs and ahhhs from everyone in our group. I was beyond thrilled and just trying to capture some of the moment on my camera. I’d already been mystified by the lights earlier but this was just unreal. I had no idea the lights truly danced.

Northern lights Norway
Stunning northern lights.

This went on for about 5 minutes and even when the dancing died down, the northern lights continued to appear and reappear in the sky for hours. Our group built a fire and some lay down on reindeer skin hides to watch the light show. Servings of hot chocolate and hot soup warmed us up as we finished up the night.

We didn’t make it back to our hotel until late close to 2am that night but it was completely worth it, because I could not have asked for a more memorable encounter with the northern lights.

Night two: A battle with the elements

I questioned whether we should go out a second night in a row. The first night had been such an overwhelmingly amazing experience that I could’ve happily ended my northern lights experience there. My feeling was that if the lights didn’t show the second night we would be ending our northern lights experience on a low note, not to mention that it would just suck to spend hours roaming aimlessly in a van all night.

But, we decided we didn’t travel all that way to Norway to settle for one good night of the lights so we decided to go out a second night.

This night was a battle. We settled on a point along the rocky coast to watch the lights but the the winds whipped up from the Norwegian Sea creating a brutally cold experience at times. Unlike the night before, I had to completely bundle up and keep my gloves, beanies, and face mask on at all times and I still found myself shivering. The winds penetrated my jeans and thermals and after a couple of hours I could feel my toes getting icy.

Despite the cold, however, we caught some of the most amazing views of the northern lights. It started out with a pretty mild showing like the night before.

Northern lights and shooting star Norway
The northern lights with a shooting star.

And then as the evening progressed, a more intense display showed up.

Northern lights Norway
The northern lights in Norway.

Eventually massive streaks of green covered the sky and moved fluidly behind the low-lying clouds.

Northern lights Norway
The northern lights in Norway.

At one point, things had gotten quiet for a while and a few people in our group went back inside the van to defrost. I’d just set up my tripod outside the van and the folks warming up inside the van asked me to tell them if anything happened.

Well, within about two minutes, I noticed thick green streaks appearing more intense in the sky and I knew something special was happening. I ran into the van and told them to come out and that’s when we witnessed an even bolder display of the northern lights. This time we saw bright pink streaks rippling all over the sky and even through the clouds.

Northern lights Norway
Pink northern lights display.

A tour bus, with immaculate timing,  pulled up right as this show was starting and as the lights show picked up, tourists poured out of the bus, immediately gawking up to the sky as they caught this magnificent show.

Northern lights Norway
The northern lights directly overhead.

It’s worth noting that northern light experiences can sometimes become something of an endurance event. By the end of this night, I could barely feel my toes and my face and I was utterly exhausted from so little sleep but the hours spent under the lights had been 100% worth it.

Night 3: The test drive

On night 3, clouds blanketed the sky and sleet poured down all over Tromsø. Even though we’d enjoyed our tours the two nights before, we decided it was time to do some exploring on our own in our rental car.

I’d still been running on fumes from the lack of sleep from the past three days, so we decided to only do a “test drive” about an hour into the fjords just to see how difficult it would be to drive on those icy Arctic roads. Having virtually no experience in driving in cold conditions, I wasn’t sure if we’d be sliding up and down the roads and to be honest was a bit nervous about it.

Luckily, we didn’t have any issues that night so we decided that the next night we’d venture a few hours all the way into Finland while chasing the northern lights.

Night 4: Christmas night with the northern lights

Night 4 would be one of the most memorable experiences of my entire life. It was also Christmas.

We started very early around 5pm, as it was already very dark. This night was special because it was the first clear night of our trip. Even though the city of Tromsø was still covered in snowing clouds, the fjords found inland were completely devoid of any clouds.

About 25 minutes into our drive, we were riding along the coast of a fjord and I took a peak out the side of the car window. That’s when I noticed a massive streak running across the sky, over the tops of some mountains overlooking the fjord.

We stopped and got out to catch some photographs. This green streak soon doubled and then tripled as the color intensified. Soon the entire sky was filled with these green ribbons of light, folding and stretching above us.

Northern lights over north Norway
Northern lights over north Norway.

We didn’t realize it at the time, but we were witnessing an unexpected solar storm hitting the Earth’s atmosphere.

A solar storm over Norway.

It was an absolutely brilliant display of light.

Northern lights
The Northern lights over Norway.

The lights continued to morph into several odd shapes and at one time even formed a giant “X” in the sky.

Northern lights Norway
The northern lights forming a giant X.

Other odd shapes continued to come to life as we watched.

Northern lights Norway
The northern lights.

Eventually we made our way a bit further into the fjords until we started to witness another spectacular showing forming in the sky.

Northern lights Norway
Th northern lights over a fjord.

This showing started to transform into something resembling a northern light cyclone at one point.

Northern lights Norway
A northern lights cyclone?

After a few minutes, more and more lights appeared and we witnessed the strongest display of northern lights that we saw during our entire trip.

Northern lights Norway
A solar storm on display in Norway.
Northern lights Norway
The northern lights.

Tip: Use WalletFlo for all your credit card needs. It’s free and will help you optimize your rewards and savings!

At one point, the lights almost covered the entire sky.

Northern lights Norway
The northern lights in northern Norway.

I can’t speak for everyone, but for me, the sight of the lights never got old. Sure you’d get neck cramps from looking up at the sky for hours and you’d begin to freeze, but those were small prices to pay considering the reward of catching the northern lights.

Northern lights Norway
The northern lights in northern Norway.

After the intense display, we made our way into Finland. We climbed through a winding road across the border where we had no cell phone service and didn’t see but maybe one or two cars — this was Christmas night after all.

Northern lights Finland
The northern lights over Finland.

We stopped for a while and I got out of the car. As soon as I stepped out into the -2ºF air, it was eerily quiet. Absolutely no noise coming from anything. All I saw was a brilliantly clear sky with lights slowly waving through it.

Northern lights Finland
The northern lights over Finland.
Northern lights Finland
The northern lights over Finland.

After trekking into Finland, we returned back on our way to Tromsø. Before arriving back into the city, we made a few stops to admire the dancing lights that continued to appear throughout the night.

Northern Lights
Dancing northern lights.

We were blessed with one more strong showing of the lights — this one came with bright showings of purple that rippled through the sky.

Northern lights
Purple northern lights over Norway.

We made our way back to the hotel some time around 1am. My experience with the northern lights had been well beyond even my most optimistic hopes. After having such a disaster of a trip in Iceland in 2014 while trying to catch the lights, this was all the redemption I could’ve asked for. I really hope to see the lights again (soon) one day but until then, these memories will suffice for me.


Booking.com

Swimming with Whale Sharks in Holbox, Mexico

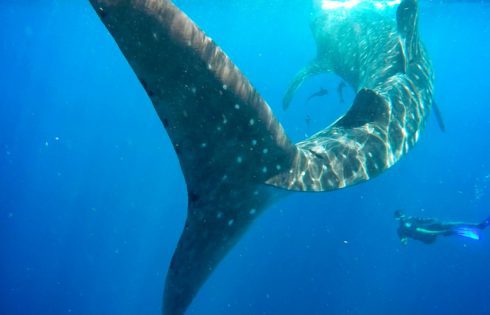
Swimming with whale sharks has been on my bucket-list ever since I found out it was an actual “thing.” Since then, I’ve waited for the right season and opportunity to schedule a swimming date with these giants. That date finally came when I booked a tour with HolboxIsland.com. Here’s a review of my experience of swimming with whale sharks off the coast of Holbox Island, Mexico (near Cancun) and some tips to help you have a great experience when you decide to swim with whale sharks. 

Scheduling the trip

The communication from HolboxIsland.com’s staff from the very beginning was great. If you’ve read any of my other tour reviews, you know I’m huge on pre-trip communication (especially when crossing international borders). We worked out all of the specifics for transportation and scheduling via email and everything went as smoothly as I could hope for. It always makes me a little bit nervous when I agree to let a tour company arrange for all of my different legs of transportation but with HolboxIsland, I felt I was in good hands.

HolboxIsland.com offers a number of different tour packages and we ended up booking the whale shark tour + air transportation option and flew in from Cancun. It’s a full day affair that starts with being picked up at your hotel at 6am and ends with you being brought back to Cancun at about 3pm.

Instead of going by private plane, you can also get to Holbox Island with a combination of taking a taxi/bus, ferry, and golf cart. We went with the plane option for the convenience and for the great views of the area. You can look more into options of how to get to Holbox here.

Tip: Use WalletFlo for all your credit card needs. It’s free and will help you optimize your rewards and savings!

The plane ride

A nice SUV picked us up from our hotel in Cancun at 6am on the dot and took us to the airport about 25 minutes away. We arrived at a small section of the Cancun airport that operates private planes. A rep from HolboxIsland.com met us there and introduced us to what would be happening for the day. He also went over a lot of the ecological restrictions that the company follows to ensure the welfare of the sharks, which made me feel even better about my decision to go with HolboxIsland.

We then went through security and even though this was a small private plane, were forced to throw out our 3 water bottles. Tip: if you’re flying in from another airport, inquire with someone about purchasing water when you arrive in Holbox. While the boat will have some water, it’s always a good idea to have some of your own.

Our plane ride was a much more enjoyable than our last experience with a puddle jumper where we were packed like sardines. This time we had the cabin for ourselves and the interior of the plane was actually nice, roomy, and comfortable with plenty of room for us to stretch our legs.

Interior of private jet
Interior of our private plane.
Ocean view from private jet
Checking out the views.

The flight to Holbox from Cancun is only about 20 to 30 minutes. You’ll fly over a lot wooded areas as you leave the Cancun area but once you reach the coast of the peninsula the scenery becomes much more dynamic with different shades of blue and green reflecting from the saltwater flats extending down the coastline.

Ocean view from private jet
Beautiful scenery on our way to Holbox.

You’ll know you’re close to the Holbox airport when you notice the large plume of smoke where they burn huge piles of the island’s trash. Be ready for a little bumpy landing, as the runway at Holbox is more of a cleared out dirt path than a paved runway. Still, for being a dirt runway the landing wasn’t that bad.

Private jet on runway
The “runway” in the background.

We hopped out of our plane and within a couple of minutes one of the instructors appeared with a golf cart and told us to hop in. The ride through downtown Holbox is a bit bumpy and we worked our way through a fair amount of sludge to get to the beach, but it was actually pretty fun.

Dirt road in Holbox
Two men in golf cart

The docks where all of the boats depart from stand over some beautiful light green water. Our boat was called the “Glendy” and it sat 10 people not including the instructors.  Thankfully, it comes with a canopy so you won’t be completely exposed to the sun while you are out at sea. However, you will still be exposed to the sun much of the time and for that reason, make sure you bring sunscreen and/or clothing to cover your neck and arms.

Boat in water
Beautiful Caribbean waters at the dock.

As soon as we had everybody on board, our captain told us it was time to head out. But first, we’d have to put on life jackets. And on top of that, we’d have to keep those on while swimming with the whale sharks. I was very bummed about my diving/photography being limited by a life preserver, but I understand why that’s a strictly enforced regulation and it’s probably better for the whale sharks in any event. So kudos to them for enforcing the rules. 

With our life jackets strapped on and everybody boarded, we finally took off.

Men in boat
Slightly bummed about the life jacket situation.

Shortly after departing, our instructor took us through the different rules for encountering whale sharks and also walked us through how the tour would be working, where we’d be sitting, etc. The most important rules are pretty simple: keep about 6 feet from the whale sharks, don’t touch them, keep your life jacket on, and try to stay out of their way if one’s coming for you.  

Finding the sharks can take a while

One thing that you have to remember about doing an activity like swimming with whale sharks is that you’re dealing with the unpredictability of nature. With that in mind, it’s hard to know for sure how long it might take to reach the sharks.

Men in moving boat
Scanning the ocean for whale sharks

Our guides told us that after about one hour and 20 minutes at sea, we were in the “feeding zone” where we might find whale sharks. At that point, everyone’s attention was piqued and we scanned the ocean for signs of these giants.

Group looking at ocean
Looking for wildlife.

One person quickly spotted something pretty big breaking the surface of the water. It took a while to get close to enough to figure out what was splashing around but as we got closer, it turned out to be two massive sea turtles just hanging out.

Sea turtle
Just a turtle.

The next guest appearance came when some other plankton-eaters came our way — huge manta rays!

Manta ray
Manta ray gliding below he water’s surface.

We saw several manta rays swimming along the water’s surface, taking in mouth-fulls of zooplankton. It’s hard to get a good look at the manta rays because they are so flat and sort of blend in with the water at times but they are magnificent creatures and their wings spanned much wider than I thought they did.

Manta ray
Manta ray

After a few meet and greets with the manta rays, the anticipation to see the whale sharks grew tremendously.

That anticipation would soon subside greatly over the next hour, however. As I stated before, when it comes to nature, you can’t ever forget that you’re on its time — not yours. Although we entered the “feeding zone” there was no sign of the whale sharks. So we continued to speed through the ocean, bouncing along as we cut through the waves.

Group of people in boat

Arriving to the shark area

After close to 2.5 hours at sea, our captain told us we were approaching the zone where all of the whale sharks were. At that point, we were pretty far out into the open ocean — I couldn’t see a single sign of land in any direction. That was my first time to ever be that far out at sea (in a small boat) and while it was a little unsettling to think about all the things that could go wrong (I’ve watched too many movies), our captain reassured us that everything was going to according to plan and I felt fine.

Ocean view from boat
Nothing but open ocean.

Once we came upon the site where the whale sharks were feeding, we saw a number of other small boats lining the horizon in the area. We stopped pretty far from the nearest boats, however, so we never felt overcrowded. Also, I never saw any of the boats (including ours) intrude too close to one of the sharks (they have to stay about 10m away) so it made me feel good that boats weren’t interfering with the sharks as they fed upon the plankton.

Putting on our snorkeling gear

Once we arrived to where the sharks were, we slipped on our snorkeling gear and flippers and got ready to jump in. 

If there’s one thing that could be done a little better it’s the distribution of the snorkeling equipment. Don’t get me wrong, everyone had snorkel gear to dive with but when it came to distributing the gear out between dives, things got a bit confusing with some using gear that was originally used (and fitted) by someone else. I simply kept my gear next to me at all times to prevent this but if you’re able to, it might be a good idea if you can just bring your own snorkel gear to avoid any potential problems.

People getting into water
Getting ready to jump in!

At one point, I’d forgotten that I was wearing a GoPro head strap and when I took my goggles off to clean them, I knocked my GoPro into the ocean! Strapped tight into a snug life jacket that I couldn’t slip out of, I knew there was no way that I’d be able to get it off in time and catch the GoPro so I just watched it quickly disappear into the blue oblivion.

But that’s when our instructor — without hesitation — dove into the water off the side of boat and after a few seconds, popped up with my GoPro in his hand! Moronic feeling aside, I was stoked he was able to get it and became all the more ready to jump in with the sharks.

Whale shark tour
Watching my GoPro reemerge from the depths!

Finally time to swim with the sharks

Swimming with the whale sharks is a little bit more difficult than I expected. That’s because while the whale sharks appear to be moving along slowly, they’re covering a lot of ground pretty quickly. Combine their speed with somewhat limited visibility and you’ve got roaming giants that can be a lot more elusive than you might expect. But once you finally get your timing right and you’re in the right spot, there’s nothing quite like laying your eyes on one of these giants.

Holbox whale shark swimming

How the swimming part of the tour works is that the captain positions the boat in close proximity to where a whale shark is headed and then he’ll tell everyone to “jump!” (slide off the side of the boat) and “swim, swim, swim!” to the shark.

Snorkeling with whale shark
“Swim, swim, swim!”

If you’re lucky, you might get a shark that is going a bit slow or that might remain slightly stationary for a short while. But most of the sharks didn’t bat an eye to us and continued on at a speed that required us to kick pretty fast to keep up. When we were able to keep up, the results were astonishing….

Holbox whale shark swimming

Our instructor did a superb job of keeping us rounded up and directing us toward the sharks. It’s not that easy to locate the sharks when you’re in the water so the guidance provided by the instructors was often crucial for getting up close to the sharks.

Holbox whale shark swimming

You’re not allowed to touch the whale sharks and I believe the recommended  distance to be kept from them is about 6 feet. Sometimes a shark will approach you and just be within a couple of feet of you, though, and in that case just remember to not touch them (it can cause infection) and just enjoy marveling at their massive bodies — they absolutely dwarf us humans and the fish around them.

Holbox whale shark swimming

The swimming session consists of about 4 to 6 attempts to swim alongside a shark for as long as possible without venturing too far from the boat. It might take a couple of attempts, but the first time you get one of the sharks to head right where you are and you take a look into their little eyes from just a few feet away, it really is quite the feeling and one of those travel moments that you will always remember with vivid recollection.

Holbox whale shark swimming

Something else that fascinated me were the streaks of light rays that danced underwater. The water was about 150 feet deep where we were and so at times you’re just looking down at endless blue abyss that adds to the mesmerization of the entire experience.

Tip: Use WalletFlo for all your credit card needs. It’s free and will help you optimize your rewards and savings!

Photographing whale sharks

I recommend using a GoPro on a selfie stick to photograph the whale sharks. I have an underwater point and shoot that takes superb reef shots in clear water but didn’t do very well in these waters which were full of plankton and huge whale sharks (and snorkelers) thrashing around. However, the GoPro footage we took came out great.

Holbox whale shark swimming
The GoPro did much better than the point and shoot.
Holbox whale shark swimming
I highly recommend going with a GoPro plus a selfie stick.
Men wearing snorkels in water

The tour continues

After sprinting about the ocean chasing these gentle giants, we climbed back onto the boat and awaited our next stage of the tour. Before we left the sharks, however, the captain made sure everyone was satisfied with their whale shark encounter. With everyone in agreement, we set off for the next stages of our tour. 

Snack break

The next stop for us was a little snack shack located right on the coast. There we could buy drinks (beer) and snacks like potato chips. The guy and kid tending to the place only took pesos so make sure you have those on you if you plan on purchasing anything.

Snorkeling

After that, they took us to a small reef area for some snorkeling. The visibility of the brownish waters isn’t the best due to run-off from the island (my guess) but it’s still a decent side-trip to enjoy some snorkeling on your way back. Two of the highlights of the reef area were the multi-colored starfish that were everywhere and the large stingrays that patrolled the reef.

After about 20 minutes of snorkeling, you’ve pretty much seen it all and it’s time to move on to the next place.

Stingray
Big stingrays out on the reef!
Orange Starfish
If you like starfish you won’t be disappointed.

Flamingos and ceviche!

We then arrived to an interesting saltwater flat with tons of birds and juvenile fish. The water is only a few inches deep at certain points and we spotted little fish like needlefish darting around. A couple of times, we also saw some large pink flamingos flying overhead, which was a first for me (I didn’t even know they could fly).

After we waded around in the warm, clear waters for about 15-20 minutes, we got back into the boat and our instructor served up some of the best ceviche I’ve ever tried. You don’t want to pass it up, either, because it’s really fresh and with some chips and a little bit of chili sauce, it’s the perfect little lunch on a boat.

Ceviche in orange bowl
Ceviche!

Speaking of food, I suggest you take some snacks and water with you on the boat. They will provide you with some water and soft drinks but it could be a number of hours from the time you start the tour before you’re able to eat the ceviche, so I suggest eating a big breakfast before you board the boat and bringing along snacks.

Final word

This bucket-list experience went about as smoothly as I could ask for. While it required us to have a little patience out on the open ocean, the sights from our tour that day will always live fresh in my memory. If you’re considering swimming with whale sharks in Mexico, I highly recommend booking through HolboxIsland.com.

Snorkeling at the Hol Chan Marine Reserve with Searious Adventures

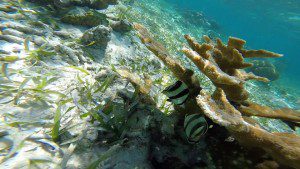
A must for any visitor to San Pedro, Belize, is a trip to the Hol Chan Marine Reserve off the coast of Ambergris Caye, Belize. This protected area is chock-full of marine life and beautiful corals and is easily accessed via a short boat ride from the island. Here’s a review of my recent snorkeling trip to the Hol Chan Marine Reserve.

Booking the tour

We booked our tour with Searious Adventures. The tour — which included a stop at Shark and Ray Alley — was relatively cheap and came out to about $95 USD for two people, which included all equipment, park entrance fees, and even some post-dive refreshments.

We actually booked our tour the day before our dive and booked it through a hotel so while you can book online you don’t always have to do so.

Searious Adventures will come pick you up from wherever your hotel is so you don’t have to worry about traveling to their headquarters and can just wait for the boat to come pick you up at the nearest dock.

Our tour had a total of 20 people on the boat so it was pretty packed. Luckily, the boat ride is only about 10 minutes away, as the marine reserve is very close. Once we arrived to our diving area, we hopped into the warm Caribbean waters and they  divided us up into groups of 6, 7, and 7. From that point, each group had one guide who led them through the reef independently so the group size was definitely manageable.

Overall, everything was run pretty organized and efficiently and I can’t say I had any complaints about the service.

Tip: Use WalletFlo for all your credit card needs. It’s free and will help you optimize your rewards and savings!

The Hol Chan Marine Reserve

The marine reserve is one of the primary spots for snorkeling in the area. In fact, I think many would agree that it’s the best spot (or one of the best spots) for snorkeling in all of Belize.  It’s a very popular spot and so don’t be surprised to see many other divers, both scuba and snorkelers, out and about when you arrive.

The reserve is fairly young as it wasn’t established until 1987, after concerns grew about unregulated overfishing and diving. The Belize government not only protected this area but also protected the neighboring sea grass beds and mangroves, which are all interlinked and provide support to all of the sea life, up and down the food chain.

The focus of diving at the Hol Chan Marine Reserve is on the “Hol Chan Cut.” This is a naturally occurring channel, about 25 yards wide and 30 feet deep, which was always highly utilized as a means of getting in and out of the reef area. Hol Chan actually translates to “little channel” in Mayan and is where the preserve got its name.

Diver at bottom of Hol Chan Marine Reserve Channel
A diver at the bottom of the Hol Chan Marine Reserve Channel

Due to the narrow formation of the channel, it’s also where strong currents move in and out of the reef area. They day we went for our snorkel, our guide told us that the current was pushing out to sea so we needed to remain mindful at all times of where we were in relation to the channel. While this was a little concerning, we never once felt like we were at risk of being washed out to sea so just stay close to your guide and you’ll probably be just fine.

Man floating in water
Our guide leading our dive.

We had done a scuba dive the day before out on the reef and while it was an amazing experience, we actually came across more wildlife on our snorkeling tour. The fish were out in droves and it was difficult to keep up with all of the different types of species we were coming across! We saw parrot fish, hog fish, angel fish, grouper, huge snapper, and even barracuda! Some of the fish, such as the snapper, looked like behemoths moving through the water.

Coral at Hol Chan Marine Reserve
Black fish at Hol Chan Marine Reserve
Two angelfish at Hol Chan Marine Reserve
Fish and coral at Hol Chan Marine Reserve

When we approached the channel, several schools of fish were swimming about below us and our guide started to point out a host of other species.

Group of sharks at Hol Chan Marine Reserve

At one point a nurse shark, probably about five feet long, came into the channel and looked to be hunting something under a large patch of reef. Right next to the nurse shark, a moray eel was peering up at us after a diver prodded him out of his dark crevice.

Shark at Hol Chan Marine Reserve

One cool thing I wish I would’ve given a go was taking a free dive through a small hole in the reef. It looked like fun but also looked pretty deep and I didn’t have any experience with free-diving so I passed on the opportunity. Still, plenty of others were enjoying the dive through the miniature cave.

Diver at Hol Chan Marine Reserve

After spending quite some time at the channel we moved on to much shallower depths, where he hovered over reef in about three to four feet of water. This is when we were able to get very close views of the coral and reefs and eventually came across a sea turtle.

Hol Chan Marine Reserve sea turtle

While there were quite a few other divers in the area, it wasn’t so swamped as to be annoying or uncomfortable, so hopefully you won’t have any major issues with that. One thing that could’ve been a little better is the timing. Our boat was running a bit late and so when we arrived to the diving area, it looked like everyone else had already arrived. I think that if we had been able to arrive a little bit earlier we may have been able to beat the crowds a bit, especially when we went over to Shark and Ray Alley.

Shark at shark and Ray Alley

After about an hour of diving we got back in the boat and then headed to Shark and Ray Alley. You can read about my experience there here, but in short, it was a an exciting, yet short-lived stop. When we got over there, several boats had already been there for quite some time. I’m not 100% sure, but it seems like if we had arrived there a little bit earlier we may have gotten a better response from the rays and sharks who likely would have been hungrier. Still, it was a great time and I really enjoyed getting so close to the sharks and rays.

Ray at shark and ray alley

In conclusion, a snorkel excursion into the Hol Chan Marine reserve is definitely a must-do activity at Amergris Caye, Belize. There are plenty of other places to see and explore but I’d highly recommend making this a part of your trip to Ambergris Caye when you visit!

Belize Pro Dive Center: Amazing Intro Scuba Diving at Ambergris Caye, Belize

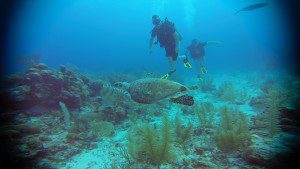
Searching for a good intro scuba diving tour can be a bit nerve wracking. For one, you want to make sure that you’re going to be left in good hands and that you’ll have a skilled and knowledgable instructor. Secondly, you want to be able to have a relaxing and exciting tour where you’re able to spend plenty of time in the ocean exploring the reef. If you’re looking for a beginner or intro scuba dive tour in Ambergris Caye, Belize, then I highly recommend going with Belize Pro Dive Center.

Outside of Belize Pro Dive Center

Here’s a review of our recent experience with them.

Tip: Use WalletFlo for all your credit card needs. It’s free and will help you optimize your rewards and savings!

Communication is superb from the beginning

We booked our tour about a month in advance and from the first email I sent to the Dive Center, I was thoroughly impressed with the swift responses I received from Belize Pro Dive Center staff, answering all of my questions and putting me at ease.

They worked with me to put together the best package for me and made sure that all of my concerns were met while booking. If you value quick responses and excellent customer service then you won’t be let down by this company.

Pricing

The pricing for the intro training course and one dive for two people was $340 USD, which was not bad, considering how long the dive was and the level of service we were given.

The orientation was thorough but not exhausting

This was my fifth scuba dive but Brad’s first, thus I had just a little bit of experience having gone through a few introduction dives before. I’ll say that my experience with the Belize Pro Dive Center was the best out of all of them. The reason is that our guide, Ian, was a very talented instructor and the entire process from beginning to end ran without a hitch.

The dive center first situated us in a swimming pool for the training. Our instructor Ian went over the gear and how everything works and then we immediately got started on the skills of locating our respirator, removing water from our goggles, equalizing pressure in our ears, and learning how to control our buoyancy.

During this process, Brad had some issues with his goggles leaking and had to try on like four or five pairs to finally get a pair that fit. Our guide was very patient through this process and insisted that Brad get just the right fit for his goggles before we proceeded to head out on the boat.

Tip: If you’re a newb like me and don’t know, shaving your mustache will cut down on water leaking into your goggles!

After about 30 to 40 minutes of splashing about in chlorinated waters of the Banyan Bay Hotel pool, we were all set and ready to load up in the boat and head out to the second largest barrier reef in the world!

Ready for the dive

There were about 10 divers total who went along with us on the boat but our diving group consisted only of Ian and me and Brad. This made for a pretty intimate experience and it was great for Brad since it was his first ever scuba dive and his nerves were a little (okay a lot) on edge.

After we made it about 10-15 minutes out to sea we were at our diving spot. The surf had kicked up a bit so we had to jump into some pretty choppy water conditions. All my other previous dives were into completely calm waters so it made me feel a little uneasy but Ian reiterated that once we were submerged a few feet, the currents wouldn’t affect us.

Man in water

This being Brad’s first dive, he was getting a bit anxious going down and I could sense a bit of panic knocking on the door. As Brad grew more tense by the second, Ian emphasized slow breathing and worked to calm Brad’s nerves. It took a little bit of time, but I think Ian earned Brad’s trust, which is an invaluable asset for any instructor and why I think this place is a sure-fire way to go for beginners like ourselves.

Scuba divers floating in ocean
Getting ready to descened

Once Brad got a bit settled, we were finally ready to descend in a smooth and controlled fashion to the ocean floor. From that point on it was pure diving bliss for both me and Brad!

Scuba divers on ocean floor
Everybody calm and collected now!
Scuba divers on ocean floor
Our guide posing with us.

Exploring new depths

My previous scuba dives had consisted of reaching maximum depths of up to 30 feet but in this dive I believe we hit up to 50-60 feet, so that was an entirely new experience for me. As I looked back up at the surface of the water from the sea floor, I could tell that we’d descended much deeper than I had ever done and was excited to start exploring the reef at these depths.

Scuba divers in ocean
Ready to roll!
Scuba diver in ocean

Ian wore a wristband so he could communicate to us via what looked like some kind of special underwater pencil. This was really an asset as we could communicate with more than mere hand signals if something went awry. But what was really cool about it is that he could tell us what all of the fish and coral that we were seeing were. This interactive approach to diving was a first for me and it really enriched our underwater experience.

Scuba diver
Our instructor scribbling down some notes.
Scuba divers
Me reading the instructor’s notes.

The wildlife

We moved through the reef at a steady pace but with plenty of pauses to appreciate and investigate our surroundings. At one point a sea turtle approached and Ian took our GoPro to get some awesome shots of the sea turtle and even got some shots of me and Brad. Despite my previous dives in the Great Barrier Reef, I’d never encountered a sea turtle so I was pretty thrilled to have such a close encounter with one.

Sea turtle and scuba divers
Sea turtle!
Sea turtle and scuba divers
Brad on his way to getting a little too close for comfort to the sea turtle.

We saw tons of other marine life as well, such as trumpet fish, hog fish, grouper, parrot fish, angel fish, and tons of other brightly colored fish and interestingly shaped coral. Although it was fun recording video with the GoPro on the dive, I found out that I much prefer using an underwater camera to capture stills rather than video, so next time I head out I’m going to go with a standard underwater camera.

Every so often, Ian checked up on our oxygen/pressure levels and monitored us closely, constantly checking in with us to make sure we were good. We never once felt like we were being unattended for longer than we’d like.

Scuba divers
Ian adjusting Brad’s gear mid-dive.

A longer intro dive

Another difference with this intro dive from previous dives I had done was the length — our dive lasted for about 47 minutes, which was much longer than the 25-30 minute dives I’d done before. Of course, time flies when you’re having fun so it felt shorter than that but I liked that we were able to stay down there for so long.

Scuba diver
Coral

At the end of our dive we paused midway to the surface to prevent decompression sickness and then finally surfaced and waited for our boat to come and get us as we bobbed in the water. The boat soon picked us up and we were back in the boat in no time and headed back to shore.

The verdict

Without a doubt, I highly recommend the Belize Pro Dive Center and if you can catch him, book your intro dive with Ian (I’m sure the other instructors are awesome as well). If you’ve never done an intro dive don’t underestimate the impact that a good instructor can have on keeping you calm. It can make all the difference and I really think it helped Brad get settled and enjoy the dive. Unfortunately, I got hit with a bad dizzy spell after our dive and we decided to just explore the island after our first dive, but I will definitely be going back to Belize Pro Dive Center when we return to Ambergris Caye in the future!

Scuba Diving in the Great Barrier Reef with Tusa Diving

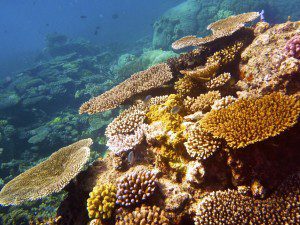
The Great Barrier is the world’s largest coral reef system, made up of over 2,900 individual reefs and spans across the north-east side of Australia. This vast reef, estimated to have been living for up to 20 million years, is larger than the UK, Switzerland, and the Netherlands combined and is about half the size of Texas. And of course, most notably, it’s one of the seven natural wonders of the world. I’d never had the privilege of scuba diving in the ocean or exploring a reef before, so when I had  the chance for my first diving experience to be in the Great Barrier Reef in Australia, you can imagine how thrilled I was.

Arial view Great Barrier Reef Australia

Tip: Use WalletFlo for all your credit card needs. It’s free and will help you optimize your rewards and savings!

The best time of year to dive

We dove in the middle of Australia’s winter in July, which I think is a perfect time to dive. For one, the weather is great and while the water can be just a tad chilly (low 70sºF/20sºC at its coldest), wearing a wetsuit gives you the perfect body temperature. Another reason to go in the winter is to avoid the deadly box jellyfish that comes out in the summer (not to mention the horrendous tropical heat and humidity).

Box jellyfish
The dreaded box jellyfish

The best scuba diving tour in Cairns… to us, at least

We booked our dives with Tusa Diving and I had a great experience with them. We were told by multiple people that they were the best scuba diving tour in Cairns because they don’t herd as many people on their boats as other companies do and had great customer service. And they didn’t disappoint. Although they herded us pretty efficiently on and off the boat, they had a great staff who were knowledgable and a lot of fun. They also ran a very organized check-in/out system so if you’re worried about getting left behind by your diving boat (like the poor souls  in Open Water), you likely don’t have anything to worry about with Tusa.

We left the docks early in the morning and loaded onto the boat that would take use out to the reefs. None of us were scuba certified so we were doing an intro dive that required us to be alongside at least one instructor at all times. On the way in, we were instructed on how to use all of our equipment and how to safely go about our dives. I’d recently done a shark tank dive in Manly, Australia so I’d gotten some good experience in dealing with diving apparatuses under some relatively stressful conditions (not to mention cold water), so I felt pretty confident. On the boat ride in, we stopped a couple of times and were able to catch some humpback whales breaching, which was an added bonus that I think got everyone a little bit more excited for the upcoming dives. We’d actually gone whale watching a few weeks before in Sydney but the sights we came across on our way out to the reef were just as good if not better than what we saw on our tour in Sydney.

Man wearing snorkel and face mask

Once we arrived at the reefs, the water changed from a deep blue to a light, sparkling turquoise. As we approached the deck to unload, I looked down and saw a large stingray gliding over the ocean floor, about 30 feet below us. And that’s when it hit me that I was actually about to be swimming in the Great Barrier Reef! I was pretty pumped at that point, especially because I had a camera and if you’ve seen any of my other articles on this website, you know how much I love to take photos.

Great Barrier Reef Australia coral

Renting a water-proof camera

We rented a Canon point and shoot in a waterproof housing from Tusa diving so that we could have our own personal shots. We also paid extra  for a Tusa Diving photographer to accompany us along the way so that we’d have no shortage of memories from our trip. It was a perfect combination. The top-notch equipment of the photographer provided us with professional quality photos of us and some of the marine animals, while the point-and-shoot allowed us to capture some shots of our own.

Great Barrier Reef Australia coral

After a couple of minutes of performing checks on our ability to clear our goggles, find our breathing apparatuses, and properly signal to our instructors we were all set for the adventure to begin. We descended via an anchored rope, just a few feet at a time to acclimate ourselves to the pressure. This was something I was pretty nervous about. As I looked down, beneath my dangling flippers, about 30 feet to the bottom, I’d recalled all the times I had attempted to free dive in the ocean or elsewhere only to stop a few feet down due to the pressure making my head feel like it would explode. I couldn’t imagine getting all the way to the Great Barrier Reef and then NOT being able to explore it because I simply couldn’t force myself to dive deeper.

Great Barrier Reef Australia coral

Luckily, I found that this gradual process of descending wasn’t a challenge at all. It just required blowing out of my nose every 6 feet or so and I instantly regained the right balance of pressure. With that huge worry out my mind, I didn’t see anything else holding me back and I was now officially ready to explore the reef!

Great Barrier Reef Australia scuba diver

One thing you have to get used to is lying laterally and smoothly utilizing your flippers. If you’re not lying parallel to the bottom of the sea floor, any kicking motion will send you straight up toward the surface of the water and you don’t want that. Once you relax and get a smooth “kicking motion” down, it’s pretty much an effortless glide through the water from that point. If you can’t get the motions down immediately, don’t panic. I saw several people who took a while to get the hang of it and after some help from some very patient instructors they joined in on the fun a little later.

Great Barrier Reef Australia scuba diver

On an introductory dive, the dive instructor leads the way on the tours and you and your group of about five people follow along, stopping to take photos and check out some amazing sights. The water wasn’t quite as clear as I thought it might be, something that some people have told me has gotten worse over the decades. But it was still some of the clearest waters I’ve ever swam in and offered me the chance to see all that the Great Barrier Reef had to offer.

Great Barrier Reef Australia scuba diver

Discovering the Reef

It’s a beautiful sight to see nothing but wafery discs of coral spread out in multi-tiered  colonies around the sea floor with little brightly colored fish poking in and out of the shadowy crevices. The coral takes on a vast array of shapes from mounds and spires, to intricately folded sheets and blobs. Purples, yellows, oranges, and lime greens paint these oddly shaped reefs and create a colorful world that’s ever-changing.

Great Barrier Reef Australia coral

As you hover close to the coral, occasionally something odd appears right under you like a giant clam. The instructor performed some kind of hand gesture, almost like she was casting some kind of voo-doo spell on the clam, and within an instant, the giant clam shut its hinges as if to remind us that inside those large valves something was alive.

Great Barrier Reef Australia giant clam

We came across several other fascinating little creatures like sea horses and a sea cucumbers, which we were able to hold for a bit (under direction of the instructor, of course).

Great Barrier Reef Australia coral

I was having a field day with the camera we rented. In fact, my friend and I took over 300 photos while we were there (we came close to beating Tusa’s official record for number of shots). And it’s not easy to take good photos when diving. For one, you have the limited light down at the bottom of the ocean floor pretty much forcing you to use flash, which can lead to some unsightly sunspots in your exposures (I edited out some of these spots but you can still see them in several of my photos).

The other difficulty is trying to get the focus and proper angles while you are moving underwater. It’s not easy, especially when you don’t have a viewfinder to look through, so my suggestion is to just fire away! Also, in between dives we did a little bit of snorkeling and I found it much more difficult to snag photos while dealing with the currents at the water’s surface. Plus, it was much harder to get close-ups of many of the corals, so I definitely recommend renting a camera and going with the scuba diving option.

Great Barrier Reef Australia coral

Finding Nemo?

We soon approached a sea anemone where there happened to be a few clown fish hanging out. These little “Finding Nemo” fish were a lot smaller than I thought they would be and it was very interesting how they just squirmed through the swaying tentacles of the sea anemone that would sting most other fish. They seemed to be pretty curious about us though and came out of their little habitat to get a closer look at us.

Great Barrier Reef Australia scuba diver with clown fish

Some groups  of divers got a little more lucky than others — I heard other people saw sea turtles, reef sharks, and even an octopus crawling along the rocks. While we didn’t see any of that, I still was just thrilled to be in the water and see the reef. I just couldn’t get over the designs and patterns of the colorful coral — I’d never seen anything quite like it before. With all of the amazing camouflage techniques marine animals use, there’s no telling what else we missed while scuba diving.

Great Barrier Reef Australia coral

The one thing they don’t tell you about scuba diving that you’re going to hate is how fast time flies underwater. We did three dives in total, each 30 minutes, but to me it felt more like 10 minutes. It’s almost therapeutic being down there. It’s quiet, it’s mesmerizing, and it feels like you’re exploring some alien-like world in outer-space.

A threatened future

Unfortunately, the Great Barrier Reef that we love today is not the same one that existed a few decades ago. I was talking with a British ex-pat who’d been living in Australia for about thirty years or so before I went diving. She told me that right when she got to Australia she went on a dive in the Great Barrier Reef and then just recently went back for the first time in nearly three decades. She told me that she almost wept when she saw what the reef looked like now! The Great Barrier Reef has lost about half its coral in the past three decades, so I tend to believe her that the reef just isn’t what it used to be.

Great Barrier Reef Australia coral

The Great Barrier Reef is a marvelous site. Hopefully conservation efforts will prove effective in the decades going forward because I feel like every generation should get a chance to see this natural wonder and be in awe of its beauty.

Checking Out Street Art in Melbourne, Australia

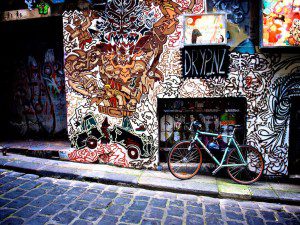
One of the coolest memories I have about living in Australia is my trip to Melbourne (that’s pronounced more like “Melb’n” for the outsiders). Melbourne is the second most populated city in Australia and the financial hub of the country and the region as a whole. Though a leading financial center for Oceania, the city is also packed with modern Australian culture, where the art, TV, and film industries have a strong presence. One of the most evident signs of this art culture is the street art that you will inevitably stumble upon while in Melbourne.

Tip: Use WalletFlo for all your credit card needs. It’s free and will help you optimize your rewards and savings!

Street art brick wall Melbourne Australia

Inspired by the graffiti scenes in New York City, this street rose to popularity in the 1970s. It started off mostly being done with tags on trams and railways but soon made its way onto street corners in an ever-expanding way. By the time the 90s came, new techniques were being utilized by artists like stenciling, posters, stickers, and installations. In fact, stenciling has been adopted so widely in Melbourne that it’s been dubbed the “stencil capital of the world.”

Street art brick wall Melbourne Australia

Today, you can find brick walls and buildings bleeding with imagination, full of bright colors and vivid portrayals of everything from monsters, teddy bears, intricate pattern designs, robots, cartoon characters, and plenty of abstract pieces. The street art scene hasn’t completely lost the early rebelliousness that street art originally grew out of. There’s still an obvious socio-political nature to many of these art works that can be found around the city. I recall several pieces that clearly referenced war, immigration, race, inequality, etc. However, it seems that the aesthetic nature of street art seems to have changed to a more commercially driven scene today, where plenty of works are found in galleries and sold in markets and street vendors.

Street art brick wall Melbourne Australia

Not that there’s anything wrong with that. Of course, I’m not a street artist so my opinion doesn’t mean much on this topic, but I don’t think there’s anything inherently wrong in artists capitalizing on the growing demand and interests in their works. I agree that the genesis of street art seems like it came out of the growing counter-cultures around the world that were opposed to “the system” not only on social and political levels but also in the sense of going against the norms of traditional art forms. Add in the fact that it’s a historically free attraction to the public and it does seem a bit contradictory that today we’d find it nestled alongside other forms of traditional art in a gallery charging admission fees. But still, I don’t have a problem with people capitalizing on their talents, especially if that means those talents can then produce more brilliant pieces in the future and thus expand a brand, style, message, etc. I’m all for it.

Street art wall Melbourne Australia

You can find some of the best places to see the street art in Melbourne here but it’s not difficult to find it throughout the city. There are also tours that are offered by local experts who can take you around and provide you with insight into the street art scene. We opted to just walk around ourselves and explore the city on our own. It’s a lot of fun and I highly recommend it. You never know what you’re going to see in the next street corner or alleyway and many of these works were put together by some highly skilled artists as evidenced by their high quality.

Street art wall Melbourne Australia

There’s still some resistance from public officials on whether or not  street art is a good thing for the city. A few years back, Disney World actually put up a Melbourne-inspired alleyway display in Orlando decked out with graffiti but the Victorian Premier John Brumby forced Disney to withdraw the display, stating graffiti was a “blight on the city” and not something they wanted to be on display overseas.

Street art wall Melbourne Australia

Others adamantly disagree with the Premier. It’s hard to deny the uniqueness of such a highly concentrated collection of beautiful art pieces. Yes, some of the areas are tagged with generic graffiti that serves no other purpose but to detract from the beauty of the art work but that’s something you find in any city. I think Melbourne officials should be proud to support the products of such a talented group of contributing artists over the years and welcome the interests of tourists. The good news is that the city has put forth efforts to preserve some of the street art but such efforts are inevitably complicated due to the subjectivity involved in determining what works “deserve” preservation, the ephemeral nature of the art, and random acts by others to remove street art.

Street art wall in alley Melbourne Australia

Like I said, I’m not by any means an expert on street art around the world and not a Melbourne resident who might be more invested in this debate. However, speaking as a traveler, I represent the perspective that street art done in places like Melbourne is a valuable and vibrant thing and something that definitely helps to draw people to come and check out a city like Melbourne. City officials may not be able to preserve the art, but I hope it’s at least allowed to flourish as long as it can.

Renting Pedal Boats on the Serpentine in Hyde Park, London

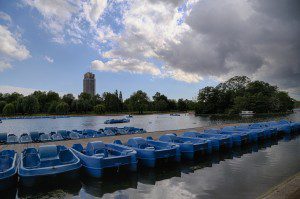
The trend-setting Serpentine

Hyde Park is one of the best places in the charming city of London to catch a break and relax. One of the fun things to do in the park is to rent a pedal boat and boat around the Serpentine, which is a 40 acre man-made lake in the middle of Hyde Park that was created back in 1730 pursuant to orders by the Queen.

It was a bit revolutionary for its time, as most man-made lakes were long and straight while the Serpentine was one of the first man-made lakes designed to appear natural with its curvy shape.

Other places around the world took note of this natural design and soon hundreds of man-made lakes were popping up around the globe assuming more natural shapes. So when you’re paddling around the lake just remember that the Serpentine, like most pats of London, is rich in history and tradition.

Tip: Use WalletFlo for all your credit card needs. It’s free and will help you optimize your rewards and savings!

Prices per adult: £12 for one hour; £10 for 30 minutes

It obviously seems worth it to pay the extra two pounds for an extra 30 minutes but do note that they actually allow you an extra ten minutes to get back to the dock so the thirty minute option actually gets you about 40 minutes.

Because it’s only a matter of two pounds, you’re probably not going to worry about potentially choosing one option over the other. Just know that if you’re overweight or just big and don’t have experience with these boats you might be ready to head back by the time 30 minutes rolls around.

Pedal boats Hyde Park London

You rent the pedal boats from the gift shop/boat house on the northeast side of the lake. Thus one of the easiest ways to get to the pedal boats is from the Hyde Park Corner Underground station. Once you pop out of that station just follow the Serpentine Road until you see the little blue boats — you can’t miss them.

They have windows on the outside of the gift shop but they were closed when we were there so if you don’t see anybody selling tickets at those windows then just go inside the gift shop and they will take care of you inside.

One thing to remember is that you can only rent these boats from March to October, from 10am to sunset.

The paddling experience

I’m not going to lie, the paddle boats were causing us a little bit of trouble. For two pretty big guys (plus our heavy bag we had with us), I think we had our pedal boat loaded down pretty good so that we were making very little progress with a lot of effort.

We saw several boats fly on by us with smaller kids on them so I’m thinking that if you’re much lighter you probably won’t have any issues. It’s also possible that our boat was a bit broken because it felt like our pedal mechanism was constantly getting stuck so watch out for that.

Pedal boats Hyde Park London

Another thing to be prepared for is if you’re over six feet tall (I’m 6’1″) your legs may be a bit squished. It wasn’t horrible but having your kneecaps come up to your chin is never the most comfortable position. Also, try to position your shoes correctly on the pedals for the best experience.

If you’ve got a big foot (11 in mens or larger) then try to make sure that the metal rods on the pedals fit right into the middle of your shoe, otherwise you’re going to have a hard time making full rotations.

So aside from a little discomfort peddling around the boats and taking in the views is a nice way to relax. We didn’t see any fish but we did come across a lot of ducks and a couple of massive swans that I swear looked like they were standing 5 feet tall. Some of the ducks seemed to really enjoy tailing us while we peddled off.

Birds Hyde Park London

I think we would’ve enjoyed our time on the Serpentine a little more if we weren’t worried about the weather. As you can see by the photos, some powerful looking storm clouds were rolling through and considering we had two laptops and my DSLR on us in the middle of this 40 acre lake, we got a little worried that we might get stranded in a rain shower.

That’s another thing – they didn’t have any lockers for us to store our stuff so try to plan that out ahead of time if you know you’re going to have bags on you.

Birds Hyde Park London

Overall, it’s a cool experience and fun way to relax in the middle of London. Personally, I found Central Park in New York City to be a bit more interesting to explore but Hyde Park is still a great place to check out. If you’re visiting London from March to October and looking for things to do then definitely consider spending 30 minutes to an hour pedal boating out on the Serpentine.

Looking for other ideas on what to do in London? Check out these London related articles:

1 2