Simply put, the Antelope Canyon in Arizona may be the most mystifying place I’ve ever visited.
So this post deserves two parts.
The first part will focus on helping you to prepare for visiting Antelope Canyon and give you some tips on tours, tickets, and things like Upper Antelope Canyon vs Lower Antelope Canyon and nearby hotels.
The second part will give you tips for photographing the canyon.
Also, if you’re interested in learning more about national parks in Arizona, check out my article here.
Tip: Use the free app WalletFlo to help you travel the world for free by finding the best travel credit cards and promotions!
Table of Contents
1. Antelope Canyon tours and ticket prices
Unless you’re purchasing some type of package deal from a tour operator, you’ll likely purchase separate tickets for Upper Antelope Canyon and Lower Antelope Canyon.
Note: Antelope Canyon requires a tour and a guide to enter the canyon
Upper Antelope Canyon
You can find tours and make tour reservations here.
For Upper Antelope Canyon you’re looking at the following fees:
- Child $67 (ages 0 to 7)
- Adult $85 (ages 8 and older)
RATES INCLUDE Navajo Tribal Park entrance fee, local taxes.
Lower Antelope Canyon
For Lower Antelope Canyon you’re looking at the following fees:
- Infants FREE (ages 0 to 3)
- Child $30 (ages 4 to 12)
- Adult $50 (ages 13 and older)
You can book Antelope Canyon tours here.
Photography tour
As of December 31, 2019 there are no more photographic tours in Upper Antelope Canyon. They only accept the sightseeing tour.
2. Upper Antelope vs Lower Antelope
Antelope Canyon comprises two separate canyons and you have to book trips to them separately.
Lower Antelope is less populated with tourists, cheaper to visit, longer, and the canyon spaces are much tighter inside the canyon walls. Upper Antelope is more frequently visited, more expensive, and has much wider walkways in the canyon.
The important difference for me was the famous light beams of Upper Antelope.
While you can find the light beams (or “shafts”) in Lower Antelope as well, Upper Antelope’s light beams appear to be more dramatic and seemed to be the more guaranteed route for stunning photographs.
So which one is right for you?
Well, they are both going to blow you away so you really can’t go wrong with either one. But if you are trying to narrow it down, one thing to consider is your personal mobility.
In Lower Antelope, you will have to climb some stairs and ladders and get through some very tight spaces with moderate scrambling. In Upper Antelope, that is not the case because the floor is flat and there are only a few narrow sections.
So if mobility is an important concern then the decision is easy: go with Upper Antelope.

One big advantage to Lower Antelope is that there are far fewer people visiting the canyon, which means you don’t have to deal with mass herds of people.
Another is that Lower has the more adventurous appeal, because you may be able to venture without being accompanied by a tour guide and there’s a little bit of climbing here and there.
While the spaces are more cramped and thus more difficult to set up a tripod, you won’t have to deal with the big crowds so it balances out. But once again, if you are going to Antelope Canyon to shoot the light beams you probably want to go with Upper Antelope.
Another difference is getting there. For Upper Antelope, you will arrive at a parking lot where you will sign in under a tent and then jump aboard an open-bed truck and head a few minutes down the road and then on to a bumpy off-road to reach the canyon.
We did a photography tour (more below) so we were taken to the canyon in an enclosed SUV.
For Lower Antelope, you simply show up at the parking lot and then a guide takes you down into the canyon. Based on reviews, it appears the guides use their discretion as to whether they’ll accompany you down there or not.
Overall, I think the two main determining factors are mobility and desire to shoot the light beams. But just know, you really can’t lose any way you go and remember you can always schedule a tour for both. As for my recommendation, I say do both.
However, if you can’t do both then I’m on Team Upper Antelope (at least for your first time out there).
You might be interested in: REI Co-op World Elite Mastercard Review
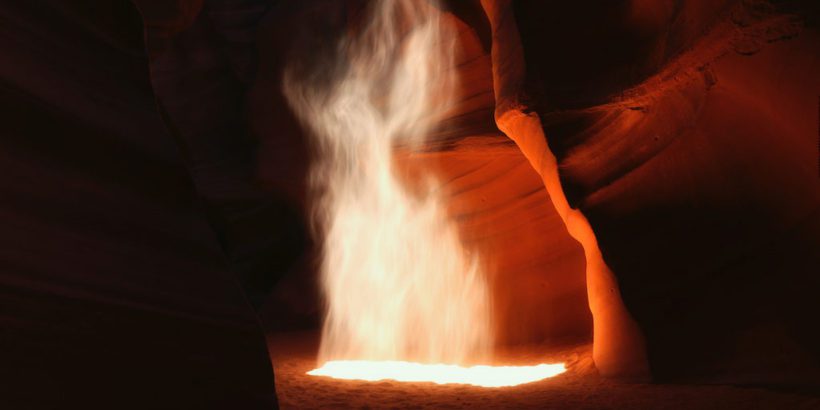
3. Antelope Canyon light beams
The light beams in Antelope Canyon are, to me, what makes this place is so unforgettable. They only occur at certain times of the day and only last for a short while but when they shine through the openings up top it’s truly a sight to see.
I highly recommend planning your visit so that you can witness the magnificent light beams. Call the tour guides to see when the best time to come to see the beams is since that time will differ depending on the time of year. Usually the time will be between 10am-12pm.
If you can’t get there to see the beams, don’t worry, this place is still one of the most mystifying destinations you’ll ever visit.
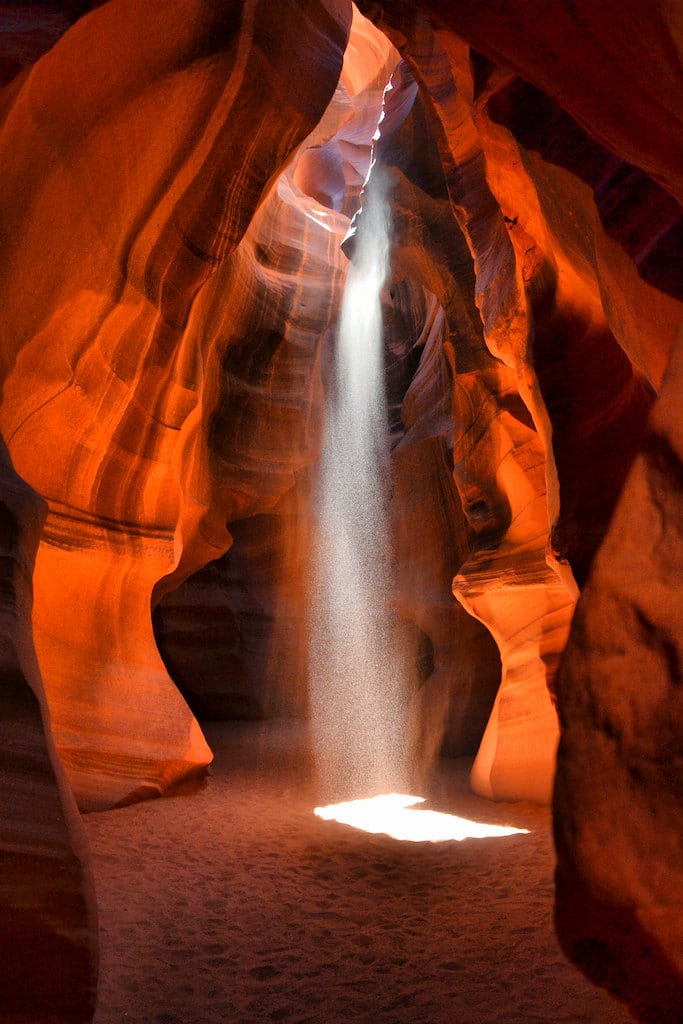
The guides in Upper Antelope will take care of throwing sand into the beams to make sure that the light sticks out, just try to time your shots to make sure you capture the beam when the sand is mid-air.
And please, as much fun as we all have throwing sand up in the air, just let the guides handle the sand throwing and work their magic.
There was at least one visitor who threw up a handful of sand only for it to shower upon an entire group of photographers in front of me. Suffice it to say, he instantly became the least popular person in the canyon.
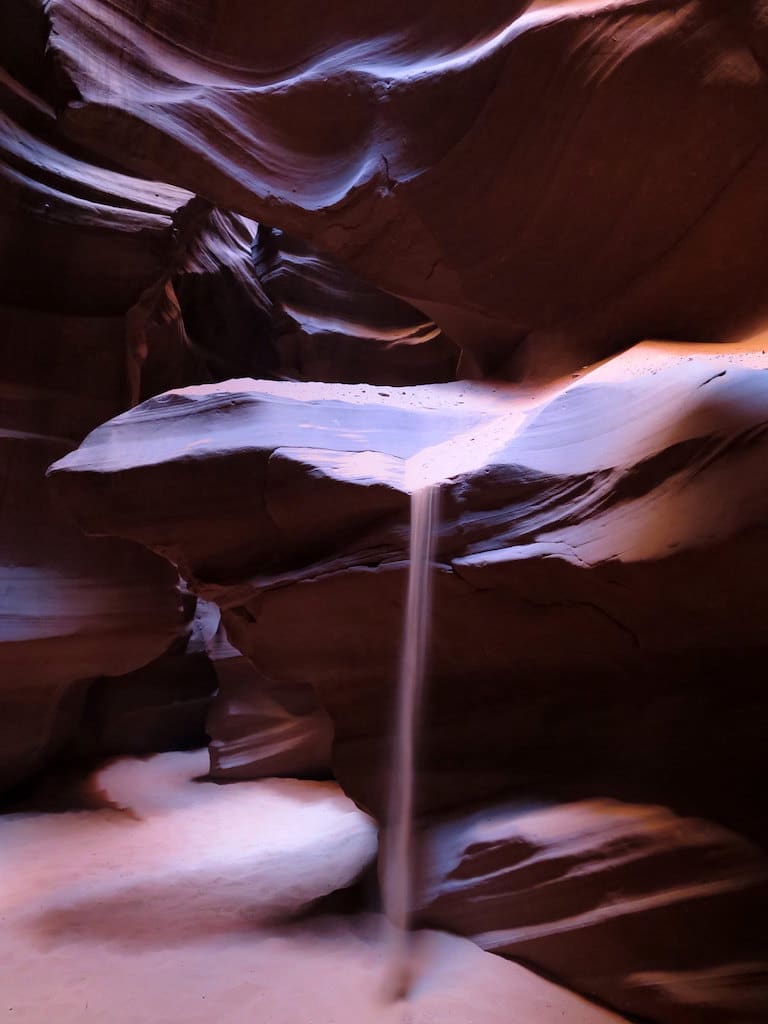
4. Pouring sand
Another amazing sight is the pouring sand effect. This happens when the guide throws a lot of the sand onto the canyon walls or also when the sand is blown from above the canyon.
When I visited, a strong wind blew tons of sand from the top so we had more than enough pouring sand to go around. And when I say tons, I mean it felt like I was trapped in the bottom half of a giant hourglass.
Our guide said that’s something that usually doesn’t happen but just be ready for it because it will get everywhere.
5. Bring a bandana
This is probably not necessary for most visitors.
But if you run into a massive sand pouring as we did, a bandana will come in handy to keep all the sand out of your mouth and from running down your shirt.
A few of the guides were wearing these so it’s something to think about. Plus, there’s always the added effect of feeling like a bad-ass because you’re wearing a bandana.
6. Bring water
While the canyon is much cooler than the desert air above, don’t forget that you’ll still be getting thirsty and try to bring a bottle of water with you. If you’re going to bring a backpack, try to bring the smallest one possible.
7. Watch out, it’s dark down there
One thing that I wasn’t prepared for was how dark the canyon got at times. Upper Antelope can get really dark, much like a haunted house you’d go to during Halloween (note Lower Antelope is not as dark).
One unfortunate person in our group was startled during the sand downpour just mentioned and so she took off running through the canyon only to be absolutely leveled and knocked to the ground by a section of the canyon jutting out. Aside from some ego bruising, she appeared to be okay.
So just be careful and even if you are being rushed in a tour; use your hands to get around when you can’t see.
Also, watch out for the photographer groups. While shooting we had the occasional straggler who stumbled right into our shots. Be alert and not try not to be that person, though I will say all of us photographers were extremely polite in those cases.
8. Watch the weather (Lower Antelope folks)
If you haven’t come across any articles about the flash flood disaster at Lower Antelope in 1997, now is a good time to inform yourself. I’ve been told that the guides at Lower Antelope Canyon take extra precautions now to avoid disasters with flash floods.
Even so, know that you may be the only person who can ultimately look out for yourself. All it takes is one mistake or unexpected storm to find yourself in a situation.
So check and double check the weather on your morning out to the canyon. With all the awareness of the dangers today, the odds of another disaster are probably very slim, but the last thing you want to do is venture down into a slot canyon and find yourself in a situation.
If you want to find out more about the (very sad) disaster in this canyon in 1997, click here. The flash floods can occur in Upper Antelope as well.
However, there you never leave the sight of your guide and the route of escape is much easier so it’s probably safe to say your risk is minimal.
9. Time zone differences
The Navajo lands operate on a different time zone from the neighboring lands in Arizona who don’t acknowledge daylight savings time.
Coming from the pacific time zone, I confused myself three times over trying to remember what time zone they were on. So my recommendation is to just call the tour company you booked with and make sure you know what time your tour starts on in Navajo time.
10. Eat and go the bathroom before
Remember to use the bathroom and maybe grab some snacks right before you go on your tour.
11. Hotels near Antelope Canyon
A great thing about staying a night or two in Page, AZ is that it gives you time to perfectly construct an itinerary for seeing some of the nearby sights.
For example, you can wake up early and get some sunrise shots at Horseshoe Bend and then head over to Antelope Canyon and catch the canyon at the best time of day (when the light beams are out) and then still have time to head over to another amazing place like Glen Canyon (though if you want to visit Rainbow Bridge that needs to be an all-day event).
I stayed at the Marriott Courtyard in Page, AZ, and highly recommend it.
12. Nearby attractions to Antelope Canyon
- Horseshoe Bend 10 miles (15 minutes)
- Grand Canyon North Rim 128 miles (2.5 hours)
- Grand Canyon South Rim 135 miles (2.5 hours)
- St. George, Utah 215 miles (2 hours, 50 minutes)
- Las Vegas, Nevada 380 miles (4.5 hours)
PART II
Photographing Antelope Canyon
I consider myself an “enthusiastic amateur” photographer based purely on the idea for that title that just popped into my head. So feel free to take my advice with a grain of sand salt. But if you like how my photos turned out then this information should be helpful.
1. Photography tours
If you are going to Upper, then I highly recommend a photography tour.
The main reason is that there are so many people in that canyon — especially during peak hours — that you will struggle to find room to set up for shots and struggle even harder to keep others out of your pictures.
Also, most guides don’t allow others on non-photography tours to use tripods, so there’s goes your chance at getting professional-quality shots.
I chose Adventurous Antelope Canyon for my photography tour (no longer available).
Now the photography tours are expensive but worth it. Our guide was a youngster but he did a great job of keeping everyone else back and out of our shots.
He also directed us on where to set up for the shots. Without him telling everyone to stay back, I don’t know how I could have gotten half the shots I did. The guide also gave us some good tips on shooting in there.
I only had two real complaints with the tour.
First, our tour guide initially told us “no taking HDRs,” presumably because it would slow down the tour. I’d paid wayyy too much money to be told I couldn’t shoot HDRs, so I ended up shooting them anyway. My second issue was just the nature of the tour. It’s quite hectic (more on that below).
Overall, I still had a great experience and I highly recommend AAC tours. Note: I’m not affiliated with AAC in any way.
2. Tripod and Lenses
If you scheduled a photography tour with Upper Antelope, you will have to bring your tripod and your DSLR. For lenses, try to stick to one wide-angle lens. There’s a ton of sand floating around down there and it’s all looking to land itself in the little cracks of your camera so try to stick to one lens.
Also, if you’re on a photography tour, it will be a hassle changing lenses more than once. That said, if you really just have to use two lenses it’s doable (I had at least one person in my group do so). Just take extra precautions to keep the sand out and not to waste time.
If you’re planning a trip with your partner and he/she doesn’t have a DSLR/tripod you are kind of stuck. In my case, I called the tour company and told them my situation and they said it’d be okay for my partner to come along and shoot with just an iPhone (as long as I payed full-price for another spot).
But when I arrived to sign in they asked for his DSLR and I had to reason with them for us to be able to go on the tour. I understand them wanting to reserve spots for serious photographers only but you’d think they’d have options for partners/assistants or at least be consistent with their customers.
Aside from that mix-up everything went just fine, though.
3. Shoot multiple exposures
Shoot multiple exposures even if you’re not intending to create HDRs.
I walked out of the canyon with about 450 exposures and I’m glad that I did. I had several shots where I wouldn’t have got the exposure right were it not for shooting multiple exposures of -.5, -1, or -1.5.
I highly recommend at least taking/making some HDRs but don’t feel like everything has to be HDR; plenty of single exposures will turn out excellent.
4. Underexpose
I’m not going to lie, dealing with the light down there is not easy.
The metering is tough and the dynamic range is often times impossible. If you’re not shooting multiple exposures (or even if you are) make sure that you underexpose about a stop and a half.
5. Shoot RAW… or JPEG
I shot the first 25% of my shots in RAW but due to shooting multiple exposures this became impossible to keep up with the tour, so I switched to JPEG.
If I wasn’t shooting multiple exposures, I would have stuck to RAW due to the occasional impossible highlight.
But I honestly am glad I switched because I feel my best shots were the result of being able to capture the canyon with multiple exposures, which would not have been possible for me shooting in RAW.
6. Aperture/ISO/etc.
In almost all of my shots, my aperture ranged from 9 to 11 with an ISO at 200. Shutter speed varied greatly depending on the section of the canyon. I used a Canon EF 17-40mm f/4L with a Canon 6D.
Feel free to experiment but that’s what worked for me.
7. You can ditch the polarizer
One article I read before going recommended using a polarizer to deal with reflections on the canyon walls. I asked our guide if others use the filters and he said nobody ever does and recommended I don’t. Of course, I ignored his advice and tried out the polarizer for a little while to see for myself.
After a few shots, I decided it wasn’t doing much for me and quickly ditched it.
For me, a polarizer just doesn’t seem necessary but there’s nothing wrong with giving it a try depending on the lighting conditions, especially if you are in the brighter Lower Antelope Canyon.
8. Autofocus or Manual Focus?
Another article I came across stated to avoid autofocus down there because the light beams would affect the focus.
I usually alternate between both manual and auto-focus when I shoot, so I figured I’d be fine just keeping to my usual routine.
But due to the rushed nature of the tour, I opted to stick to autofocus and my photos turned out fine. It probably depends a lot on your camera, but I think autofocus can work out just fine — just keep an eye out for potential issues.
9. Wrap it up (the camera)
Try to get a hold of saran wrap or a plastic bag and tape it around your lens and camera in such a way to protect the cracks of your equipment.
As long as you wrap where you can still manipulate your zoom/and or focus, you’ll be just fine.
Another way would be to just bring a bag to cover the camera in between shots if you didn’t want to hassle with wrapping the camera.
10. Vertical framing
Most of my photos were framed vertically as you can tell. Obviously, this depends on preference and taste but I think on average vertical framing allows you to capture the canyon better.
11. Find your rhythm
If you’re using a timer then you’re going to need to find your rhythm early on to make sure that you catch the beams at the right time. The guides will tell you when to shoot but if you’re going off a timer on the camera it’s not that helpful, so you’ll need to time it yourself.
This is why I recommend using a cable release for you camera.
If for some reason you don’t think you got the shot you wanted, don’t be shy and just ask the guide for another throw of sand or another minute or two and they’ll make sure you get your shot.
Keep in mind that it’s also nice to have a variety of captured light beams with different degrees of opacity.
12. Don’t forget to look up
Everyone will tell you not to get caught up in the light beams and sand. Remember to look up for interesting views and shots.
13. Be prepared for camera warfare
One reason you may want to go with Lower Antelope is that Upper Antelope is chaotic.
There are tons of groups going in and out and tons of people directing orders for others to move that it can feel chaotic. Even doing the photography tour with only five other photographers involved a constant jockey for position with others directly above, below, and to the side of you at all times.
One guy remarked that this was “camera warfare” and I’d have to agree.
Everything is rushed.
You’ll be directed to go to a spot, take your shots, then pick everything up and scurry off to the next spot.
There’s no time wasted in “taking in” the canyon. On the one hand I appreciated the efficient approach to the tour, but I also felt like I didn’t get the chance to just relax and enjoy being down there.
If you’re looking for a laid-back type of photography experience that is not what you are going to get in Upper Antelope, at least not during the peak hours.
I love shooting photos but after about an hour and 45 minutes in there, I was ready to wrap it up because it was so hectic in there. Now, they did give us about 15 minutes at the end to roam freely which was nice.
With that said, don’t let the potential stress keep you from doing the photography tour.
If you get a good guide, he or she will make sure you get your shots. And in a way, dealing with all the commotion made the experience more rewarding because it was challenging.
I think the important thing is just to be prepared for a little bit of madness and go in with the mindset of not allowing all the chaos to affect your shooting. One thing that might help is staying at the front of the pack and next to your guide. That’s what I did and it helped me get my shots.
14. Cleaning your gear
There’s a good chance you’ll end up with at least some sand in your camera gear (and other places). In my case, I had tons of sand stuck in my lens so that when I tried to zoom it sounded like I was grinding peppercorns. The guides have air pumps to help knock some of the sand out but what worked best for me was wrapping my camera strap around my wrist and holding the camera outside the car window as we drove off on the highway.
Holding your $2,000+ camera gear out the window on the highway feels like you’re just asking for a disaster and you’ll definitely get some strange looks by others — but trust me it works. Also, try twisting the zoom/focus to shake up the sand loose even more. It took a long time for me to get all the sand out, but I finally was successful.
15. Tip
Don’t forget to tip your tour guide….
16. Additional Resources
Finally, if you want more information take a look at this blog. This guy is ridiculously talented and experienced and has shot the canyon a million times, so definitely check him out for more technical advice.
Keep in mind that pricing and policies of these places is subject to change, so always call the tour companies with your questions. The owners of these companies are extremely friendly and helpful on the phone.
That’s all I have. Seeing Antelope Canyon is one of the most amazing things I’ve done in life so far. Even if your photography tour gets a little hectic, you’ll still leave that place thoroughly impressed with its natural beauty.
If you found this article helpful then check out my eBook Hidden Gems of the Western United States to find more stunning destinations and learn how to explore these places best!
Antelope Canyon FAQs
A guided tour for an adult is $85 and for a child it is $67.
Upper Antelope Canyon is closed for all of 2020 and will likely remain closed several months into 2021.
The tours last about 1.5 hours.
Yes, you are required to take a guided tour to explore Upper Antelope Canyon.
7:50am, 9:50am, 12:00pm and 2:00pm.
No, tripods are not allowed.
No, strollers are not allowed.
Approximately five hours driving.
Upper Antelope Canyon operates on Arizona time.
Daniel Gillaspia is the Founder of UponArriving.com and the credit card app, WalletFlo. He is a former attorney turned travel expert covering destinations along with TSA, airline, and hotel policies. Since 2014, his content has been featured in publications such as National Geographic, Smithsonian Magazine, and CNBC. Read my bio.

Thanks for this post! We SugarLanders are planning to take a regular tour May 2nd, staying 2 nights in Page. I had only a vague idea of what to expect. Your suggestions are very helpful, especially the heads up about the sand, crowds and spacial awareness. Then there is the notion of keeping expectations realistic. I HOPE my little automatic waterproof canon will serve well. I plan to head to the front of the pack!