The Harry Potter London Tour Review at Warner Brothers Studio

If you like Harry Potter and you’re going to London you pretty much have no choice but to do the Harry Potter London Tour at Warner Brothers Studio.  From strolling through the cobblestoned Diagon Alley to checking out Weasley’s crooked dining room, everything in the tour is extremely well done and there are thousands of props to see along with the rebuilt scenes from the movie.

I’ll try to give you an idea of what to expect along with a sneak peak at some of the amazing sets without spoiling too much of the fun for you and who you how to get tickets for your studio tour.

Tip: Use WalletFlo for all your credit card needs. It’s free and will help you optimize your rewards and savings!

The Harry Potter London Tour Experience

Your Harry Potter London tour experience begins before you arrive at the studio.

Get sorted by the Sorting Hat

The first thing you have to do is get selected to your respective house. That’s right. Go to the official Harry Potter site, WizardingWorld.com, sign-up, complete the questionnaire and let the Sorting Hat determine your fate. I’d like to just point that I did get chosen for Gryffindor (*ahem*) while Brad ended up with good ole Ravenclaw.

Some of the questions you’ll answer online are actually kind of thought provoking and will make you think about some odd scenarios but the test only takes a few of minutes. For the true Potter fans, finding out your house before you go is a must.

Related: Hocus Pocus Filming Sites in Salem, MA Guide 

Harry Potter
Not braggin’ – just sayin’

There’s also a whole gaming community on the site where you can earn points for your house by competing in wand duels and things like that but after getting it handed to me in my first few attempts I gave it a rest pretty quickly (some of the people on that site are pretty serious and on a different level).

Harry Potter London Tickets 

The second thing you need to do is book your tickets online you can do that here as far in advance as possible. This is especially true if you are wanting to visit any time close to the holidays.

In such a case, you need to book at least a month ahead if not longer to have a chance at getting your preferred time slot. If you’re visiting at any other time of the year, you should be okay waiting even only a few days before your visit but do try to still book early.

Tickets cost £47 ($63 USD) per adult (16+ years). Ages 5 to 15 are £38 ($51 USD) and must be accompanied by an adult. Children four and under are free.

They also have a family packages. With those, two adults & two children OR one adult & three children can get in for £150.

It seems pretty steep, but this is one of the pricey attractions in London (it’s actually located outside of London) where you’ll actually get your money’s worth. If for some reason you have to re-schedule you can do so but it’s £10 to reschedule your tour so try get your date right the first time.

Harry Potters Cupboard on Harry Potter London Tour
Harry Potter’s Cupboard

One thing we found out is that you can actually enter your tour before your designated time. Try to keep it within reason but we were about 45 minutes early for our designated slot and they just let us go right on in. When choosing your time slot one thing you might want to think about is doing a later tour. The reason? Field trips! 

I’m assuming UK schools are like the US in that they usually don’t do field trips later in the day so your chances of being hit with endless herds of school children may be less. Of course, this is Harry Potter, so you’ve got to expect for tons of kids to be running around but during our tour (which was around noon), there were endless droves of school children pouring in, which made it kind of hard impossible to get good photos of some of the sets. So just think about that when planning.

Harry Potter Studios London The Great Hall

During the tour, you are free to roam about the movie sets at your own pace with the one exception being the Great Hall. In there, you’re only given something like 15-20 minutes before the next group arrives so it’s a little quick (though you can always hop back in the room once the next group enters).

Harry Potter Studios London The Great Hall
Harry Potter Studios London: The Great Hall.
Harry Potter Studios London The Great Hall
Harry Potter Studios London: The Great Hall.
Harry Potter Studios London The Great Hall
Harry Potter Studios London: The Great Hall.

The Harry Potter Studio Tour London Great Hall is pretty stunning and lining the walls are uniforms and costumes worn by the characters of the different houses, including some of the original attire worn by none other than Harry Potter himself.

The tables are set with all of their fancy silverware and decked out in the most delicious-looking fake food you’ve probably ever seen. Apparently, the producers used real food in the first Harry Potter but after old food started causing a nasty stench in the place they moved to decorative props instead.

Harry Potter Studios London The Great Hall
Harry Potter Studio Tour London Great Hall.
Harry Potter Studios London The Great Hall
Harry Potter Studio Tour London Great Hall.

Tons of extremely detailed sets and props to check out

From there it’s off to wherever you’d like to venture.  You’ll be amazed by the thousands of props on display. The attention to detail that went into making everything from the wand boxes to the potion bottles is utterly mind blowing.

Wands at Harry Potter Tour London
Cauldrons at Harry Potter Tour London

The studio has all of the major sets you’d probably expect it to have. You get to see the Gryffindor common room, the dorm rooms, Dumbledore’s “office,” the potion room, a room from the Weasley’s house, and a bunch more. At each exhibit there are little information panels with tons of interesting facts about the props that you’d likely never know. Also, while we didn’t do the headset tour, I was told that there’s plenty of interesting info to learn while doing those.

As of March 2015, they have Platform 9 3/4 and the Hogwarts Express. And now they even have the Forbidden Forest.

Gryffindor Boys Dormitory Harry Potter London Tour
Gryffindor Boy’s Dormitory
The Entrance to Dumbledores Office Harry Potter London Tour
The Entrance to Dumbledore’s Office
Dumbledores Office on Harry Potter London Tour
Dumbledore’s Office
Weasleys Dining Room Harry Potter London Tour
Weasleys Dining Room
Snape in The Potion Room on Harry Potter London Tour
Snape in The Potion Room

Harry Potter Tour London green screen experience

Although we didn’t, you can opt for a green-screen experience where you can actually ride a broom in front of a green screen and get some kind of sweet video/photos made. I think they even dress you up a little with a scarf and cloak. I’m not sure what it costs to do that but it seemed like a lot of people weren’t passing up the opportunity to do a little broom flying.

Motorbike on Harry Potter London Tour

After you’re done exploring the first building you move into the cafe area. Here, they sell hotdogs and other food items  (even breakfast dishes before 11:30) so you can relax a little bit and get off your feet if you want. The one thing you have to try here is butterbeer!

Tip: Use WalletFlo for all your credit card needs. It’s free and will help you optimize your rewards and savings!

Harry Potter Studio Tour London Butterbeer!

First, butterbeer is not alcoholic so don’t get too excited. It tasted just like cream soda to me (which I liked but Brad didn’t care for). The foam on top of the “soda” is extremely sweet and tastes like butterscotch.

I saw where some recommended only getting one cup for two people but honestly the cups are so small I recommend going with one cup for each person. I’m not 100% sure, but I think each glass of butterbeer costed about £3.

Foamy butterbeer at the Harry Potter Studio Tour London
Foamy butterbeer at the Harry Potter Studio Tour London!

After you drink up on butterbeer you head outside into the parking lot for some more interesting set pieces. There’s the triple-decker purple bus that you won’t miss as soon as you step out, the Covered Bridge from Hogwarts, Harry’s house, and if you visit during the winter, you’ll be showered with a bit of snow as you walk outside.

Harry Potter London The Knight Bus
Harry Potter Studio Tour London Knight Bus
Harry Potter Studio Tour London
Harry Potter Studio Tour London bridge.

From there, you enter into the third portion of the tour. Once you enter the third building  you’ll come across a number of fascinating props and costumes used in the different movies.

One of my favorites was seeing Voldemort’s little (disgusting) veiny corpse from the Deathly Hallows II and some of the other moving props. It’s really something to see these props close up and it gives you more appreciation for the artists who likely spent hundreds of hours working to create these props.

Voldemort creature at Harry Potter Studio tour London
Harry Potter London

Harry Potter London Diagon Alley

After that, the next main attraction is Diagon Alley!

It’s really cool to see the Weasleys’ Wizard Wheezes shop, Ollivander’s Wand Shop, Florean Fortescue’s Ice Cream Parlour, and a few others. The lighting changes from dim to bright pretty quickly as you walk through so be ready to adjust your camera settings if you’re shooting manual with a DSLR. Overall, Diagon Alley was one of the coolest portions of the tour and really make you feel like you’ve entered into the world of Harry Potter.

Harry Potter London Diagon Alley
Harry Potter London Diagon Alley.
Weasleys Wizard Wheezes shop
Ollivanders Wand Shop

Harry Potter London Tour Hogwarts set up

The final attraction that awaits you is the magnificent Hogwarts model.

The model of the castle and the surrounding rocky mountain upon which it’s built, is simply phenomenal. It was much more massive and far more life-like than anything I’d imagined it would be. As the lights dim in the room, yellow lights twinkle throughout the castle, creating a life-like appearance where you’re left almost anticipating someone walking out of the castle.

Hogwarts model Harry Potter London
Harry Potter London Tour Hogwarts.
Hogwarts model Harry Potter London
Harry Potter London Tour Hogwarts.

If you visit in the winter the castle is topped with “snow” and really is spectacular. It may surprise you how long you spend in this room as there’s plenty of different angles to admire this work of art from.

Harry Potter London Tour Gift Shop

Once you leave the last exhibit you end up in the gift shop.

It’s a pretty large gift shop with tons of different types of souvenirs, from wands to sweaters and scarves to candies from the movie and all kinds of different stationary items. As you might expect, it’s all pretty overpriced, especially the clothing items. We left with a magnet and a chocolate frog so we got out of there without splurging which was great but if you intend on getting any kind of clothing souvenir keep in mind that it’s going to cost you.

Warner Brothers Studio FAQ

How much are tickets for adults?

The price per adult (ages 16 years and above) is £47.

Do I need to buy my tickets in advance?

Yes, you need to purchase your tickets in advance. If you are planning to visit during a holiday, make sure to purchase them far in advance.

How long does the tour last?

On average, you will spend about 3.5 hours at the tour.

Where can I get butterbeer?

You can purchase butterbeer at the Backlot Café. It can come in a frothy drink or you can get it in ice cream form.

Is butterbeer alcoholic?

No, the butterbeer is not alcoholic.

According to the website, “Butterbeer is suitable for those with gluten, wheat and nut allergies. It does, however, contain trace amounts of dairy so it is unsuitable for vegans or anyone with lactose intolerance.

Can I get sorted by the sorting hat?

You can get sorted before your visit by going to the official Harry Potter site, WizardingWorld.com.

Are there special exhibits?

Yes, you can enjoy a special seasonal exhibits at different times in the year. These include: Hogwarts in the Snow and A Celebration of Slytherin.

Are there places to eat?

Yes, you can enjoy facilities like the Chocolate Frog Café, Hub Café, the Food Hall, Backlot Café.

What are the main attractions?

Main attractions that you should check out include:

– Great Hall
– Forbidden Forest
– Diagon Alley
– Platform 9 3/4 /Hogwarts Express
– Knight Bus
– Privet Drive
– Hogwarts Bridge

In addition, there are tons of costumes and special effects that you can check out.

How can I enhance my visit?

You can enhance your visit by picking up an activity passport which includes things like a Golden Snitch hunt, puzzles and trivia. You can also get souvenir stamps at key points throughout the tour.

You can also download the free Wizarding World app – the official Harry Potter and Fantastic Beasts companion. This is a great way to find out more details about the area of the studio tour you are in.

You can also rent a digital guide for £4.95. Digital Guides are available in the following subtitled languages; English, French, German, Italian, Japanese, Russian, Spanish, Chinese (Mandarin), Brazilian and Portuguese.

Is parking free?

Parking is free of charge and is a short walk away from the main entrance.

However, you can also purchase priority parking which is located next to the entrance. This will cost you an additional £10. Priority Parking is only available to pre-book online ahead of your visit and cannot be purchased on the day.

Can I take photos of the tour?

According to the website, “taking of photographs and capturing video footage with handheld cameras and mobile devices is allowed in all areas of the Studio Tour, apart from the pre-show cinema and green screen areas.”

Final word

Overall, the Harry Potter London tour is a must-see attraction in London for any Harry Potter (of any age). I didn’t hop on the Harry Potter bandwagon until about a year ago and I thought this place was pretty amazing so I could only imagine how other must feel who’ve read all the books and seen all the movies over the years.  It’s a little pricey but the way that this place captivates your imagination is priceless and completely worth the visit.

The iPhone 7 a Substitute for a DSLR?

When Apple released the iPhone7 and iPhone7+,  a lot of people were excited about the new camera features. In particular, one feature that stood out was the new “bokeh” effect. This is the blur effect produced by capturing an object out of focus or slightly out of focus. It’s usually an easy way to determine if an image was taken from a high quality DSLR versus a point and shoot or camera phone and can make photos look much more professional and interesting when executed well.

The new iPhones allow you to capture this pseudo-bokeh effect by shooting in portrait mode. It accomplishes this by utilizing a combination of a dual-camera system and computerized effects.

Digital Trends states that:

Apple is actually using a combination of software, distance measurements, and depth of field data to calculate what it thinks the bokeh should look like, and then using advanced processing and computer vision to create the bokeh digitally (all part of computational photography).

So how does this computer engineered version of bokeh hold up to the real thing?

Here’s a great example of what the iPhone can do:

Here’s a normal photo taken on the iPhone without Portrait Mode:

Here’s a photo taken in Portrait Mode:

In the photo below, the blurring effect looks very natural to me and significantly enhances the quality of the photo.

Here’s a normal photo taken on the iPhone without Portrait Mode:

Here’s a photo taken in Portrait Mode:

I’m pretty impressed with the bokeh in both of these Portrait Mode photos, especially the first. I think that the bokeh effect is definitely a step above a lot of those apps that produce that cheap-looking bokeh effect and is approaching what you’re capable of doing with a DSLR.

However, the iPhone still has limitations. And I think the photos below illustrate the weakness of the Portrait Mode pretty well.

Here’s a normal photo taken on the iPhone without Portrait Mode:

Here’s a photo taken in Portrait Mode:

Did you notice how the silver lip at the top of the bottle just disappeared? That’s something that would never happen utilizing a bokeh effect on a real DSLR.

This also commonly occurs to the rims when I try to photograph cocktail glasses. Notice the blur in the middle of the rim on the glass on the left. That blur looks out of place and again is something that wouldn’t happen on a DSLR, since I believe that’s essentially a “glitch” in the computerized graphics.

It should be noted that you can alter the bokeh effect by moving the iPhone closer and farther away from the subject, which often remedies these out of place bokeh effects. However, in the photos above, I was not able to capture the subject without the errant blurs no matter how I shifted the camera. Thus, iPhone Portrait Mode definitely has its limitations.

I’ve also noticed that in low-light conditions the quality for photographs in portrait mode greatly diminishes and the images become blurry very fast.

However, in bright settings, the iPhone portrait mode works wonderfully. Here’s a comparison between my iPhone7 and a Canon 6D with a 24-105mm f/4 L Series lens with aperture brought all the way down to 4.

Here’s the iPhone photo:

And here’s the Canon 6D photo.

There’s not a huge difference with respect to the bokeh in the images. I often find that in bright rooms or outdoors on a sunny day, the Portrait Mode works the best.

Final word

Overall, the iPhone7 offers a lot of potential for increasing the quality of your photos without lugging around expensive DSLR equipment. For some images you might not be able to even tell that it was taken from a an iPhone. With that said, Portrait Mode has its limitations, since it struggles to realistically capture the bokeh effect on certain objects and doesn’t have the best abilities in low-light conditions. So while it won’t be replacing my DSLR any time soon, my iPhone7 still will be getting put to use on my travels.

Best Underwater Camera For Snorkeling Photos: the Olympus Tough TG-4

Digital cameras for underwater photography have come a long way. Nowadays, it’s remarkably easy to find a solid camera that will take great photos underwater without splurging thousands of dollars on fancy equipment, such as strobe lights and special filters. But with so many great options, it’s difficult to narrow down your choices. Fortunately, I’ve had a great experience with one of my underwater cameras, so I decided to share a review of the Olympus Tough TG-4.

Waterproof

This is a rugged camera meaning that it’s made to take some abuse. Most relevant for snorkeling of course is that the camera is waterproof. The TG-4 is waterproof up to 50 feet. That’s 50 feet without any additional housing. That’s plenty of depth for your average snorkeler and even for discovery scuba diving which should be limited to a depth of 30 feet.

Roatan, Honduras
Using the TG-4 with housing while scuba diving.

However, I don’t like to take chances with electronics, so I also purchased underwater housing for the camera. I went with the Olympus PT-056 underwater housing, which you can find on Amazon. This housing extends the waterproof depths all the way to 150 feet! This allows me take the camera on scuba dives and just rest easy about using it underwater in general.

The housing is superb and I find it very easy to still use all of the functions. Changing settings is very easy and I don’t have trouble manipulating the dials and buttons. It also comes with a rubber piece that provides the necessary shade you need to be able to see your LCD screen when underwater, which is very handy. If you’re interested in the Olympus Tough TG-4, I highly recommend getting the additional underwater housing.

Image quality

So this is probably your main concern.

You want an underwater camera that will take high quality photos and not those grainy and dim, uninspiring underwater photos you so often see. When you’re snorkeling in water with good visibility, this camera is absolutely exceptional!

Take a look at several photos I took during a snorkel in Roatan, Honduaras. All of these images were taken with the Olympus Tough TG-4. You’ll notice that this camera captures brilliant colors in high quality thanks to its 16 Megapixel Live 
MOS Sensor. And it comes with the ability to shoot RAW, which is not something that many rugged cameras have been able to do in the past.

Roatan, Honduras

Roatan, Honduras

Roatan, Honduras

Roatan, Honduras

Roatan, Honduras

Keep in mind all of those photos were taken without any kind of additional lighting or filters.

Autofocus

This camera’s autofocus is quick, and I mean really quick with its wide aperture at f/2.0. The ability to capture light at f/2.0 and quickly focus is a vital feature for any underwater camera, especially when snorkeling.

It can be very difficult to get shots of moving fish when being tossed around the by the current or surge, but this camera will still allow you to capture detailed images even of fish quickly darting in and out of coral reef crevices.

I recommend holding the camera with two hands to stabilize the camera and allow for better focus.

Roatan, Honduras

Settings

There are a few different underwater settings you can use. There’s a mode for pool/shallow water shots, wide landscape shots, wildlife, macro, and even HDR. I typically keep the camera in landscape mode when snorkeling or diving and then change the settings depending on the subject I’m shooting. It’s really easy to switch between modes, too, since all it takes is hitting a couple of buttons.

Roatan, Honduras

Close ups

This camera has one of the best macro modes in its class. With microscope control mode you can get 44.5x magnification from just 1 cm away. That’s truly impressive, especially for a rugged camera.

You can often capture exceptional detail if you can keep your hand steady enough in the surge. While the photos below are pretty close to their subjects, I’ve seen other photographers get much closer using macro mode and capture some pretty extraordinary detail with little reef critters.

Roatan, Honduras

Roatan, Honduras

Roatan, Honduras

Roatan, Honduras

Roatan, Honduras

HDR

I don’t often use the HDR mode on this camera but I’ve used it a few times when the conditions feel right. Below is one of my favorite HDR shots that truly captured the dynamic range and color in a way that’s pleasing to the eye.

Roatan, Honduras

Video

The TG-4 shoots video in the following modes: 1080p, 720p, VGA, Time-Lapse Movie (720p), High-Speed 120fps (640×480), High-Speed 240fps (320×240).

Below is a video shot with the TG-4. This video was recorded around 50-60 feet in depth. Without any type of external lighting and/or filters, the picture is going to come out blue with pretty much any camera so you can’t fault the TG-4. Still, I thought the TG-4 did a great job of capturing quality footage in such low light conditions and if I would have had some type of external lighting, I’m sure the color would’ve turned out great.

Sea Turtle

Final word

This camera is perfect for people who are serious about getting high quality photographs and video when snorkeling but don’t want to drop a crazy amount of money on a new camera. If you just want to capture high quality and brightly colored images of wildlife and coral reefs, then the Olympus Tough TG-4 will prove to be one of the best snorkeling cameras you can get without breaking the bank.

The Best Travel Tripod: Reivew of the MeFoto Roadtrip Tripod

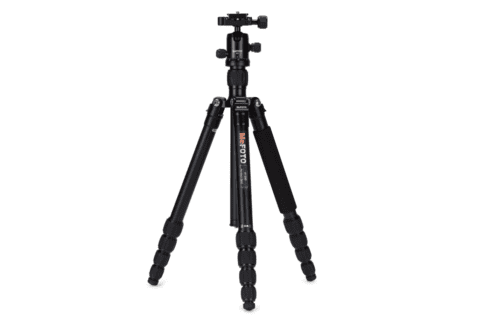
I’ve gone through many tripods over the past few years on my quest to find the best. After cycling through a number of cheap tripods, I decided it was time to invest a little bit more money and go with a well-reviewed tripod. So I bought the MeFOTO Aluminum Roadtrip Travel Tripod and I have not regretted it for a second. It’s light, compact, yet still sturdy enough for many of my slow-shutter shots and it’s gets the job done quite well. Here’s my review of what I believe is the best travel tripod.

The specifications 

The build 

  • This is a very compact tripod but the build and all of the features feel very high quality. The aluminum and the rubber grips and spikes just feel like they’re solid and built to last. Also all of the legs stretch out and fold over and lock/unlock smoothly like you’d expect a well designed product to do. I firmly believe that you can sniff out a pretender just by playing around with the features and to me the MeFOTO instantly feels like a winner when you get it in your hands.    

Weight

  • The tripod only weighs 3.6 pounds. I absolutely love how lightweight this tripod is and the weight alone has made my travels so much easier.

Maximum weight it supports

  • The maximum weight is 17.6 pounds.

Dimensions

  • It can be as compact as 15.4 x 3 x 3 inches. (You get the tripod that compact by folding in its legs in the reverse.) Having a legit tripod tripod that can fold down into 15.4 inches is an absolute asset that makes traveling with it very practical and headache free.

Maximum height

  • It can be extended all the way to 61.6 inches which I’ve only done a couple of times. I recommend using it at heights closer to 50 inches when using a heavy duty DSLR and lens. I’ve extended out the tripod to about 50 inches with my Canon 6D mounted several times and head great results — I’d just be careful about image blur on very window or vibrating surfaces when extending it our farther. With smaller cameras, I don’t think you’d ever have an issue. (I’ve also not used the spring loaded recessed hook, located in the bottom of the center-column, that allows you to hang additional weight from the tripod’s center of gravity for increased stability.)

img_1942

Ballhead

  • It comes with a precision matched “Q series ballhead, Arca-Swiss style compatibility quick release plate and integral bubble level to prevent uneven pans and head movements.” I’m not familiar with the different types of ballheads but I do find adjusting the ballhead on this tripod to be simple. It’s not hard to lock in the position you’re aiming for and it’s also easy to operate the quick-release.

Monopod

  • Interestingly, you can convert the tripod into a monopod. I haven’t had the need to do that ever so I can’t comment on actually using that function but it is pretty cool to have that feature. To assemble it, you simply unscrew in the leg with the added pad on it (that has a monopod marking) and screw it into the center after taking out the spring loaded recessed hook. It’s very simple. 

The legs

  • The legs are “twist lock legs with anti-rotation system, paired with rubberized locking grips and enable fast and fumble-free set-up plus weather and dust resistance.” I like how easy they are to grip and manipulate to get your tripod at the height you want it to be. And so far, I haven’t had issues with weather causing any problems or erosiveness on any of the joints. They also are great for photographing on uneven surfaces as the legs angle out to whichever position you need them to be in.

img_1946
Using the MeFOTO on an uneven hill.

Colors

The tripod comes in a number of different colors. 

  • Black, blue, gold, green, orange, purple, red or titanium.

Case

  • Comes with a carry case for transport and protection.

Warranty

  • Backed by MeFOTO’s 5 year warranty: 2 years at purchase + 3 years after registration.

Issues I needed addressed

When I began searching for a tripod, I had a few issues that I needed to address.

When it came to packing for flights, I pretty much had to store my old tripod in my stored luggage. I tried bringing it through security once and while they let me go through with it, they made an ordeal about it being so big. I don’t like causing scenes at airports so I had to figure out an alternative solution.

fullsizerender
The MeFOTO fitting perfectly inside a carry-on, while my old tripod dwarfs the luggage.

The other issue was bringing it with me when hiking. The size and weight of my old tripod would make it a burden to try to bring it with me on long hikes. That, and it wouldn’t fit into any of my bags without it protruding out the top. On really long hikes, that extra weight really added up and always tempted me to just leave the tripod at home.

Finally, just bring it on subways, busses, and other modes of public transportation was a hassle. I felt like it was always in the way and it was too big to stuff in my backpack so I always felt like it made me a target when we ventured out in some places, especially at night. 

Issues resolved

All three of these issues were easily resolved with the MeFOTO Aluminum Roadtrip Travel Tripod.

With the MeFOTO, I don’t have to think twice about taking it with me on a plane. It can easily fit into my backpack or carry-on bag (as seen above). I’ve gone through the airport security probably 30 times with this tripod in my bag and I’ve never encountered an issue. I’ve seen other MeFOTO users even attach the tripod to the outside of their backpacks when going through security, which seems like a good option if you want to save space or only have one bag.

As stated, the tripod only weighs 3.6 pounds and can be as compact as 15.4 x 3 x 3 inches. That’s very compact and pretty lightweight, too. Now, when it comes to trekking through a city or even hiking the weight and size of the tripod is a complete non-issue. If there’s even a chance I might be using it I bring it out with me which is in stark contrast to the attitude I had towards my much larger and heavier tripod before.

Slow-shutter capabilities

While I needed a travel tripod that was easy to carry around I also needed it to allow me to take superb slow-shutter photographs. This is my favorite way to photograph at times and so I needed a tripod I could actually trust.

I read through the reviews of a lot of  light travel tripods that could do okay with slow-shutters but only for around 5 to 10 seconds. I sometimes use up to 30 second exposures, so that wouldn’t fly for me. Luckily, the MeFoto came through. Here are some real-life samples of me using the MeFoto tripod for slow shutter photographs.

Photographing at Niagara Falls

This photo was taken at Niagara Falls. I used full 30 second exposures on a a very windy winter day at the falls. Despite the wind, the photographs still came out okay. 

Niagara Falls
30 seconds at 105 mm.

Niagara Falls
30 seconds at 50.0 mm

Niagara Falls
20 seconds at 24 mm

Niagara Falls
25 second at 105.0 mm

Photographing the Dallas Skyline on a vibrating bridge

One of the best tests I put the tripod to was in Dallas. I was photographing from a bridge that was pretty sturdy but as most bridges do it did seem to vibrate just enough to blur my photos if I didn’t anchor the support of the tripod just right. For these photos, I had to lower the neck of the tripod to eliminate blurring from the vibrations. That’s the one tip I have for using this tripod: try to keep the neck from extending too much especially if using a heavier DSLR. 

Dallas Skyline
20 seconds at 105 mm.

Still when you consider how heavy my DSLR and lens were, the vibrations of the bridge, the long shutter times, and the portability of the tripod, it’s easy to see that the tripod performed quite brilliantly. Keep in mind that I was zoomed all the way in at 105 mm and took the shot with a 20 second exposure. With those conditions in mind, I’d give the MeFOTO an A+.

Dallas Skyline

Photographing at Table Mountain, South Africa

I got to test out the tripod again at a higher altitude where winds were furious at over 3,000 feet. The tripod did great in providing support for my shots and I was able to get both wide angle and zoomed in shots. As you can tell in the photo below, I didn’t extend the neck out due to the high winds, so I’m not sure how it would’ve done with a full extension.

Table Mountain -- Cape Town, South Africa

Table Mountain -- Cape Town, South Africa

I’ve used the tripod countless other places, including several trips to the sandy beaches at the Caribbean which have resulted in it being exposed to some levels of sand and saltwater. Still, after one year it’s still holding up like a champ and I plan on continuing to use it for all of my future trips.

Singapore
25 seconds, 16 mm

Even though I absolutely love my MeFOTO, it still has its limitations with slow-shutter photography. There’s just no way of replacing the capabilities of a heavy duty tripod in certain conditions. I personally don’t find that to be a problem, because I rarely find myself needing ultra-long shutter shots (longer than 30 seconds) or stabilization in places where the MeFOTO couldn’t get the job done for me. Still, for some who prefer tripods capable of more “heavy duty” capabilities for shots with very heavy or large lenses, the MeFOTO will likely best be purposed as a travel tripod and not a go-to tripod for every outing.

Final word 

I’ve tested out the MeFOTO Aluminum Roadtrip Travel Tripod for over a year now and I’ve got to say that it’s met my very high expectations. When it comes to finding a portable tripod that’s made for travel, I really don’t think you can go wrong. I give the MeFOTO a full 5 stars and think the $200 I spent on mine was well worth it. 


Snorkeling in The West Bay, Roatan, Honduras

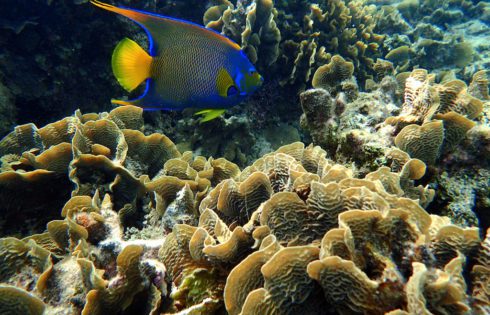
The West Bay in Roatan, Honduras is arguably one of the best snorkeling locations in the world. The coral reef extends to the beach and offers easy and safe access for snorkelers and it chockfull of marine life. While the reef is beautiful and accessible, there are some things you should know about snorkeling in the West Bay to ensure that you’ll have a safe and memorable snorkeling trip.

Interested in finding out the top travel credit cards for this month? Click here to check them out! 

The West Bay is a protected area 

The first thing to note is that this area is part of a protected marine reserve. This means that you are not to take, touch, or harass any of the inhabitants of the reef system. This is particularly important to remember in the West Bay because much of the reef is located in shallow water and if you are not careful, you can easily damage portions of the reef by coming into contact with it.

West Bay snorkeling map

Below is a map of the coral reef published by roatanwestbay.org. As you can see, there are three different zones to the reef. The area with the red flags receives a high amount of boat traffic so you won’t want to snorkel in that portion of the coast. The yellow flags indicate shallow waters that might be impassable due to the reef and the finally the green flag sections indicate waters deep enough to pose no problems.
Screen Shot 2016-06-15 at 4.07.36 PM

In real life you will only see white cylindrical buoys bobbing in the ocean and not colored flags. I’m not sure if the buoys directly correspond to this map but they can be good markers to help you remember where you entered the reef from.

Because there are a lot of shallow reef areas you need to be extra cautious about your snorkeling route. Some of the reefs crest so close to the ocean’s surface that you will surely destroy some of the reef by trying to traverse it and will also likely scrape up your body in the process. Thus, I recommend you have some sort of routing strategy in place before you head out.

Roatan, Honduras
Shallow reef waters.

I’d start out in the middle of the reef where there is a channel that opens up. This channel extends out to another channel that runs parallel to the beach and opens up to the 25-feet deep portion of the reef. I’d follow that channel going parallel to the beach, poking in and out of the reef as it’s pretty easy terrain to navigate. An example of that route is below. 

Screen Shot 2016-06-15 at 4.07.36 PM

I like swimming over channels like that because you get a wide view of the ocean and can often spot large fish in those areas coming in and out of the reef. Moreover, you don’t have to worry about knocking into the reef since you’ll have plenty of room to swim around.  

Roatan, Honduras
The channel with waters as deep as 25 feet emerging.

If you don’t feel comfortable swimming out to the “deep end” (or after you get through experiencing the deep end) then another good route is just to meander in and out of the inlets along the reef, eventually making your way towards the “wall.” Your route would look something like below.

Screen Shot 2016-06-15 at 4.07.36 PM

If you’re not very confident in your swimming abilities, the trick is to never swim too far into the reef. As you wander, you’ll probably make your way through some tight/shallow passageways between coral that will allow you to get further out from the beach.

Doing that is a fun way to explore the reef but the problem is that once you’ve navigated a maze of numerous tight passageways, it can become very difficult to retrace your route and you might end up getting stuck in very shallow coral reef waters with no apparent exit. By meandering back and forth as seen in the image above you never go too deep into the labyrinth of coral reef and so it will be easier to retrace your steps when needed.

If you’re comfortable with your underwater route finding capabilities and swimming skills to get through shallow reef water, this probably won’t be necessary but for inexperienced snorkelers, I think it’s a great way to avoid trouble.

The currents and water temperature

I can’t speak conclusively on the currents at West Bay but based on what others told me and what I experienced, the currents are usually not very strong due to the topography of the island blocking strong winds coming from the east. Of course, we experienced the usual back and forth “tug effect” (surge) at the surface the water but overall, it was very manageable to navigate around the reef.

As for temperature, the water felt just a tad bit chilly when entering in early in the morning but we became acclimated very quickly. In the afternoon, we barely noticed the water temperature, although you’ll likely get jet streams of cool water blowing in from time to time.

The wildlife

Now for the exciting part. I’m certainly not a diving pro, but I’ve snorkeled in a handful of famous snorkeling locations like the Great Barrier Reef in Australia, Belize, etc., and I can honestly say that I was blown away by the marine life we found snorkeling at the West Bay. As soon as we dipped our heads under the water, fish greeted us and once we got into the actual reef, the fish started putting on a dazzling display.

The West Bay is like a breeding ground for parrotfish and they seemed to be everywhere and come in all different sorts of varieties. We saw rainbow parrotfish, stoplight parrotfish, blue parrotfish, the list goes on…. If you’re not familiar with these fish, they’re gorgeous fish that have powerful jaws that can break up coral and rock. They continuously eat away at the coral and excrete the rock by essentially turning it to sand. It’s a sight to see and you can often hear them knocking away at the rock underwater.

Roatan, Honduras West Bay snorkeling
Stoplight parrotfish

Roatan, Honduras West Bay snorkeling

Roatan, Honduras West Bay snorkeling

Roatan, Honduras West Bay snorkeling

The highlight of our snorkeling experience was probably seeing a huge rainbow parrotfish that had to be almost four feet long! It came in lurking in pretty shallow water and when it hammered away at the coral, it was pretty loud. All of the parrotfish I’d seen up to that point had been at the most, about 12 to 15 inches long, so when this heavyweight showed up, we were pretty shocked.

Roatan, Honduras West Bay snorkeling
Giant parrotfish.

Roatan, Honduras West Bay snorkeling

Many Cowfishes and trunkfishes made appearances, too. These fish have an odd, boxy shape and move about slowly making them easy to find and admire. If you watch them long enough, you might witness their spectacular color change  that they rely on for camouflage.

Roatan, Honduras West Bay snorkeling

Roatan, Honduras West Bay snorkeling

The colorful scrawled cowfish below was about twice the size of the juveniles and we got to witness it color change as it hid in the coral. The small horns on the front of the fish are how it got its name as they resemble horns found on cattle. 

Roatan, Honduras West Bay snorkeling
scrawled cowfish

Another memorable encounter came when we were all of a sudden face to face with a barracuda! Barracuda attacks on divers are extremely rare but they can happen. This particular barracuda appeared to be sizing me up after I got some shots of it, so just to be on the safe side, I backed off after a minute or two but it was still an amazing encounter and recalling its gaze still gives me goosebumps.

Roatan, Honduras West Bay snorkeling
Barracuda!

Keep your eyes out for lionfish, whose toxins can be potentially fatal to humans of young or old age or who have pre-existing health conditions. We saw two of them while snorkeling and both of them were suctioned to the coral, with one of the lionfish positioned upside down.

Roatan, Honduras West Bay snorkeling
The lionfish

Roatan, Honduras West Bay snorkeling

These fish are not known to attack offensively but you should always remain alert in case they are in the area. Their (invasive) presence is another reason why I don’t recommend trying to hover closely over the shallow reef areas — you never know what might be hiding out.

In addition to the fishes pictured above, we saw tons of other species at every corner. Here’s a rundown of some of the other marine life we spotted.  

Roatan, Honduras West Bay snorkeling
Foureye butterflyfish

Roatan, Honduras West Bay snorkeling
Queen Angelfish

Roatan, Honduras West Bay snorkeling
Crab munching on a sea urchin.

Roatan, Honduras West Bay snorkeling
Blue tang, I believe.

Roatan, Honduras West Bay snorkeling
Needlefish.

Roatan, Honduras West Bay snorkeling
Squirrelfish.

Roatan, Honduras West Bay snorkeling
Sergeant majors.

The fish weren’t the only attraction, either. We found several sections of the coral to be filled with vivid colors and beautiful shapes and formations. 

Roatan, Honduras West Bay snorkeling

Roatan, Honduras West Bay snorkeling

Roatan, Honduras West Bay snorkeling

Roatan, Honduras West Bay snorkeling

Roatan, Honduras West Bay snorkeling

The only things we didn’t see were sea turtles or sharks. I’ve been told that sharks, even nurse sharks, are really rare in this area of the reef but I’m not sure about sea turtles.

Overall, the West Bay in Roatan, Honduras is definitely one of my favorite snorkeling locations in the world. There’s so much wildlife to see and it’s so easy to access that I think this spot can compete with just about anywhere else. If you keep a good awareness of your surroundings, you should have the time of your life snorkeling here.


Booking.com

The Best Helicopter Tour in Chicago: Chicago Helicopter Experience

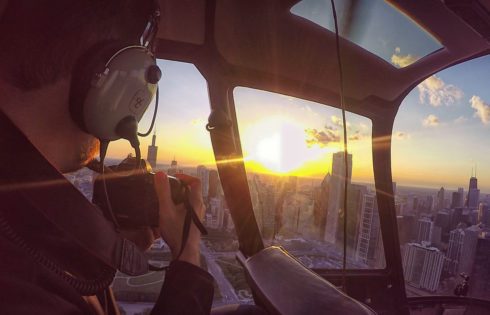
There’s simply no better way to take in the renowned skyline of Chicago than to be swooping over and around its many super-tall skyscrapers in a helicopter. Sure, there’s the Willis Tower Sky Deck and the John Hancock Center Tilt 360 that offer unique experiences for viewing the city but none of those can compare to the thrill of exploring an urban landscape like Chicago from the sky.

The Chicago Helicopter Experience is a first-class operation that will leave you with unforgettable memories (and tons of stunning photos) of your visit to Chicago. The staff, pilots, and everyone else involved will do everything to ensure that your’e able to comfortably enjoy a scenic (and exciting) flight around some of the most prolific skyscrapers in the world. Here’s a review of a recent tour Brad and I did with the Chicago Helicopter Experience (CHE). 

The facility

Chicago Helicopter Experience
The entrance to the facility

We arrived to the facility about 30 minutes prior to our take-off. Right now, I believe CHE is planning some massive renovations for a new facility so you might not be too impressed with the exterior of the facility. But don’t let that fool you, the experience of actually flying with CHE will be nothing short of excellent. 

From the moment we walked in, I got a an immediate sense of the of the laid-back vibe at CHE. Inside, we found a large open area with bar stools, comfy seating, tables with various games to occupy your mind like Jenga, Connect 4, etc., indoor corn hole (bags), and even a flight simulator to play around on. For the slightly anxious passenger, these are perfect distractions to put your mind at ease. For everyone else, it’s just a great way to pass the short time you’ll be waiting for your flight.    

Chicago Helicopter Experience
Waiting area inside

Chicago Helicopter Experience
Corn hole to pass the time!

As you wait to board, you’ll see helicopters take off and land every 20 minutes or so. This was my first time inside of a chopper, so I was very intrigued just watching these big red machines come in for landings, hover around for a bit, and literally ride off into the sunset. It was also reassuring to see everyone hopping out of the helicopters after their tours with smiles on their faces and it just added to the excitement of getting up in the air as our time for departure grew nearer. 

Chicago Helicopter Experience
Watching helicopters land and depart from the heliport.

Getting ready

After a short wait, we were told they were ready for us (others were called by their “flight number” printed on their boarding pass). We were taken to a locker room where we stored all of our belongings that we were not taking on the flight and used a custom combination to lock them safely away. (We brought my Canon 6D and GoPro along with us for the ride.)

From that point, we went through a metal detector and then proceeded to the prep room, where we were placed in a violet-lit room that contained the same seat arrangement that we’d be riding in.

Chicago Helicopter Experience
Inside the prep room.

I’ll be honest, I got a bit nervous when I first noticed the seat belt was pretty much the same type you’d find in an automobile, just with a slightly different clasp. I reasoned that since I’d be up in a helicopter a couple of thousand feet high, with the doors off, I’d need some form of extra harnessing or something. Turns out, I’d be just fine and once we got in the air, I wasn’t even thinking about it.

Once we were seated and strapped into the seats in the prep room, we watched a short, roughly 5 minute safety video. It goes over a lot of common sense stuff but you should make sure you pay attention to the parts regarding getting into and out of the helicopter. You don’t want to be standing in the wrong place beside a helicopter and you don’t want to look like a moron trying to take selfies while putting yourself at risk.  

Chicago Helicopter Experience
The safety video at Chicago Helicopter Experience.

After the video, we stepped out into the hallway and were led outside. It was time to board! We did a photography tour so before we got in, the crew removed the side doors so we would have optimal views for photos. Riding with the doors off added a whole new thrill to the ride, so if you can swing it, I’d definitely consider booking a doors-off tour as well. 

Chicago Helicopter Experience
Taking off the doors for our photography flight.

The crew confirmed our tour and then ushered us to the front of the helicopter for our keepsake photo. As soon as they snapped our photo, we hopped into our seats, snapped on our seat belts, put on our headsets, and were ready to go.

One great thing about a private photography tour is that you can customize your options and focus on the parts of the city that you want to see. For example, we’d just spent the afternoon at Wrigley Field, and so rather than spend a chunk of our time hovering on the north side of Chicago, we decided to just loop around the downtown area multiple times as the lighting changed.

Taking off

I’d never ridden in a helicopter before so I didn’t know what to expect at all when taking off but to my surprise it was a graceful experience. 

As we began slowly floating above the CHE facility and gliding over the river, I felt the same rush of giddiness that instantly hit me the first time I went SCUBA diving — a euphoric reminder that I’d just discovered a new addiction. In this case, it was flying on a chopper with the doors off!

As we crossed over a wide interstate, wide spans of green fields came into our line of sight. Beyond those, the imposing Chicago skyline rose into view.

Chicago Helicopter Tour
The Chicago Skyline

Chicago Helicopter Tour

Our pilot, speaking through our headphones, told us that we’d be swinging over Lake Michigan to take in the views of the waterfront and then looping around the skyline multiple times. Before flying out over the lake, we got a unique glimpse of “The Bean” from above, with the rest of of Millennium Park surrounding.

Chicago Helicopter Tour The bean
Aerial photo of “The Bean.”

Chicago Helicopter Tour sunset
Buckingham Fountain and surrounding park areas.

Once over the lake, we descended to a lower elevation to catch a closer view of Navy Pier, where just beside it, large streaks from the golden sunset happening above us reflected on the water.

Chicago Helicopter Tour
Navy Pier

Chicago Skyline and Navy Pier

From there, we ascended back over the skyline where we caught striking views of the Willis Tower, Aon Center, and Trump Tower. I’d already been quite impressed with the Chicago skyline from the time we rode in from the airport but seeing the skyline from hundreds of feet in the air added more immensity to the skyline and gave me better appreciation for the high concentration of skyscrapers that Chicago is home to. 

Chicago
Chicago Helicopter Tour Chicago Skyline

Chicago Skyline

Chicago Helicopter Tour Chicago Skyline

Chicago Helicopter Tour Chicago Skyline

The lighting was beautiful to look at and admire, but at times almost impossible to deal with from a photography standpoint. If I could’ve gone back in time, I probably would’ve opted for a midday tour or a ride about an hour after sunset. If you’re just wanting to soak in some great views and take some pics from your phone to remember your trip, sunset tours are great — but if you’re trying to capture detailed shots of the buildings, the ever-changing lighting at sunset (especially with very few clouds present) can present a number of challenges that could otherwise be avoided. 

Chicago Helicopter Tour
Sunset lighting can be tricky.

After our first loop around downtown our pilot asked us what we’d prefer and offered his own ideas on routing options. We decided to mix-up our route to ensure that we’d see downtown from all different angles. This took us right over the Chicago River and we got great aerial shots of the riverwalk, lined with high rises, such as Trump Tower.

Chicago Helicopter Tour Chicago Skyline
The Chicago Riverwalk, modeled after the riverwalk in San Antonio.

Chicago Helicopter Tour Chicago Skyline
Trump Tower in the middle.

One of the coolest moments of the tour came when we approached the Willis Tower. As we circled around the tower, we were eye level with the dozens of tourists in the Sky Walk who were looking out at us as we photographed them. I’d thought about venturing up to the Sky Walk before but now that I was about 1,300 feet up in the air, roaming over the city, I was content to experience the Sky Walk from the outside.

Chicago Helicopter Tour Chicago Skyline
The Willis Tower sky deck from the outside.

After waiving back at the tourists behind the glass walls in the Willis Tower, we caught one of my favorite views of the entire tour. All four of the tallest Chicago skyscrapers stood in view, with the Willis Tower positioned prominently in front, and the other big three towering in the background.

Chicago Helicopter Tour Chicago Skyline Willis tower Sears Tower
My favorite view

Chicago Helicopter Tour Chicago Skyline

Later, once we pushed northward, we got another view of the big four but this time reversed with the John Hancock Center jutting up in the foreground from near the waterfront of Lake Shore Drive.

Chicago Helicopter Tour Chicago Skyline John Hancock Center
The John Hancock Center on the bottom left.

Chicago Helicopter Tour Chicago Skyline
The John Hancock Center

Chicago Helicopter Tour Chicago Skyline John Hancock Center

Chicago Helicopter Tour Chicago Skyline John Hancock Center

Chicago Helicopter Tour Chicago Skyline John Hancock Center
A view with the Lake Michigan waterfront.

Finally, with the tour coming to a conclusion, we made our way back towards Navy Pier over Lake Michigan and noticed that the sun had dropped a few more degrees over the horizon and was now casting a brilliant purple over the city.

Chicago Helicopter Tour Chicago Skyline John Hancock Center

Chicago Helicopter Tour Chicago Skyline Willis Tower

We took in the view for a little bit and then made our way back. Once we touched down, the staff ushered us back inside where we were given sharpie markers to leave our mark along with hundreds of other previous riders. After signing the wall, we checked out, purchased our commemorative framed photo, and then we were off the head back into downtown Chicago, only this time it would be via automobile.   

Final word

This tour was definitely the highlight of our trip to Chicago. From the moment that we first contacted Chicago Helicopter Experience over the phone to book the tour, everything was taken care of smoothly and effeciently. They always promptly responded to my inquiries and gave me assurance regarding any of my concerns. The operations on the day of the flight were just as smooth — CHE does a great job of balancing professionalism with its laid back atmosphere so you feel at ease but not too at ease about getting in a helicopter.

I think a helicopter ride is the ideal way to experience Chicago and its world renown architecture — no other viewing experience can compare. If you’re looking for a legit helicopter tour then definitely consider booking with CHE, you will not be disappointed! Tours start at $148.   


Best Places to View and Photograph the Dallas Skyline

I recently completed a two-week stay in Dallas and had the chance to get out on multiple occasions and explore some of the best places to view the downtown Dallas skyline. After doing a little bit of research and some experimenting of my own, here are some of the best places I found to view and photograph the downtown Dallas skyline.

(Keep in mind I’m not a local so there are likely tons of other spots you could find. Check out the links at the bottom of the article for more photo spots.

Interested in finding out the top travel credit cards for this month? Click here to check them out!  

My favorite spot: bridge at N Edgefield Ave

Dallas Skyline
My favorite view to photograph of the Dallas skyline.

My favorite place to photograph the skyline is from the N Edgefield Ave bridge. This is a perfect spot to photograph for a few reasons. There’s parking right next to the bridge and there’s a wide sidewalk on the bridge so you have plenty of room to set up your tripod and you don’t have to worry about traffic (which is pretty minimal in any event).

See the Google Image screenshot below to see the type of room you’ll have to roam.

Screen Shot 2016-05-14 at 7.58.16 AM

The view is spectacular for photographing light trails of the highway traffic in the foreground and skyline in the background. You can play around with a lot of different perspectives but I don’t think you can really go wrong with any of them. Luckily, it looks like some of the street lights are out (and have been out for a long time), so you shouldn’t have to worry about them ruining your photos.

An easy way to find this bridge is to enter “First Quality Fabricating Inc” into your GPS. Their address is:

1529 N Edgefield Ave, Dallas, TX 75208

Once you arrive to it, you’ll see N Edgefield Ave bridge right next to the shop. If you arrive in the evening, there should be plenty of open parking spots there that you can park at. I didn’t see any “no parking” signs anywhere nearby and I’d be shocked if you were to ever encounter an issue parking there.

Views from the Trinity River Spillway

There are several different points along the Trinity River Spillway to choose from. I first tried two popular spots:

While the views aren’t necessarily bad, they just weren’t quite what I was looking for. For example, below is a shot from the official overlook point at Trinity Overlook Park that is for the most part obscured by what I think is a jail. It probably doesn’t look bad at night but it’s just not the best spot to take in the entire skyline in my opinion.

Trinity Overlook Park Dallas
View from Trinity Overlook Park

However, if you walk south along the Trinity River Spillway, you will come across seemingly infinite perspectives to capture the skyline.

The map below shows paths leading south from Trinity Overlook Park. It likely depends on the season, but the condition of those paths can vary. Right now, the path called “Perimeter Road” on the top of the hill (that you’d want to take photographs from) is a path made up of two thin tire trails with waist-high weeds on either side. If there’s been rain, it will probably be muddy.

Screen Shot 2016-05-14 at 8.13.09 AM

Here’s a photo I got along the way as I travelled south in the red oval above:

Trinity Overlook Park South Dallas
View from south of Trinity Overlook Park

You can follow that path in the red oval above all the way to the I-30 bridge/Tom Landry Freeway. At that point, you’ll encounter a construction zone that I believe you can pass through. There are just two issues with crossing through this way. First, the area looked very muddy when I was there so unless you have shoes you’re willing to get really dirty you may not want to cross. The second issue is that parking at the Trinity Overlook is limited to one hour and they claim violators will be towed. I have no idea if that’s enforced or not (probably not at night), but that’s something that I didn’t want to take a chance on.

The solution is to do this.

Park at Trinity Overlook Park. Then walk along the path towards the I-30 bridge/Tom Landry Freeway and get some shots that you’d like. Then head back to your car and drive over to another area (with no limit on parking) and then explore the other side of the Trinity River Spillway.

Check out the Google Map below to see where this “other area” is.

The red oval located on E Greenbriar Lane is a great place to park on the street. You don’t need a permit or anything. From there, it’s a very short walk to where “Perimeter Road” meets N Zang Blvd. There’s a small trail (located at the red arrow below) that you’ll see and you’ll need to hop over a small barrier to get on the trail. That trail will then give you some great views of the Dallas skyline as you move north along the Spillway.

Screen Shot 2016-05-14 at 8.13.09 AM

Here are a couple of photos I got along the way at this location:

The first photo is from my first day of scouting and shows that a clear-sky sunset looks like as it reflects off of the buildings downtown. I caught the below image at the sunset’s strongest reflection point of the evening.

Trinity River Spillway-3

This next photo was taken probably about an hour before sunset on a different day.

Dallas Skyline_-2

There are plenty of ways to play around with the foreground along the way on the trail. This photo below was taken as I approached the construction zone of the I-30 bridge/Tom Landry Freeway. Notice how the position of Reunion Tower has changed being on the far left to being back in the middle of the skyline.

Dallas Skyline_-3

One thing I liked about this area of the Spillway was that it was longer and presented more options for different compositions, such as the “lake” you see below. I’m pretty sure the “lakes” are the temporal product of rainwater and output from the sewage plant, but nobody has to know that when they view your photos!

Dallas Skyline_-4

After a few hours, a giant thundercloud began to develop behind the skyline. This cloud would later produce a furry of thunder and lightning and knock the power out for a lot of people.

Dallas Skyline_-5

There are only two issues when photographing along these trails that I encountered: the power lines and the weeds.

The two issues go together because you’ll need to venture into the weeds on the hillside to get below the power lines (a few of the photos above had power lines removed in processing).

Thus, my suggestion is to wear pants and shoes that you wouldn’t mind to get a little dirty. While it’s not 100% necessary, you’ll find it much easier to shoot the skyline if you’re willing to get down in the weeds a little bit, below the power lines.

Reunion Tower

This spot is pretty much a given. I was tempted to not go up in Reunion Tower because I wasn’t sure how impressed I would be with the views and I was kind of let down to find out I’d have to pay like $250 just to bring a tripod up there. However, I’m really happy that I decided to make the trip even without a tripod.

As soon as the sunset begins, you’re given some beautiful shots of downtown Dallas. Sometimes the Sun’s reflection is a little too bright and will over-expose your shots but you’ll just have to try to work around it.

Dallas Skyline_
Just before sunset from Reunion Tower

Dallas Skyline
Sunset from Reunion Tower

The views only get better as the sky darkens and blue hour produces a stunning backdrop to capture the city lights of the skyline. The bright oranges and pinks from the sunset will likely still be shimmering off the glass towers for some time after sunset, allowing for a lot of different lighting options that continue to change.

Dallas Skyline_-4
The sunset still reflecting well into blue hour.

The spherical network of frames on which the lights of Reunion Tower are placed, give you ample opportunities to put unique touches on your shots. Play around with different compositions and you’ll be sure to come out with a shot of the city that hasn’t been done a million times.

Dallas Skyline
There are plenty of foreground options to play around with at Reunion Tower

I’d try to go on a Friday or Saturday during the summer, however. The reason is that the tower closes at 9pm during the week, so you won’t be able to photograph the buildings with a truly dark sky because blue hour will likely be in effect. Still, I went on a weekday and I came away very happy with the views I had so it’s not like you can really go wrong.

Dallas Skyline_-7
The sunset still reflecting well after sunset

Dallas Skyline_-9

Keep in mind that I’m not a local so I don’t know all the best parking garages and pull-out spots all over the city to take in the skyline. However, below are a few links you can check out to find out more places to view and photograph the Dallas skyline.

  • http://www.dallasnews.com/lifestyles/arts/columnists/joy-tipping/20140522-10-great-spots-to-catch-a-view-of-the-dallas-skyline.ece
  • https://www.reddit.com/r/Dallas/comments/20wumm/dallas_photographers_where_is_the_best_spot_to/
  • https://www.tripadvisor.com/ShowTopic-g55711-i141-k6259214-Best_spot_to_get_a_photo_of_the_Dallas_Skyline-Dallas_Texas.html

The Skylon Tower at Niagara Falls: Best View of the Falls?

Built in the 1960s, the Skylon Tower is a great vantage point above Niagara Falls if you’re looking to catch some ariel views and photos of both the American and the Canadian side of the falls. The tower still has a very 60s/70s look and feel but that all kinds of adds a bit of retro-feel to the experience, which is kind of charming in its own way (you feel like you’re entering a once, state-of-the-art architectural marvel from your parents’ time).  Apart from that, the tower is a perfect stop if you’re in search of one of the best views of Niagara Falls and are the type of traveler always interested checking out iconic viewpoints from up high.

Tip: Use WalletFlo for all your credit card needs. It’s free and will help you optimize your rewards and savings!

Niagara Falls Panoramic from Skylon Tower

The 52 second “ride to the top” costs $13.91 CAD but if you purchase your tickets on-line you’ll usually save a couple of bucks at $10.70 CAD ( both prices are for adults). You can also combine your tickets to check out the 4D theater but we weren’t really interested in that. You can order your tickets for the Skylon Tower here.

American Falls and Bridal Veil Falls

The view from the observation is definitely one of the best views you can capture of the falls. We had a decent view from the 16th floor of the Marriott Fallsview but it didn’t really compare to the sweeping views we were afforded from the observation deck.  The observation deck is over 500 feet above ground level and actually stands about 775 feet above the base of the falls. If you’re looking for an excellent way to capture the entirety of both the American and Canadian sides of Niagara Falls then this is definitely a must and for about $11 CAD, it’s really not that bad of a price.

Niagara Falls

If you want to make an evening out of your trip to the tower you can also reserve a table at the Skylon Revolving Restaurant. We didn’t opt for a dinner there so I can’t comment on the food or the experience but from what I’ve heard, it seems like a decent way to splurge a little bit on a fancy dinner. Inside the base of the tower there’s a giant arcade area with tons of games. Since we were visiting in December, we were among only a few other visitors and the arcade was hauntingly void of tourists. We also didn’t have to wait in a line to ascend to the observation deck via the “Yellow Bug” elevators. The 52 second ride up is cool in that you have a view of the surrounding area the whole way up and although these Yellow Bug elevators were once one-of-a-kind, they don’t exactly scream “state-of-the-art” anymore — still it was a smooth ride and I didn’t have any complaints.

Skylon tower elevator view

One thing that was cool was the glass shop inside the base of the tower. There’s a glass shop with all kinds of fascinating glass pieces and if you arrive at the right time, you can even watch the glass makers in action, which I thought was really interesting. Overall, the experience of visiting the observation deck was cool but not unforgettable. Perhaps a meal and some wine for dinner could’ve added to the experience but it didn’t really matter to me. I really just wanted to visit the observation deck to see the falls from above and to capture some great shots from up high since we didn’t opt for a helicopter tour or anything of that nature.

Speaking of photography, as far as I know, tripods are allowed in the observation deck and I didn’t have any issues using mine, at least not from the staff. The hardest thing to work around is the fencing that covers the windows from the outdoor portion of the observation deck. Trying to fit your camera through the holes in the fence while maintaining position with your tripod on a cold, slippery and uneven concrete is difficult, especially if you’re attempting panoramic shots. With some patience and the right kind of tripod it’s definitely doable but just be ready for a little bit of a challenge.

Niagara Falls from Skylon Tower observation deck

That’s all I have for the Skylon Tower. In the end, it’s a cool attraction worth at least a few minutes of your time if you’re into checking out one of the best views of Niagara Falls with a bird’s eye view.

Tips for Photographing Niagara Falls

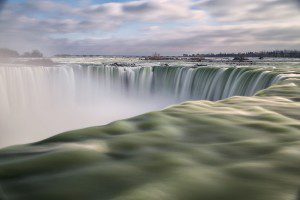
Niagara Falls has to be hands down one of the most accessible, yet breathtaking natural wonders to photograph. It’s basically impossible to not come away with some great shots after your visit, but it’s even easier when you know how to go about your trip to the falls. Here are a few simple tips on photographing Niagara Falls.

Tip: Use WalletFlo for all your credit card needs. It’s free and will help you optimize your rewards and savings!

Find the best view of Niagara Falls

The best view of the falls is going to depend on what you prefer as a photographer. If you love ariel shots and wide panoramics then one of the best places to head to is the Skylon Tower. From the viewing deck, which is over 500 feet tall, you’ll be able to shoot both falls at once with a very wide-angle lens and/or be able to set yourself up for some great panoramic shots. The viewing platform is caged so you’ll have to work around the cage-wire to get your shots, which can be a little difficult when working with a tripod but it is still doable. Below is a two-frame, HDR panoramic I stitched together.

Niagara Falls Panoramic

My favorite view of the falls is on the plaza/walkway on the ground level by the falls. Standing right over the water gushing over the ledge is a bit dizzying but it’s a great way to wrap your head around the immensity of Niagara Falls. The best time to photograph this viewpoint is at sunrise. Just google image “Niagara Falls sunrise” for some inspirational shots.

Niagara Falls
Slow-shutter effect close-up
Niagara Falls
Niagara Falls

TIP: the hotels such as the Marriott Fallsview offer close proximity to this point so that you can reach it within 10-15 minutes, which is great if you’re not exactly a morning person and want to catch as much sleep as possible before waking up to catch the sunrise. The “Niagara Funicular” (elevator thingy) doesn’t open up until around 9 or 10 am so you’ll need to walk around to Murray St. to get access to the falls in the wee hours of the morning. Another great thing about staying in a hotel like the Marriott Fallsview if that you can check out the conditions before sunrise to know if it will be worth it to head down to the falls. From the 16th floor, it was obvious both mornings that the sunrise just wasn’t going to happen so I never had to waste my time going all the way down there.

Niagara Falls
Niagara Falls

As you continue to head north from the falls, you get better vantage points to capture the entire horseshoe of Horseshoe Falls. Take a look down at the misty river below and you’ll notice flocks of birds cutting through misty clouds like a scene out of Jurassic Park. It’s really mesmerizing. I imagined the walkway along the river to be shrouded in mist and moisture but it really wasn’t. Depending on the wind conditions, you may not even get hit with any of the mist and if you do it might be marginal. However, I could definitely see how on a windy day it could be an entirely different story. The area just a little upstream for the falls is a great place to attempt a panoramic to capture both falls from the ground level. Below is the one I captured, along with a double rainbow, which usually appears in the afternoon with a little help from the sun.

Niagara Falls Panoramic with rainbow
Man standing next Niagara Falls with rainbow

There’s a bit of foreground to experiment with when shooting the falls and utilizing it helps to distinguish your shots from the thousands of photos out there of Niagara Falls. It was a little tempting to climb over the railing bordering the walkway to get some shots but I had no idea how tightly security was enforced and the last thing I wanted to do was to get banned from the area… or you know, die. You may have to do some editing later to get some of the trash debris out of your photo because the areas below the railing were pretty littered.

Niagara falls
Niagara falls

Finding an open area along the river walkway to set up for photographs with my tripod was easy. However, I know that visiting in the summer would be a completely different story and would likely be somewhat miserable. So if you’re visiting during the peak season, I’d definitely do my best to get there early before the crowds begin swarming. Finally, once you walk a good 10-15 minutes upstream you’ll be around the Rainbow Bridge area, where you’ll have a view of the American Falls. The American Falls are not as impressive as the Horseshoe Falls, mostly because they just aren’t as wide and don’t appear as tall due to the massive assemblage of rocks built up at its base. However, they’re still worth checking out and photographing.

American Falls
American Falls
American Falls

Which brings me to my one regret about my recent Niagara Falls visit. I really wish we would’ve gone over to the American side to check out Goat Island and get up close with the falls. It’s true that the better side to visit is the Canadian side but I think that viewing the falls from the viewing decks on Goat Island would’ve been a cool experience. Of course, you’ll have to deal with customs and all the time it takes to get through that but looking back I think it would’ve been worth it. Once you arrive near Rainbow Bridge you can just walk uphill a little bit and you’ll be in the middle of Clifton Hill with tons of tourist things to do like Ripley’s Museum, a haunted house, restaurants like Planet Hollywood, etc.

Sheraton at Clifton hill

If you spend a couple of hours exploring Clifton Hill, you can ten proceed to head back the same way you came and then photograph all the areas again but with slightly different lighting. My optimal route for spending a day on the Canadian side in the month of December (when sunlight is limited) would be to follow the above route starting in the morning.

I’d probably venture out during sunrise if it looked like the lighting would be good and then go back to the hotel, relax, eat breakfast, etc. and then come back out around 9 am or so and start the route. Once you get your late morning shots head to Clifton Hill and spend a couple of hours there eating lunch and checking out some of the attractions if those interest you. Then you head up to a place like the Skylon Tower for dinner or to photograph the falls from above as the sun begins to set. The lighting really softens up the falls and can look really interesting with light streaks hitting the escarpment cliffs. In the summer, you’d of course have much more time to explore the area in one day and could probably get over to the US side from Canada with enough time to come back and still catch sunset from the Canadian side.

Niagara Falls

Photographing Niagara falls is a blast and as I mentioned, it’s virtually impossible to not come away with some great shots. But definitely try to get some sunrise photos and if you can learn it, try to shoot some slow-shutter photographs to get some of those breathtaking silky-smooth water shots.

Stand in awe of Niagara Falls’ majesty. Enjoy the waterfall mists up close with Tours4Fun deals.


Scuba Diving in the Great Barrier Reef with Tusa Diving

The Great Barrier is the world’s largest coral reef system, made up of over 2,900 individual reefs and spans across the north-east side of Australia. This vast reef, estimated to have been living for up to 20 million years, is larger than the UK, Switzerland, and the Netherlands combined and is about half the size of Texas. And of course, most notably, it’s one of the seven natural wonders of the world. I’d never had the privilege of scuba diving in the ocean or exploring a reef before, so when I had  the chance for my first diving experience to be in the Great Barrier Reef in Australia, you can imagine how thrilled I was.

Arial view Great Barrier Reef Australia

Tip: Use WalletFlo for all your credit card needs. It’s free and will help you optimize your rewards and savings!

The best time of year to dive

We dove in the middle of Australia’s winter in July, which I think is a perfect time to dive. For one, the weather is great and while the water can be just a tad chilly (low 70sºF/20sºC at its coldest), wearing a wetsuit gives you the perfect body temperature. Another reason to go in the winter is to avoid the deadly box jellyfish that comes out in the summer (not to mention the horrendous tropical heat and humidity).

Box jellyfish
The dreaded box jellyfish

The best scuba diving tour in Cairns… to us, at least

We booked our dives with Tusa Diving and I had a great experience with them. We were told by multiple people that they were the best scuba diving tour in Cairns because they don’t herd as many people on their boats as other companies do and had great customer service. And they didn’t disappoint. Although they herded us pretty efficiently on and off the boat, they had a great staff who were knowledgable and a lot of fun. They also ran a very organized check-in/out system so if you’re worried about getting left behind by your diving boat (like the poor souls  in Open Water), you likely don’t have anything to worry about with Tusa.

We left the docks early in the morning and loaded onto the boat that would take use out to the reefs. None of us were scuba certified so we were doing an intro dive that required us to be alongside at least one instructor at all times. On the way in, we were instructed on how to use all of our equipment and how to safely go about our dives. I’d recently done a shark tank dive in Manly, Australia so I’d gotten some good experience in dealing with diving apparatuses under some relatively stressful conditions (not to mention cold water), so I felt pretty confident. On the boat ride in, we stopped a couple of times and were able to catch some humpback whales breaching, which was an added bonus that I think got everyone a little bit more excited for the upcoming dives. We’d actually gone whale watching a few weeks before in Sydney but the sights we came across on our way out to the reef were just as good if not better than what we saw on our tour in Sydney.

Man wearing snorkel and face mask

Once we arrived at the reefs, the water changed from a deep blue to a light, sparkling turquoise. As we approached the deck to unload, I looked down and saw a large stingray gliding over the ocean floor, about 30 feet below us. And that’s when it hit me that I was actually about to be swimming in the Great Barrier Reef! I was pretty pumped at that point, especially because I had a camera and if you’ve seen any of my other articles on this website, you know how much I love to take photos.

Great Barrier Reef Australia coral

Renting a water-proof camera

We rented a Canon point and shoot in a waterproof housing from Tusa diving so that we could have our own personal shots. We also paid extra  for a Tusa Diving photographer to accompany us along the way so that we’d have no shortage of memories from our trip. It was a perfect combination. The top-notch equipment of the photographer provided us with professional quality photos of us and some of the marine animals, while the point-and-shoot allowed us to capture some shots of our own.

Great Barrier Reef Australia coral

After a couple of minutes of performing checks on our ability to clear our goggles, find our breathing apparatuses, and properly signal to our instructors we were all set for the adventure to begin. We descended via an anchored rope, just a few feet at a time to acclimate ourselves to the pressure. This was something I was pretty nervous about. As I looked down, beneath my dangling flippers, about 30 feet to the bottom, I’d recalled all the times I had attempted to free dive in the ocean or elsewhere only to stop a few feet down due to the pressure making my head feel like it would explode. I couldn’t imagine getting all the way to the Great Barrier Reef and then NOT being able to explore it because I simply couldn’t force myself to dive deeper.

Great Barrier Reef Australia coral

Luckily, I found that this gradual process of descending wasn’t a challenge at all. It just required blowing out of my nose every 6 feet or so and I instantly regained the right balance of pressure. With that huge worry out my mind, I didn’t see anything else holding me back and I was now officially ready to explore the reef!

Great Barrier Reef Australia scuba diver

One thing you have to get used to is lying laterally and smoothly utilizing your flippers. If you’re not lying parallel to the bottom of the sea floor, any kicking motion will send you straight up toward the surface of the water and you don’t want that. Once you relax and get a smooth “kicking motion” down, it’s pretty much an effortless glide through the water from that point. If you can’t get the motions down immediately, don’t panic. I saw several people who took a while to get the hang of it and after some help from some very patient instructors they joined in on the fun a little later.

Great Barrier Reef Australia scuba diver

On an introductory dive, the dive instructor leads the way on the tours and you and your group of about five people follow along, stopping to take photos and check out some amazing sights. The water wasn’t quite as clear as I thought it might be, something that some people have told me has gotten worse over the decades. But it was still some of the clearest waters I’ve ever swam in and offered me the chance to see all that the Great Barrier Reef had to offer.

Great Barrier Reef Australia scuba diver

Discovering the Reef

It’s a beautiful sight to see nothing but wafery discs of coral spread out in multi-tiered  colonies around the sea floor with little brightly colored fish poking in and out of the shadowy crevices. The coral takes on a vast array of shapes from mounds and spires, to intricately folded sheets and blobs. Purples, yellows, oranges, and lime greens paint these oddly shaped reefs and create a colorful world that’s ever-changing.

Great Barrier Reef Australia coral

As you hover close to the coral, occasionally something odd appears right under you like a giant clam. The instructor performed some kind of hand gesture, almost like she was casting some kind of voo-doo spell on the clam, and within an instant, the giant clam shut its hinges as if to remind us that inside those large valves something was alive.

Great Barrier Reef Australia giant clam

We came across several other fascinating little creatures like sea horses and a sea cucumbers, which we were able to hold for a bit (under direction of the instructor, of course).

Great Barrier Reef Australia coral

I was having a field day with the camera we rented. In fact, my friend and I took over 300 photos while we were there (we came close to beating Tusa’s official record for number of shots). And it’s not easy to take good photos when diving. For one, you have the limited light down at the bottom of the ocean floor pretty much forcing you to use flash, which can lead to some unsightly sunspots in your exposures (I edited out some of these spots but you can still see them in several of my photos).

The other difficulty is trying to get the focus and proper angles while you are moving underwater. It’s not easy, especially when you don’t have a viewfinder to look through, so my suggestion is to just fire away! Also, in between dives we did a little bit of snorkeling and I found it much more difficult to snag photos while dealing with the currents at the water’s surface. Plus, it was much harder to get close-ups of many of the corals, so I definitely recommend renting a camera and going with the scuba diving option.

Great Barrier Reef Australia coral

Finding Nemo?

We soon approached a sea anemone where there happened to be a few clown fish hanging out. These little “Finding Nemo” fish were a lot smaller than I thought they would be and it was very interesting how they just squirmed through the swaying tentacles of the sea anemone that would sting most other fish. They seemed to be pretty curious about us though and came out of their little habitat to get a closer look at us.

Great Barrier Reef Australia scuba diver with clown fish

Some groups  of divers got a little more lucky than others — I heard other people saw sea turtles, reef sharks, and even an octopus crawling along the rocks. While we didn’t see any of that, I still was just thrilled to be in the water and see the reef. I just couldn’t get over the designs and patterns of the colorful coral — I’d never seen anything quite like it before. With all of the amazing camouflage techniques marine animals use, there’s no telling what else we missed while scuba diving.

Great Barrier Reef Australia coral

The one thing they don’t tell you about scuba diving that you’re going to hate is how fast time flies underwater. We did three dives in total, each 30 minutes, but to me it felt more like 10 minutes. It’s almost therapeutic being down there. It’s quiet, it’s mesmerizing, and it feels like you’re exploring some alien-like world in outer-space.

A threatened future

Unfortunately, the Great Barrier Reef that we love today is not the same one that existed a few decades ago. I was talking with a British ex-pat who’d been living in Australia for about thirty years or so before I went diving. She told me that right when she got to Australia she went on a dive in the Great Barrier Reef and then just recently went back for the first time in nearly three decades. She told me that she almost wept when she saw what the reef looked like now! The Great Barrier Reef has lost about half its coral in the past three decades, so I tend to believe her that the reef just isn’t what it used to be.

Great Barrier Reef Australia coral

The Great Barrier Reef is a marvelous site. Hopefully conservation efforts will prove effective in the decades going forward because I feel like every generation should get a chance to see this natural wonder and be in awe of its beauty.

1 2